Physical Inventory - Generation Selection
Generation Selection
This section guides you on how to load items. You can choose to load all items at once, create a blank page, load only the items selected through a filter, or load items that were not included in the previous stock-taking process.
Select the appropriate option to load the items for physical inventory.
The Generation Selection section displays the following options:
- Generate all items in the selected group.
- Create a new blank physical inventory count for manual entry
- Generate all items in the specified filter.
- Generate for all items with a last counted date older than the specified
1. Generate all items in the selected group
Selecting this option loads all the items on the physical entry screen. Further, you can filter manufacturer-wise and Distributor-wise items using the options provided.
Use this option to load all the items selected in the group. To select the group, select from the following options under the Group Selection section.
- All Items - All items will be loaded
- Only items from selected Manufacturer - items of the selected manufacturer will be loaded
- Only items from selected division - items of the selected division will be loaded
2. Create a new blank physical inventory count for manual entry
Selecting this option will create a blank screen. You need to select and load the items manually from the item LOV.
3. Generate for all items in the specified filer
Use this option to filter certain items based on their attributes and then load them into the physical entry screen.
Select this option and click Generate. A confirmation message is displayed to proceed. Click Yes. The Apply filter screen is displayed.
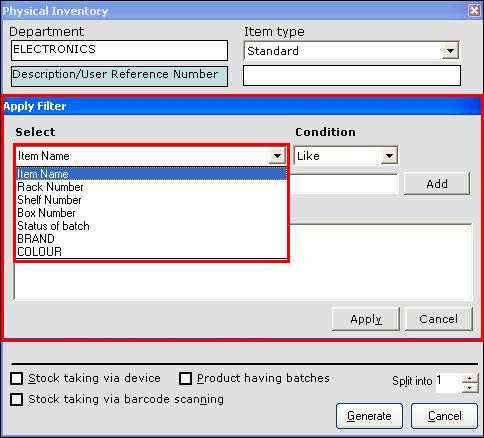
The Select is a drop-down field and displays the following options-
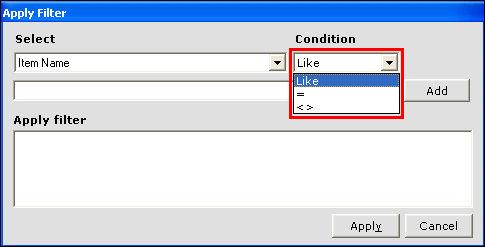
The Condition is a drop-down field and displays the following operators-
Click Apply to load the items as defined in the filter.
(or)
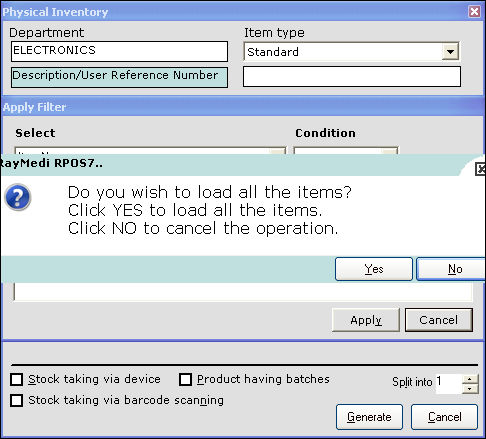
Click Cancel. A confirmation message to load all the items is displayed. Click Yes to load all the items (or) Click No to cancel the operation.
4. Generate for all items with a last counted date older than the specified
Use this option to load the items that were counted in the previous stock-taking. In the Date field, select the date for taking the stock.
Selecting this option will create a blank screen. You need to select and load the items manually from the item LOV.
3. Generate for all items in the specified filer
Use this option to filter certain items based on their attributes and then load them into the physical entry screen.
Select this option and click Generate. A confirmation message is displayed to proceed. Click Yes. The Apply filter screen is displayed.
The Select is a drop-down field and displays the following options-
- Item name
- Rack number
- Shelf number
- Box number
- Status of batch
- Category
For standard items, most Item name is selected.
The Condition is a drop-down field and displays the following operators-
- Like
- = (Equal to)
- <> (Not equal to)
In the Select drop-down field, select item Name
In the Condition drop-down field, select the operator '='
Enter the item Name under the select field.
Click Add.
Click Apply to load the items as defined in the filter.
(or)
Click Cancel. A confirmation message to load all the items is displayed. Click Yes to load all the items (or) Click No to cancel the operation.
4. Generate for all items with a last counted date older than the specified
Use this option to load the items that were counted in the previous stock-taking. In the Date field, select the date for taking the stock.
Related Articles
Introduction of Physical Inventory
Introduction Physical inventory refers to the stock of the items physically available in the store. In other words, it is a process of physically counting the inventory i.e. taking the actual count of the stock manually. This is usually done in the ...How to perform Stock taking via bar-code scanning from Physical inventory screen?
Physical inventory - Barcode scanning Use this option if you want to take the stock count by barcode scanning. This option is not available for serialised items. The steps for Standard items are illustrated below. 1. Click Inventory >> Physical ...How do we stock count the serialised items in the Physical inventory screen?
Batch items - stock taking 1. Click Inventory >> Physical Inventory. The Physical inventory screen is displayed. 2. Press F3 or click New. The Physical inventory screen is displayed. 3. In the Item Type field, select the option Serialized. 4. In ...Stock Ledger
Introduction Stock Ledger is a record which shows the stock details including the opening stock, closing stock, in stock and out stock of the items. For each item, you can also view the transaction history including purchase, sales, stock in hand, ...Exchange
Exchange Purpose: The purpose of the exchange feature in RetailEasy Electronics POS is to allow customers to exchange their old product with new product. Retailers can use the exchange feature to help keep their customers happy and satisfied with ...