How to create and manage tender in RetailEasy(RPOS7)?
Introduction
Tender refers to the type of payment made by the customer on buying goods. The customer after buying the goods makes the payment in any of the forms such as cash, credit cards, cheque or coupons etc. The person in the billing counter receives the payment, enters the payment details in the tender screen and saves the bill. The details entered in the tender are posted in the respective ledgers which can be used for tracking.
After saving the bill, a confirmation message with a prefixed bill number is displayed for the bill. The bill prefix is a two-letter code that is included as a part of the bill number. This is used to distinguish the types of bill tendered.
For each tender type, a unique two-letter code is given in the Bill Prefix Master. By default, the system created prefix is displayed. User can customize the prefixes for the different types of bills.
Tender Management in RPOS7 comprises:
1. Tender type Master - To add a new tender type
2. Bill prefix Master - To create a prefix for the tender types
Tender Type Master
The Tender Type master screen is used to create a new tender type. By default, there are 8 basic tender types.
1. Click sales >> Masters >> tender to open the Tender Type Master screen.
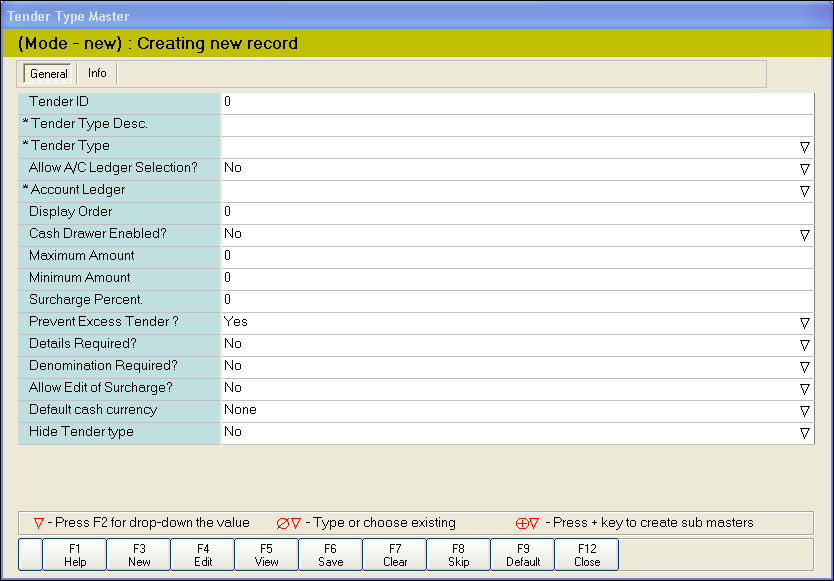
2. In the Tender Type Desc. field, enter the name for the new tender type.
3. In the Tender Type field, press F2 key.
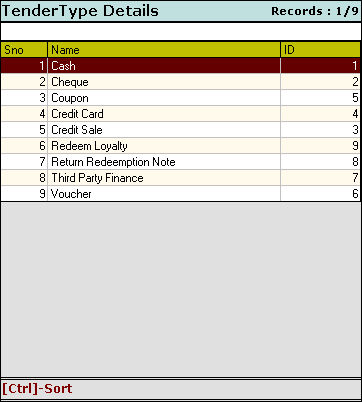
The Tender Type LOV is displayed. Select the tender type from the LOV.
4. In the Allow A/C Legder Selection field, press F2 key to select Yes or No.
5. In the Account Ledger field, press F2 key.

The Ledger LOV is displayed. Select the appropriate Ledger from the LOV as it will be directly reflected in Accounts, Daybook and Ledger reports. The Ledger name is created in Trac >> Ledger Master.
6. In the Display Order field, enter a number. This is considered for the order in which the created tender is displayed in the billing screen.
7. In the Cash Drawer Enabled? field, press F2 key to select Yes or No.
9. In the Minimum amount field, enter the minimum amount required to make the sale. This is majorly applicable for credit card based sale.
10. In the Surcharge percent field, enter the value applicable. This is applicable for Coupon and Credit card.
11. In the Prevent Excess Tender field, press F2 key to select Yes or No.
For users who make tender in more than one currency (like dollars and Euros), the currency can be created in trac and the same can be mapped here.
16. In the Hide Tender Type field, select Yes or No.
A sample image displaying the Tender screen is shown below.
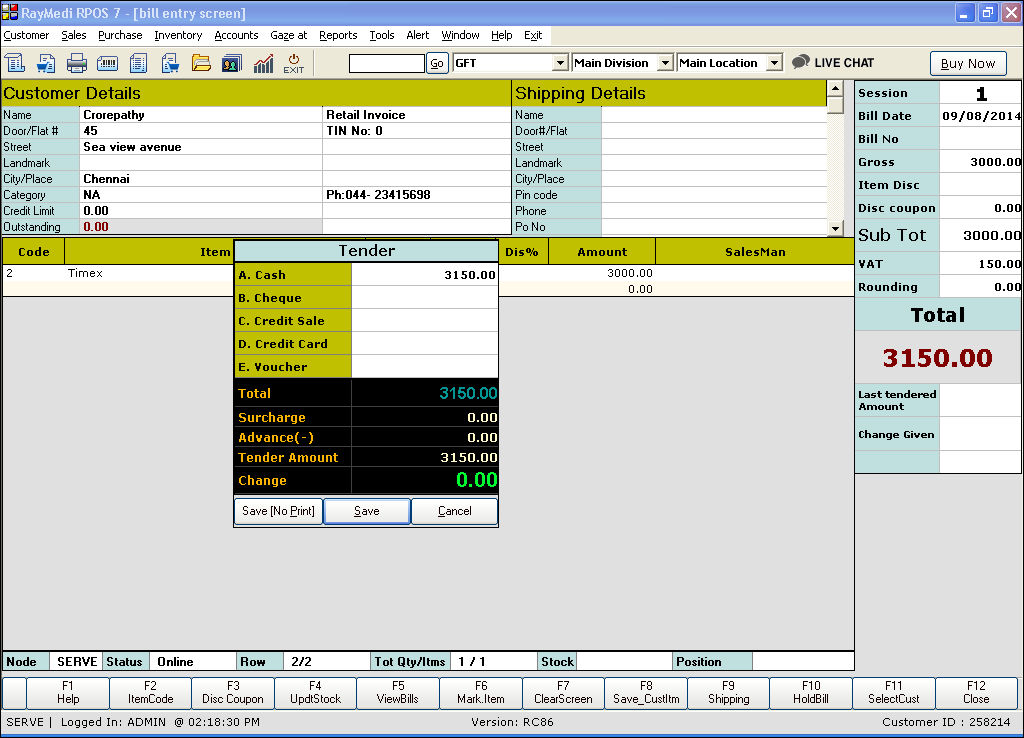
Creating a new Tender Type
Follow the instructions above to add a new tender type.
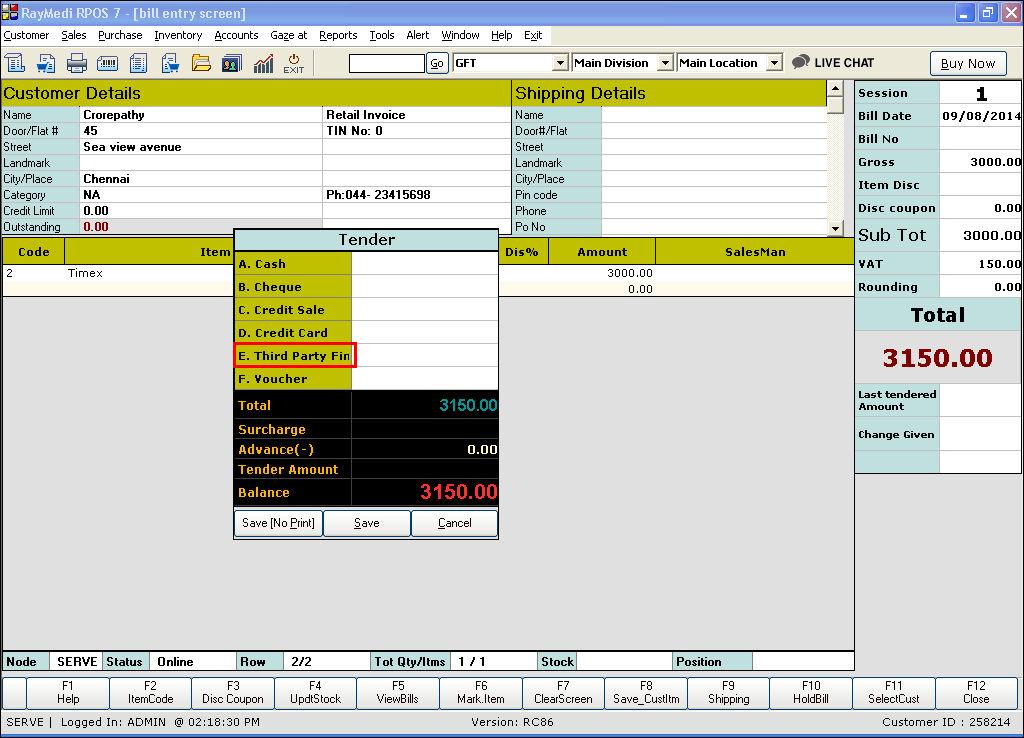
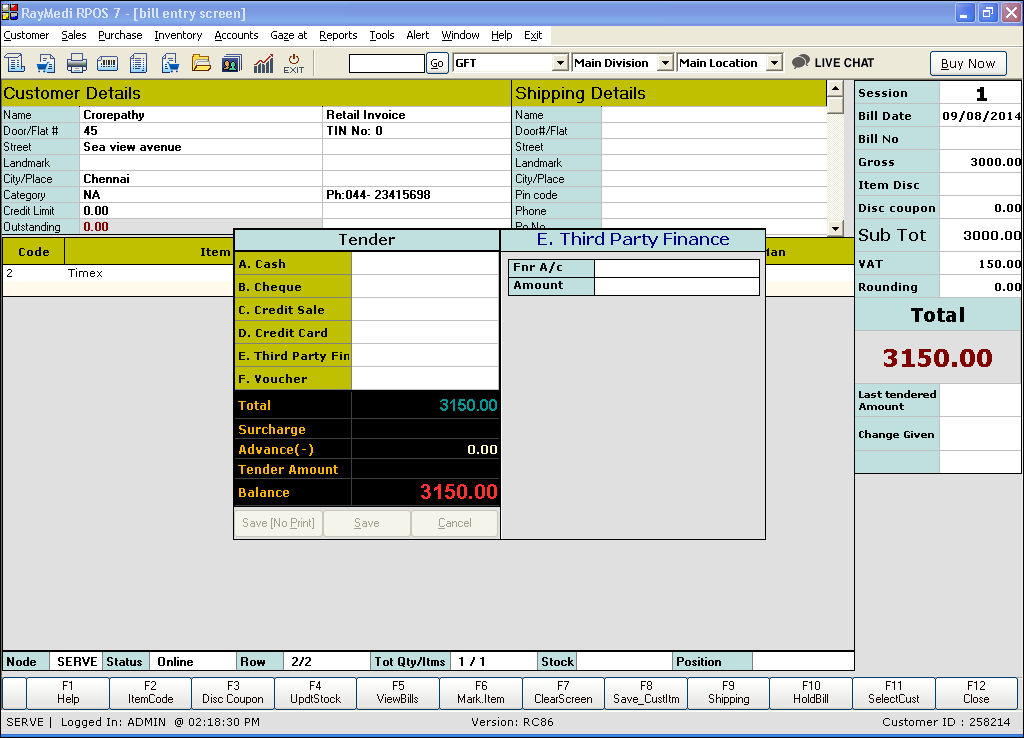
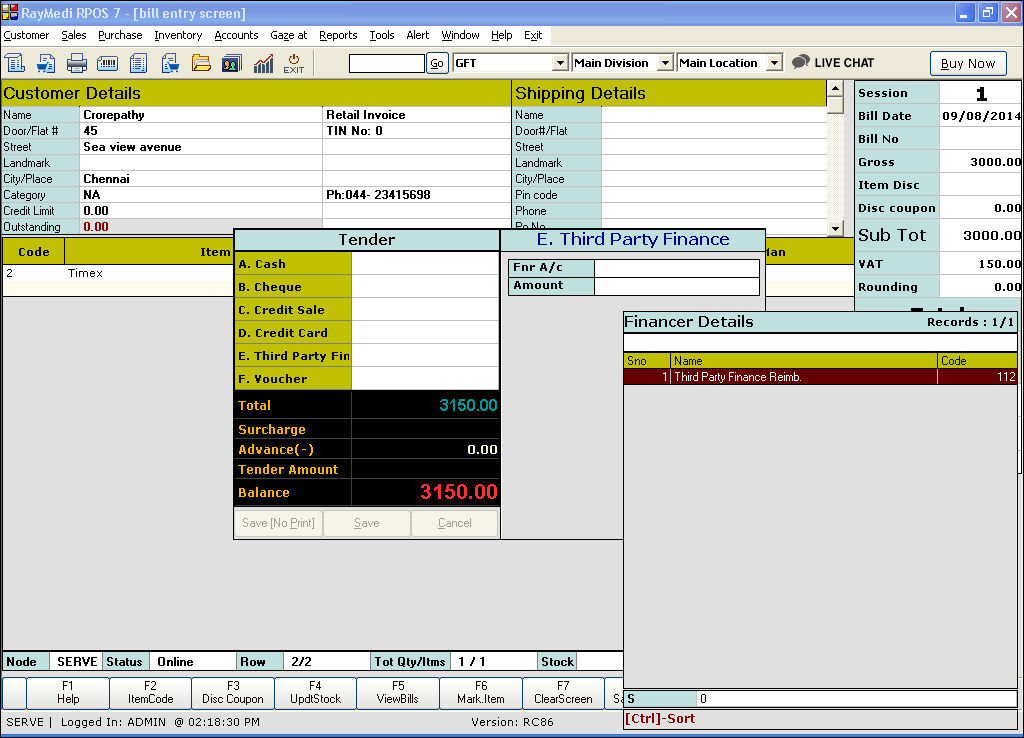
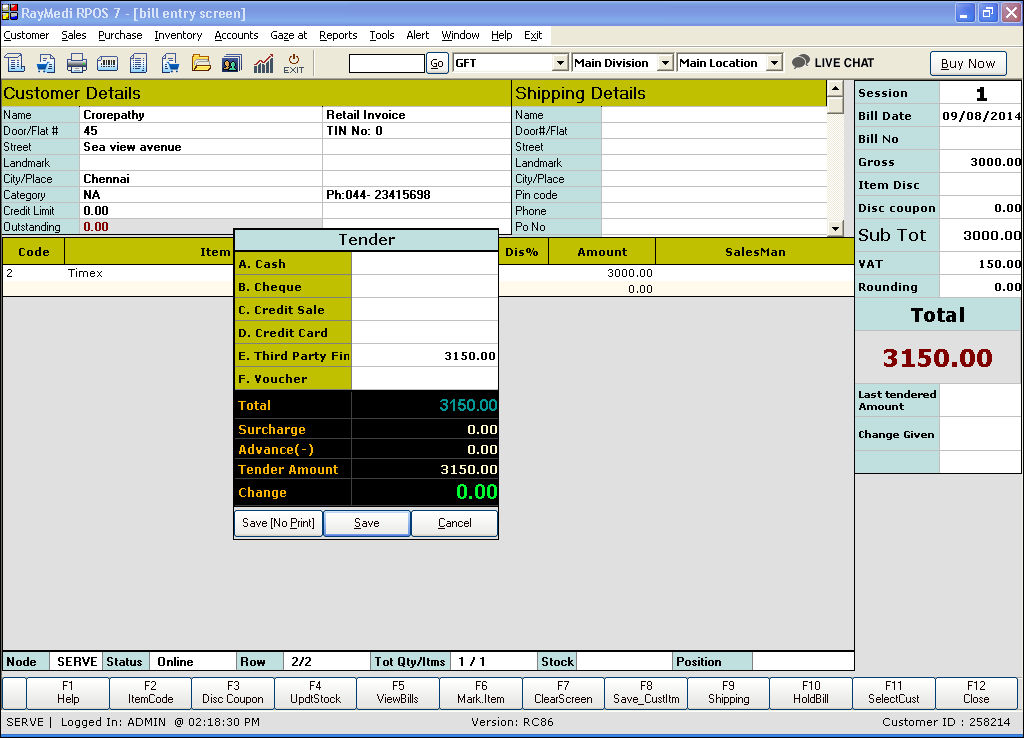
Example: Creating a new tender type - Third Party Finance
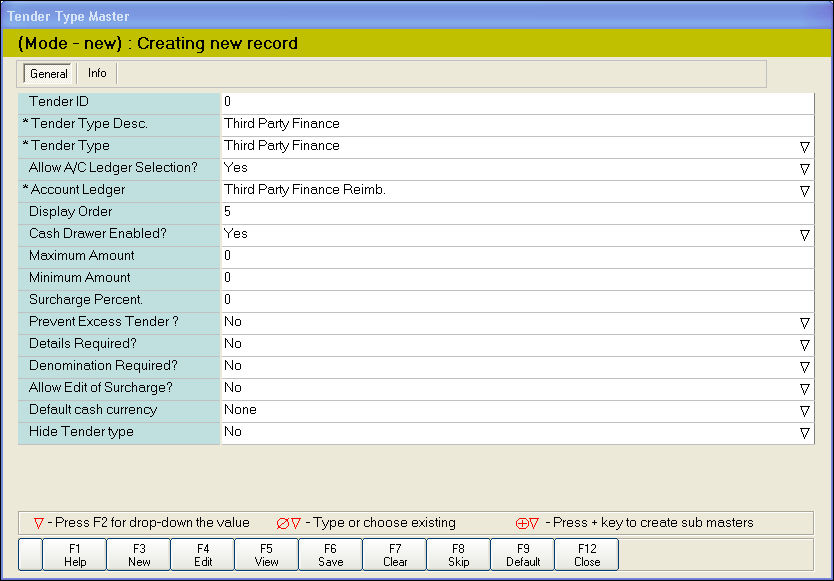
The created tender type is added in the tender screen as shown in the below image.

For Bill Prefix Master, click here.
For FAQs, click here.
Tender refers to the type of payment made by the customer on buying goods. The customer after buying the goods makes the payment in any of the forms such as cash, credit cards, cheque or coupons etc. The person in the billing counter receives the payment, enters the payment details in the tender screen and saves the bill. The details entered in the tender are posted in the respective ledgers which can be used for tracking.
After saving the bill, a confirmation message with a prefixed bill number is displayed for the bill. The bill prefix is a two-letter code that is included as a part of the bill number. This is used to distinguish the types of bill tendered.
For each tender type, a unique two-letter code is given in the Bill Prefix Master. By default, the system created prefix is displayed. User can customize the prefixes for the different types of bills.
Tender Management in RPOS7 comprises:
1. Tender type Master - To add a new tender type
2. Bill prefix Master - To create a prefix for the tender types
Tender Type Master
The Tender Type master screen is used to create a new tender type. By default, there are 8 basic tender types.
1. Click sales >> Masters >> tender to open the Tender Type Master screen.
2. In the Tender Type Desc. field, enter the name for the new tender type.
3. In the Tender Type field, press F2 key.
The Tender Type LOV is displayed. Select the tender type from the LOV.
4. In the Allow A/C Legder Selection field, press F2 key to select Yes or No.
- Yes - User can select the terminal account of the credit card and it will be posted in the respective bank account ledger which can be used for tracking later
- No - The prompt for selecting the terminal account will not be displayed.
5. In the Account Ledger field, press F2 key.
The Ledger LOV is displayed. Select the appropriate Ledger from the LOV as it will be directly reflected in Accounts, Daybook and Ledger reports. The Ledger name is created in Trac >> Ledger Master.
6. In the Display Order field, enter a number. This is considered for the order in which the created tender is displayed in the billing screen.
7. In the Cash Drawer Enabled? field, press F2 key to select Yes or No.
- Yes - Cash drawer is enabled
- No - Cash drawer is not enabled
Cash drawer is used to collect the cash, coupon or voucher received from the customer. Usually for Cash, Coupon and Voucher tender types, Yes option is selected.
9. In the Minimum amount field, enter the minimum amount required to make the sale. This is majorly applicable for credit card based sale.
10. In the Surcharge percent field, enter the value applicable. This is applicable for Coupon and Credit card.
11. In the Prevent Excess Tender field, press F2 key to select Yes or No.
- Yes - Excess payment is allowed
- No - Excess payment is not allowed
Usually, No option is selected for Cash tender type only.
12. In the Details Required? field, press F2 key to select Yes or No. The Yes option is applicable for Coupon and credit card tender types. User has to select Yes if he wants to enter the details of the coupon and credit card.
13. In the Denomination Required? field, press F2 key to select Yes or No. To enter the denomination details, user has to select Yes. For Coupon, Yes is selected.
- Yes - User can edit the surcharge percent at the time of payment
- No - User can not edit the surcharge percent at the time of payment
For users who make tender in more than one currency (like dollars and Euros), the currency can be created in trac and the same can be mapped here.
16. In the Hide Tender Type field, select Yes or No.
- Yes - The tender type is hidden in the tender screen
- No - The tender type is displayed in the tender screen
A sample image displaying the Tender screen is shown below.
Creating a new Tender Type
Follow the instructions above to add a new tender type.
Example: Creating a new tender type - Third Party Finance
The created tender type is added in the tender screen as shown in the below image.

For Bill Prefix Master, click here.
For FAQs, click here.
Related Articles
Manage Repacking for Seed Items
Manage Repacking for Seed Items Purpose: The purpose of the Repacking feature is to streamline the process of creating and managing bulk items and repack items for seeds within the RetailEasy Fertilizer POS software. This feature aims to simplify ...Manage Pricing for Retail and Wholesale Customers
Manage Pricing for Retail and Wholesale Customers Purpose: In the context of RetailEasy Fertilizer POS, the Price Level feature allows you to manage pricing for both retail and wholesale customers using different price levels. This feature is ...How to invoke tender screen automatically when a bill number is scanned in the cashier management screen?
How to invoke tender screen automatically when a bill number is scanned in the cashier management screen? Purpose: To streamline the payment process and reduce the risk of errors or discrepancies in cash handling. By automatically opening the tender ...Software License sync for renewal of RetailEasy(RPOS 7)
Purpose This document provides guidance on how to sync your GoFrugal RPOS 7 license if you continue to receive the ALR license warning after payment or if a newly purchased client license has not been linked with the server. Sync Process a) If you ...How to redeem loyalty in RetailEasy (Rpos7) ?
The loyalty points/amount acquired by the customer is redeemed in the billing screen. 1. Click Sales >> Sales Bill to open the bill entry screen. a. In the Name field, press ENTER to select the customer to whom the loyalty card was sold. ...