Business Configuration[System]
Q3. What does the “Sales Order Caption” configuration do?
Purpose: The Sales Order Caption configuration allows you to change the label displayed for the Sales Order screen, helping tailor the terminology to match customer requirements or business processes.
Available Options
You can set the caption to any of the following:
How the Caption Appears on the Screen

Q4 . The Configuration – “Customer Selection Based on Swipe Card”
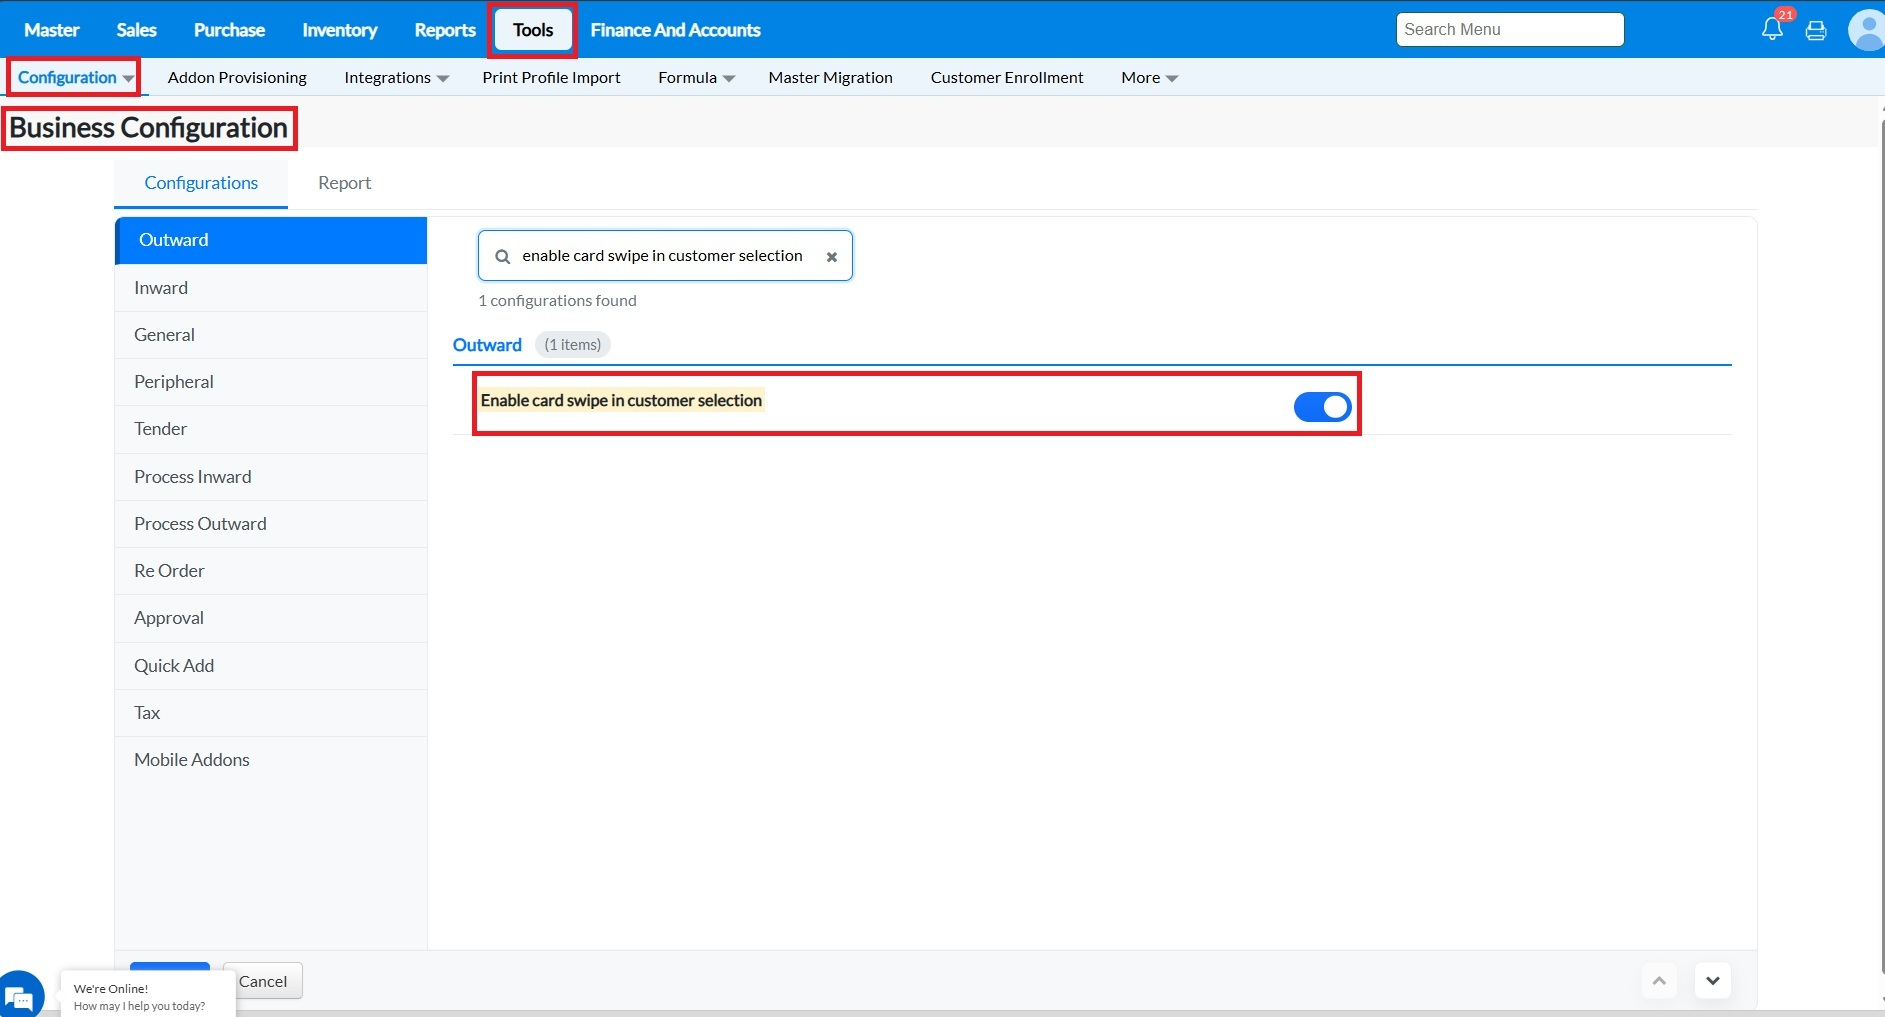
Card Swipe in customer selection
Purpose: To speed up adding a customer’s name while billing. It avoids the manual entry work during billing
Example: Customer will be given the Swipe card with barcode on it. While billing the owner will just scan the barcode and do billing.
Pre-requist:
Go to Tools->Configuration ->Business Configuration "Enable the configuration Enable card swipe in cust
omer selection" and click on Save
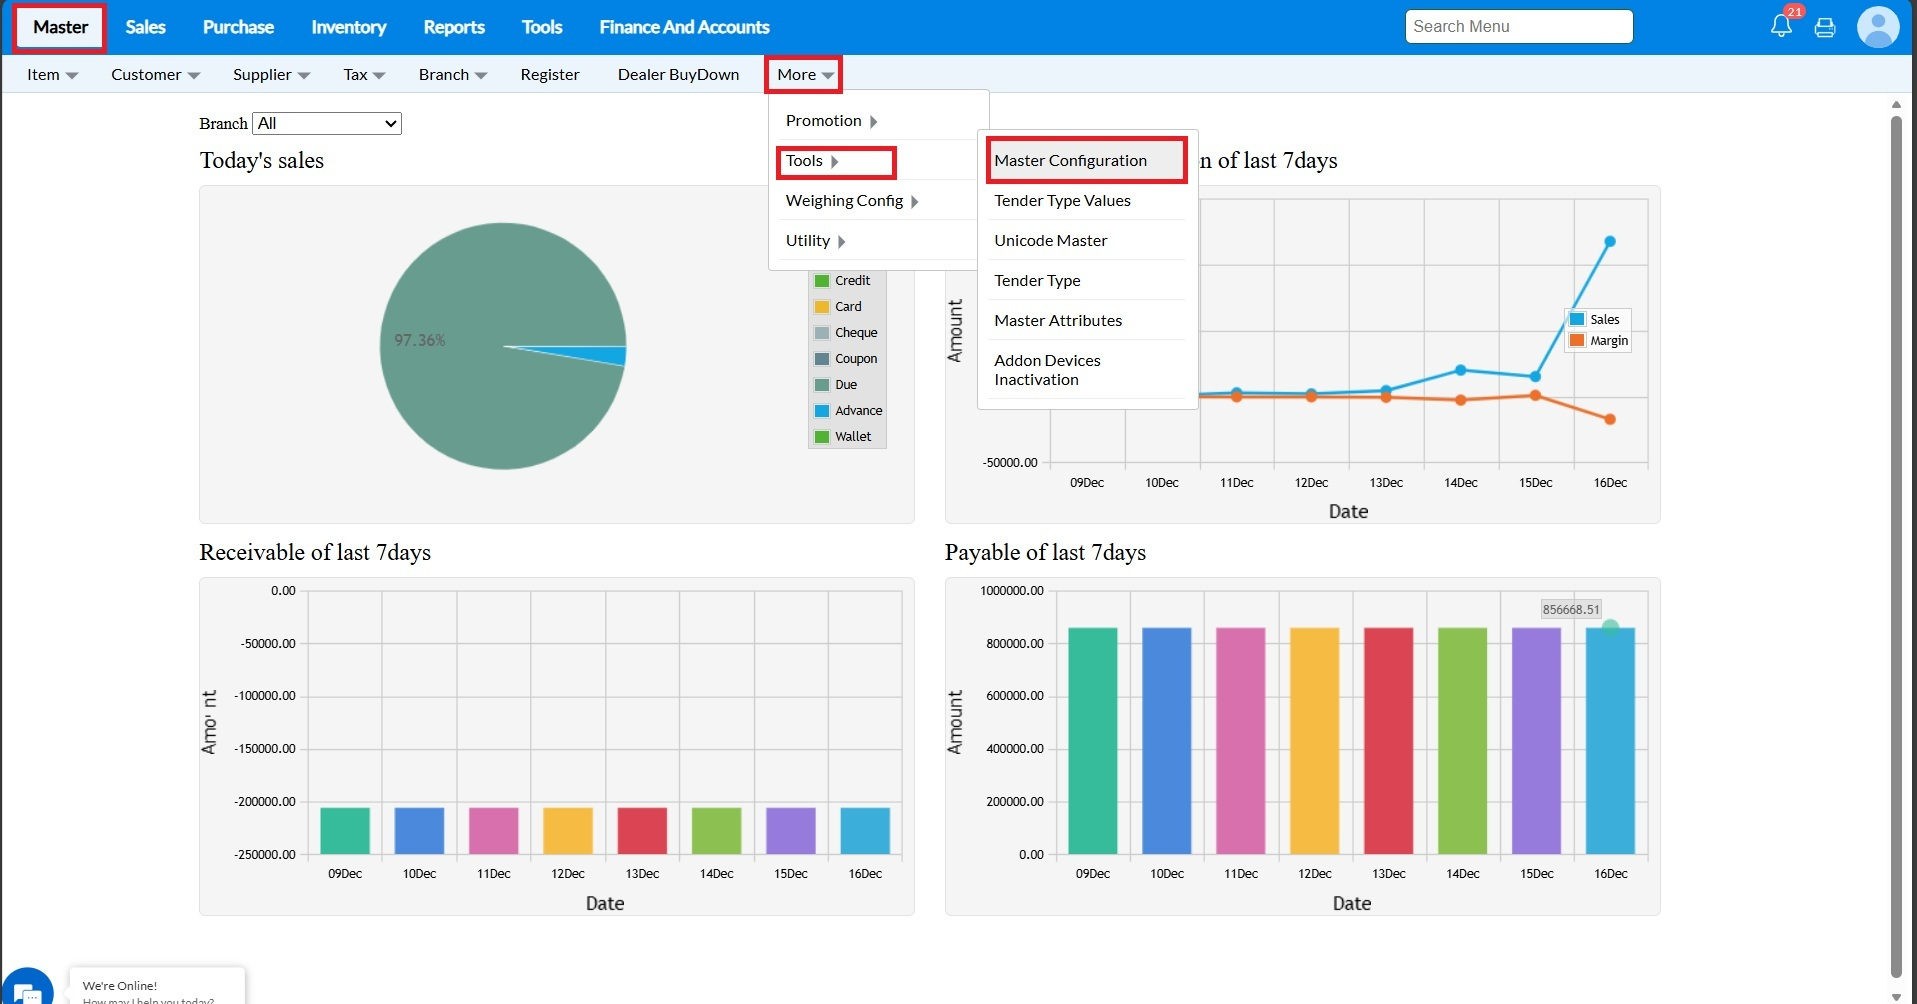
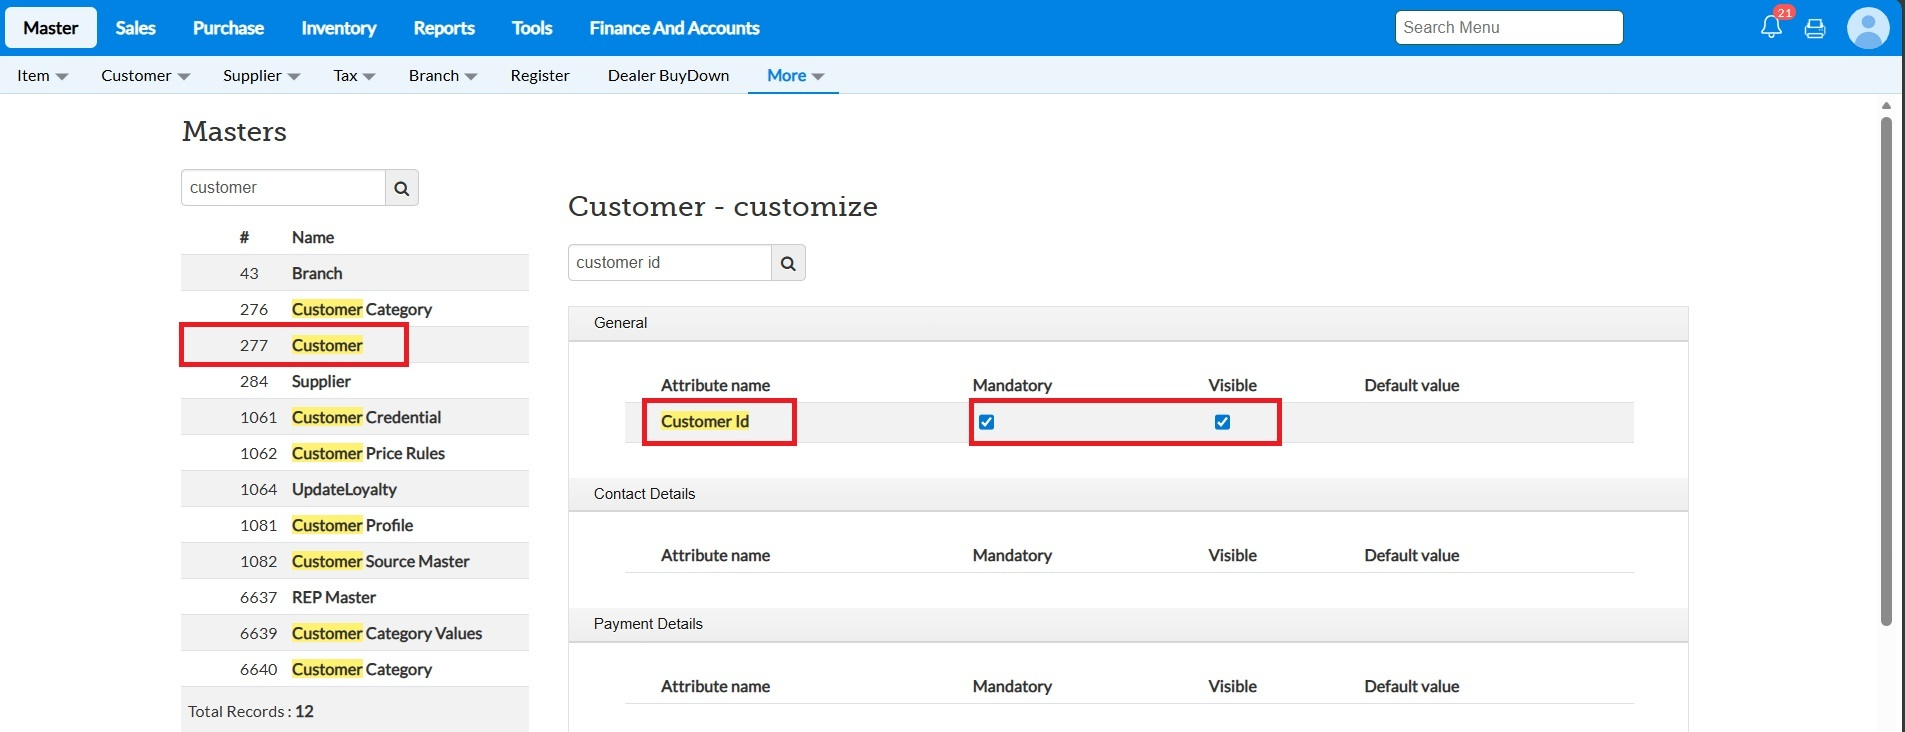
Enable the customer id field to input the barcode number
2. Go to Master->More->Tools-> Master Configuration
3. Click on customer edit and enable Customer Id and click on Save.
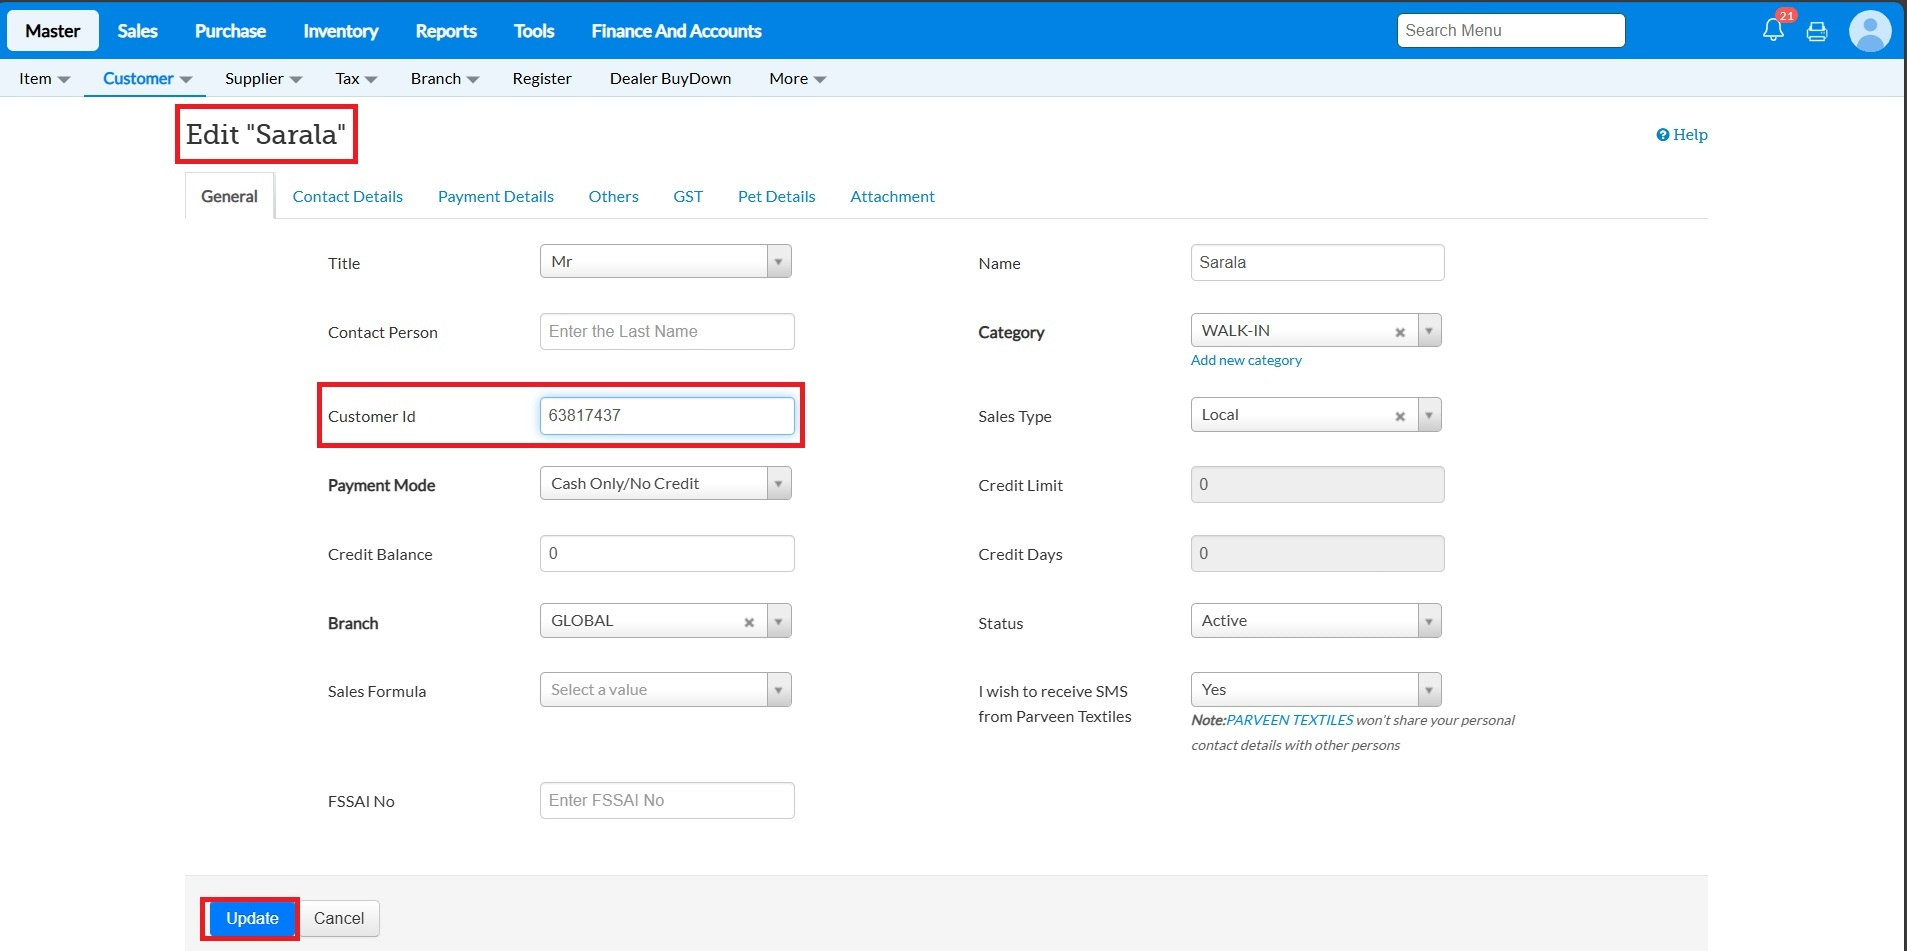
To map the customer id for particular customer
4.Go to Master->Customer->Customer .Click on Edit icon
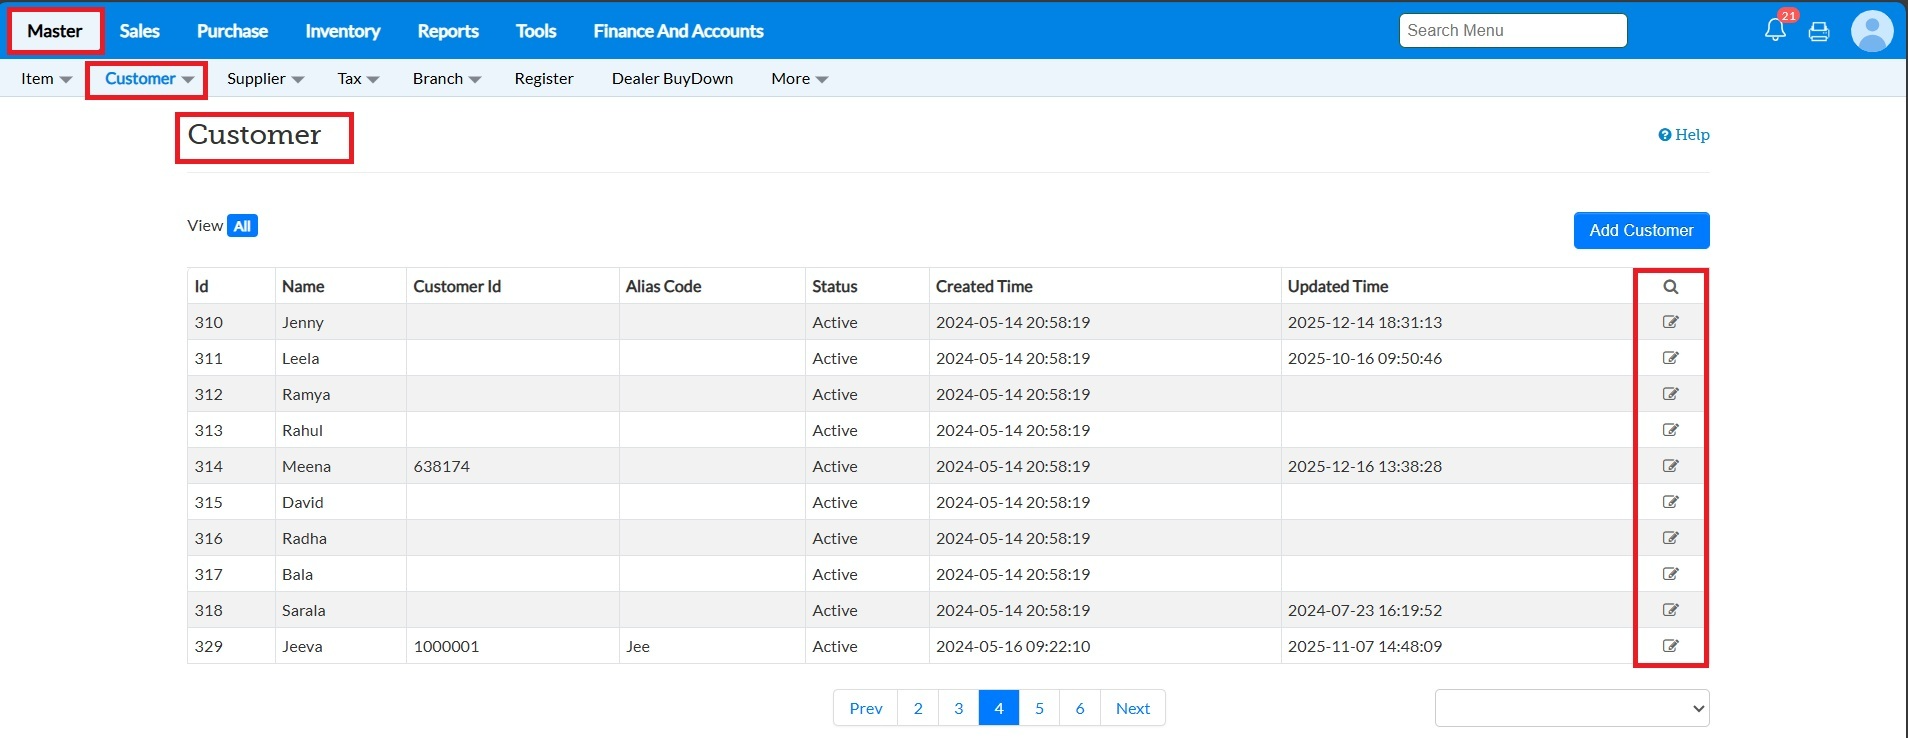
5.Enter the Customer Id and click on Update
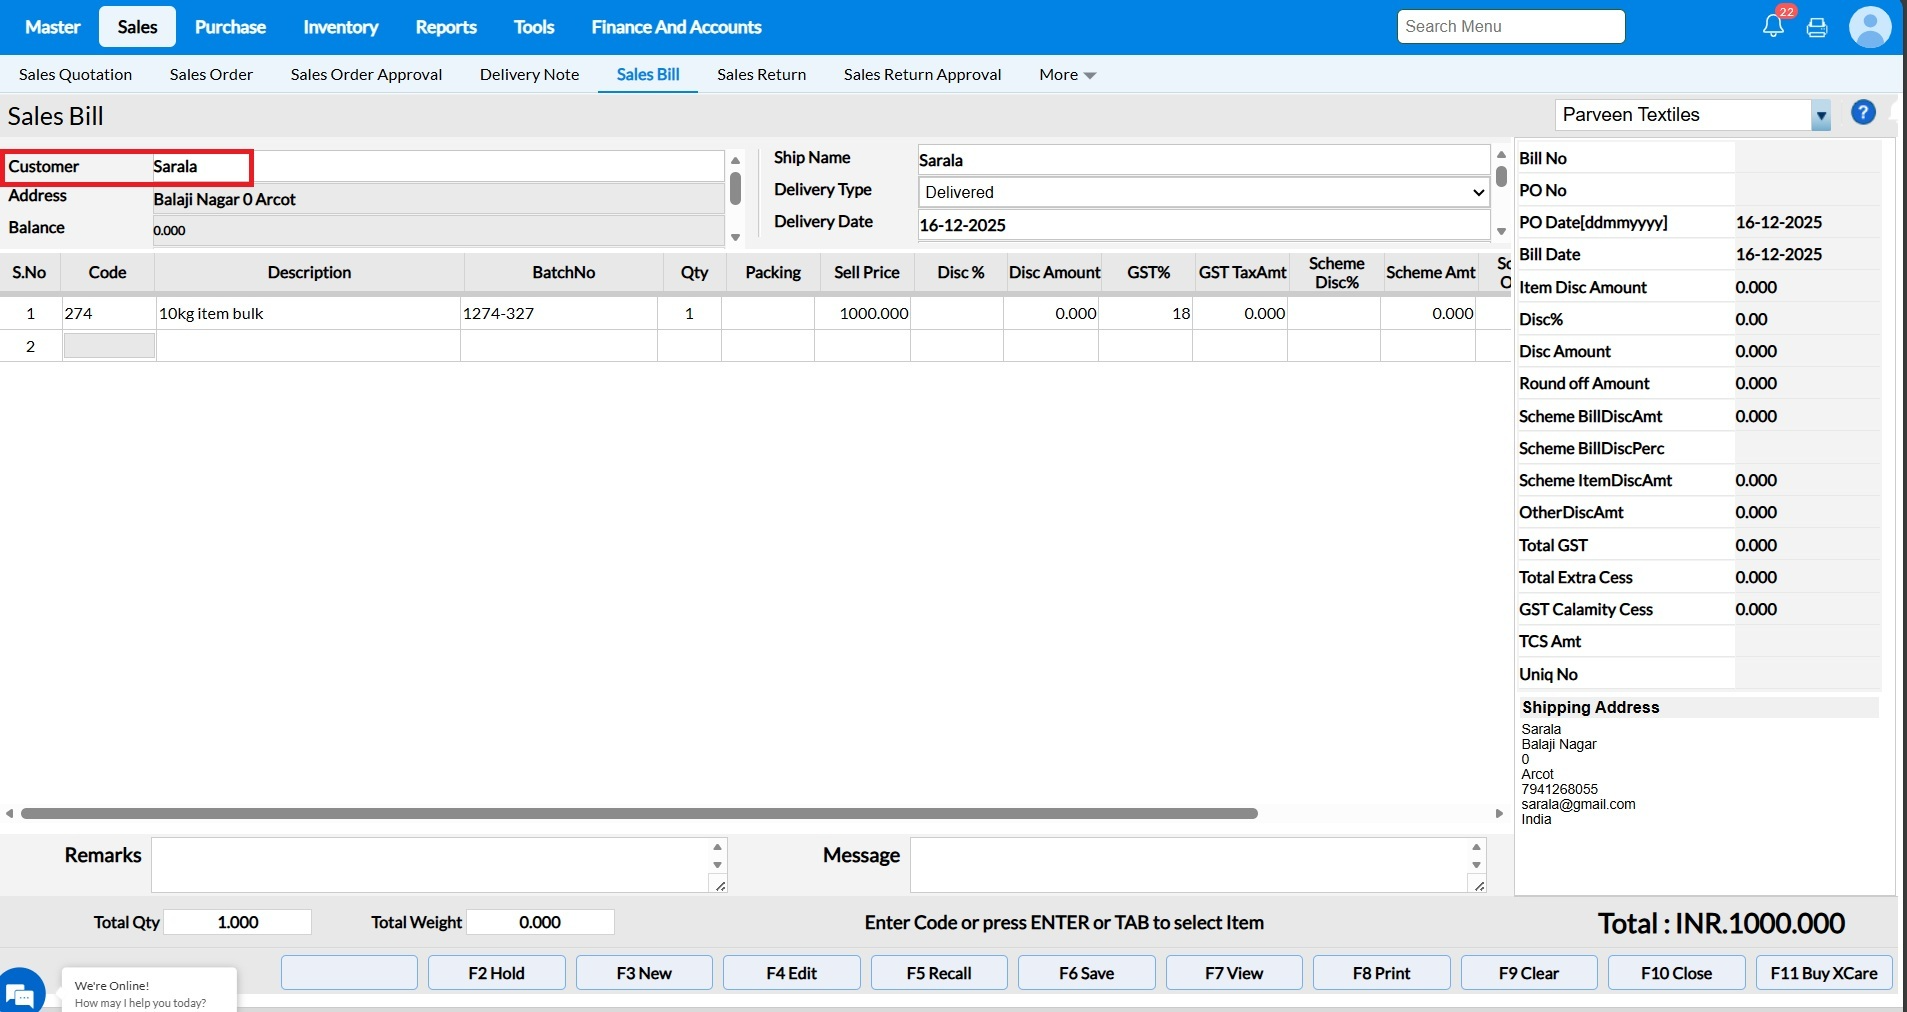
Step 6:Go to Sales-> Sale Bill. Scan the card in the customer field the name will be loaded automatically
7.After entering the Items click on Save button.
To bulk import the customer id
Go to Tools->Master Migration
Customer Master Migration- To add the customer id to the new customers
Customer Update Migration- To add the customer id to existing customers
Q6. What does the “Initial Focus on Cash Disc” configuration do?
A: When this configuration is enabled, the cursor will automatically move to the “Cash Discount” field as soon as the screen or entry form opens.
Note:These settings are applicable only to Sales Bill, Sales Order, Delivery Note, and Sales Quotation.
Q8. What happens when the “Show Rejected OPF for Revision” configuration is enabled?
Purpose: The purpose of enabling “Show Rejected OPF in Revision” is to allow users to recreate order which even include the cancelled Sales Orders, without having to create a new order from scratch.
A: When this configuration is enabled, the system will display all orders, including the cancelled sales orders, in the “Revise” Function key.
For Example: Refer the Screenshot , Sales Order no "HF/SO/54/1/DEMO" which was cancelled.

Navigate from Dashboard ->Sales ->Sales Order -> click on "Ctrl+ Shift" key "Revise" function key will be displayed.
Revise Mode – Cancelled Sales Order
In Revise mode, users are allowed to load a Cancelled Sales Order and revise it.
Even if a Sales Order is in Cancelled status, it can still be Modified (quantity, items, dates, etc.) Saved again as a revised Sales Order
Q 9. The Configuration "Show Branch Prefix in OPF and Quotation" How it works?
Purpose: This configuration helps uniquely identify Sales Orders by including the Branch Prefix and Sales Executive Short Name in the Sales Order (SO) number, making tracking and branch-wise identification easier.
This configuration controls whether the Branch Prefix and Sales Executive Short Name are included in the Sales Order (SO) number.
Note:This configuration can be enabled only based on customer requirement for the Sales Order number.
When this configuration is enabled:
- While creating a Sales Order (SO), the system will:
- Add the Branch Prefix (configured in the Branch Master) before the SO number.
- Add the Sales Executive’s Short Name (configured in the Employee Master) at the end of the SO number.
Steps to Update the Branch Prefix
Go to Master → Branch Edit the required Branch ->Update the Prefix field
Example : Branch Prefix were set as HF
Steps to Update the Sales Executive Short Name
- Go to Tools → Configuration → Employee Master
- Edit the Employee whose role is defined as Sales Executive
- Update the Short Name field.
Example: Sales Executive Short Name: BAL
Final Sales Order Number Format
Based on the settings:
- Branch Prefix: HF
- SO Number: SO/55/1
- Sales Executive Short Name: BAL
Final SO Number Format:HF/SO/55/1/BAL
Q 11. What does the “Don’t Validate Cost Price Against Selling” option do?
If Enabled "Don’t Validate Cost Price Against Selling" Allows purchases to proceed even if the selling price is lower than the cost price. The system does not show warnings or block the transaction.
Note: It was applicable for only the inward transaction like Purchase Invoice, Opening Entry, Receipt note, Purchase order.
If Disabled "Don’t Validate Cost Price Against Selling" Prevents or warns against purchases where the selling price is lower than the cost price, helping avoid potential losses.
Q 13. What does the “Don’t Ask Confirmation When Delete the Row” option do?
Purpose: The “Don’t Ask Confirmation When Delete the Row” (or “Hide Delete Confirmation”) option removes the usual confirmation popup that appears when you delete an item row. When this setting is enabled, rows are deleted instantly without asking for confirmation. This helps speed up the workflow, especially when you need to delete multiple entries frequently.
Important note:This setting applies only to the following screens:
Sales Transactions:
Sales Bill, Sales Return, Sales Quotation, Delivery Note, Sales Order, Transfer Out, Opening Stock Entry, Stock Update Entry
Purchase Transactions:
Purchase Order, Purchase Invoice, Receipt Note, Goods Inward Note, Purchase Return.
If the Hide Delete Confirmation option is disabled, the system will display a confirmation message each time you try to delete an item row, asking if you really want to remove it.
Q15. What does the “Hide Stock in Sales Batch LOV” option do ?
Purpose: When this configuration is Enabled. As a result, while users selecting items during sales will not be able to view the available quantity for each batch.
Note:A batch is used to track and manage items grouped together under the same production or procurement conditions. It helps ensure traceability, expiry control, and accurate stock management at the batch level.
When the configuration is disabled, users will be able to view the batch-wise stock quantities in the Sales Batch LOV while selecting items during sales.
Q16. What does the “No of Decimal Digits for Price Fields” option do?
A16. The “No of Decimal Digits for Price Fields” option allows you to define the number of decimal places displayed for item prices in the system. This ensures consistency in pricing, billing, and reporting, and helps avoid rounding errors during sales and purchase transactions.
Note: Maximum upto 4 digit we can set the Price field.
For Example , Now we have set the "No of decimal digits for Price fields" as "3"
How it was reflecting in Transaction screen , after setting the "No of Decimal Digits for Price Fields" as 3
Q17. What Does the Configuration “No of Digits for Discount” Do?
A17. The “No of Digits for Discount” configuration determines how many decimal places are allowed or displayed when entering a discount value in the system.
Example
If the configuration is set as: "No of Digits for Discount" as "3" (Refer the screenshot ) How does the Decimal digit given
Q19. What does the “Stock Classification” configuration do?
A19. The “Stock Classification” setting controls whether the Stock Type column is shown in transaction screens. It has three options:

None – When set to None, the Stock Type column will not appear in any transaction screen.
All – When set to All, the Stock Type column will be displayed in all transaction screens, allowing the user to choose the required stock type.
Transfer – When set to Transfer, the Stock Type column will be shown only in the Transfer transaction screen, and hidden in all other screens.

Q12. What does the “Hide Stock in Sales Batch LOV” option do ?
Purpose:When enabled, the system hides batch-wise stock quantities in the Sales Batch LOV. Users selecting batch items during sales won’t be able to see the available quantity in each batch.
Note:A batch is used to track and manage items grouped together under the same production or procurement conditions. It helps ensure traceability, expiry control, and accurate stock management at the batch level.
*If Configuration "Hide Stock in Sales Batch LOV" Enabled
When Enabled, users will not able to view the batch-wise stock quantities in the Sales Batch LOV while selecting items during sales
Purpose :When disabled, users will be able to view the batch-wise stock quantities in the Sales Batch LOV while selecting items during sales.
*.If Configuration "Hide Stock in Sales Batch LOV" Disabled
When disabled, the Sales Batch LOV displays batch-wise available stock quantities, allowing users to clearly see and select the appropriate batch during sales transactions based on available stock.

Q22. The Configuration “Grace Period for Credit Bill” configuration is to clearly inform the customer about the payment due timeline.
Purpose: The Bill Due Date is printed on the credit bill to avoid confusion and clearly communicate the customer’s credit payment due date of credit bills.
Print Field Name "MBH_BILL_DUE_DT"
Rule: The printed due date is calculated based on the billing (purchase) date plus the configured grace period (in days).
Calculation Logic: MBH_BILL_DUE_DT = Billing Date + Grace Period
Example
Grace Period: 10 days
Billing Date: 07/01/2026
Printed Due Date (MBH_BILL_DUE_DT):17/01/2026
Q23 . How do I "Enable Kit" configuration?
The Kit configuration is enabled automatically based on the license purchase applied to the domain and does not required manual method to enable the configuration.Kindly reach the Account Management or Support team about the license related details.
Note - If you want to disable the KIT management you can disable the configuration, once kit inventory cleared.
Q24. What does the “Enable Accounts Posting” option do?
If Enabled "Enable Accounts Posting" Transactions from Sales Bill, Sales Order, Sales Return,Purchase,Purchase Return are automatically posted to the Accounts/Financial module in real time.
Real-time example: When a invoice is created, which will be posted to accounts with the details , We have created the Sales Invoice and verify in the "Daily sales (Bill no wise)" Report by the "Voucher no" column voucher no will be generated if the invoice was posted. Refer the Screenshot of the report in POS and Accounts.
If Disabled ""Enable Accounts Posting"
- Transactions will not posted to the Accounts/Financial module.
Real-time example: When a invoice is created in POS, no accounting entry will be posted to accounts.You can verify in the "Daily Sales (Bill no wise)" by the "Voucher no" Column , If the "Voucher no" column were shown as "0" then invoice was not posted to accounts.
Q26. What is the "Node Locking Required" Configuration in TruePOS?
Node Locking defines whether the TruePOS license is restricted to system or can be used across multiple systems.
Available Options:
1.Strict Node Lock
2.Node Lock Not Required
Q 28. What does the “Enable Orderby Item Name in TO” configuration do?
When this configuration is enabled, the items in the TO (Transfer Order) print screen will be sorted alphabetically by item name. This ensures the TO printout is clean, organized, and easy to read. The configuration’s only purpose is to arrange items.
Note:It applicables only in Transfer out Print copy.
Q29. What does the “Show Cost Rate in Sales Batch LOV” option do?
Purpose: The “Show Cost Rate in Sales Batch LOV” option allows users to view the cost price of each batch when selecting items in the Sales Batch LOV. This gives sales staff better visibility into batch-wise cost information, helping them make informed decisions during billing.
Note: This Configuration will be working only on "Sales Bill" & "Stock update Entry" Screen.
* When enabled, the "Show Cost Rate in Sales Batch LOV" the configuration which will show cost rate across all outward transaction screens , allowing users to select batches by viewing the cost rate.

If this configuration is disabled " Show Cost Rate in Sales Batch LOV", and users will only see the standard batch details without cost information.

Q30. What does the “Item Price Change Based On” configuration do?
The “Item Price Change Based On” configuration controls how item price updates are applied across the business. It defines the scope of a price change—whether it affects a single branch, all locations, or specific tax areas. This helps businesses manage pricing consistently based on their operational structure.

Steps to Access “Item Price Change”
Go to Master ->Select Item ->Click on Item Price Change
Branch Wise
Each branch can maintain its own selling price for the same item.
A price update impacts only the selected branch, allowing location-specific pricing.
2. All Locations
- The updated price is applied universally across every branch and location.
- Ensures uniform pricing throughout the entire business.
3. Tax Area Wise
Prices can differ based on tax regions.
The system applies the price update according to the tax area assigned, allowing tax-region-specific pricing.

Q33. The configuration “Synchronize transaction with TrueBook” works as follows:
When this option is enabled, sales and related financial transactions from TruePos will be automatically synchronized with TrueBook.
This ensures that transaction details such as sales, returns, payments, and adjustments are reflected in TrueBook for accurate accounting and bookkeeping.
When the option is disabled, transactions will not be synced to TrueBook, and accounting entries must be handled manually or through other processes.
Q35. What does the “Migration Rows Limit” option do?
The “Migration Rows Limit” option sets a maximum number of rows that can be processed at a time during data migration. This helps manage system performance, prevents timeouts, and ensures smooth and controlled migration of large datasets.
For Example: if the limit is set to '200' and the sheet contains more than 200 entries, a message will appear stating, 'You can only migrate 200 rows in a single upload.'
Note - If you wish to upload more than 200 rows, you can adjust the migration rows limit as needed. However, please be aware that the duration of the upload will increase based on the number of rows available in sheet.
Q40. What does the “Enable Pet Details” configuration do?
The Pet Details feature—an add-on—which will be automatically enabled based on the license purchased and menu will enabled, Not required to enable manually. For more details and usage instructions, refer to the "Pet Masters" provided in the system.
Q41. What does the "Qty Width" configuration do?
Purpose: The "Qty Width" configuration allows you to adjust the width of the quantity column in screen interface. By setting the width, you control how much space is allocated to display the quantity of items, ensuring that the column appears just the way you need it for clarity or formatting purposes.
For Example: I have set the "Qty Width" as "20" , Refer the Screenshot of sales bill screen how the "Qty" column space increase / decrease based on configured.
Q42. What does the “Move to Next Row After Qty” configuration do?
Purpose : The “Move to Next Row After Qty” configuration controls how the cursor behaves after entering the quantity in the billing screen. When Enabled "Move to Next Row After Qty". After the user enters the quantity for an item and confirms it, the system automatically moves the cursor to the next row. This speeds up the billing process by eliminating the need to manually move to the next line, making item entry faster and more efficient.
When Disabled "Move to Next Row After Qty". After entering the quantity, the cursor stays on the same row. The user must manually move to the next row using Enter function key. This allows more control but may slow down high-volume billing.
Q43. What is the purpose of the “Import SO in Screen” configuration and how does it work?
Purpose:
The Import SO in Screen configuration simplifies the sales order creation process by eliminating the need to use the migration screen. It allows users to directly import sales order items into the Sales Order screen using a CSV file after selecting the customer. This reduces manual entry and improves efficiency.
Note: This Settings applicable only for the Sales Order Screen.
1.When the Configuration “Import SO in Screen” were enabled follow the steps:
Steps to "Import SO"
- Open the "Sales Order" screen and Select the required "Customer"
- Press the "Import SO" function key.
- Download the available CSV template.
4.Update the item details in the downloaded CSV file.
5.Click “Choose a file or drag it” and select the updated CSV file.
6.The items from the sheet will be uploaded and displayed on the screen.
7.Review the data and save the sales order.
2. When the Configuration “Import SO in Screen” were disabled
Purpose:When the “Import SO in Screen” configuration is disabled, users cannot directly import sales orders from the Sales Order screen. In this case, sales orders must be uploaded through the Master Migration screen using the "
Sales Order Upload" process. After uploading the Sales Order through the Migration screen:
Steps:
Open the Sales Order screen ->Click the Import SO function key ->Select the "sales order" from the LOV and load the sales order in screen.
Q 44. The Configuration "Show DC alone as Supplier in Franchise"
Purpose: To control whether franchise users can view only the Distributor Center (DC) alone or all available suppliers during supplier selection in Purchase.
Note: This settings will be applicable for "Purchase Order" & "Purchase Invoice"
When the configuration is Enabled:
The system displays only the Distributor Center (DC) as the supplier in the Franchise setup, ensuring centralized procurement and preventing selection of other suppliers.
If the “Show DC Alone as Supplier in Franchise” configuration is disabled
When the “Show DC Alone as Supplier in Franchise” option is disabled, the system will display all applicable suppliers, not just the DC (Distribution Center) in the supplier selection list for Franchise locations.
Q45. What does the "Franchise Location in TO/TI" configuration do?
Why Are Some Branches Not Displayed in Transfer Out / Transfer In at Franchise Locations?
If franchise branches are not visible on the Transfer Out (TO) or Transfer In (TI) screens for a franchise location, this is due to the configuration settings in Business Configuration.
Navigation Path:
Tools → Configuration → Business Configuration → Franchise Location in TO/TI

Configuration Options:
Don’t Show
No franchise locations will be displayed on the Transfer Out / Transfer In screens in the selection of "To Branch Name".
Show Based on Franchise Location Mapping
Only the branch mapped to the franchise location under Head Quarters in the Branch Master will be displayed on the Transfer Out / Transfer In screens.
Show All Locations
All locations will be displayed on the Transfer Out / Transfer In screens including the "Franchise" location.
Q 47. What does the “Don’t Allow Stock Update Greater Than Inward Stock” configuration do?
The “Don’t Allow Stock Update Greater Than Inward Stock” configuration controls whether users are allowed to increase stock quantities manually in the Stock Update screen.
When the configuration is Enabled:
- The system blocks any attempt to increase stock quantity beyond the actual inward/purchase stock recorded.
- Users can only decrease or adjust stock downward (e.g., for damage, expiry, or corrections).
- This ensures stock increases happen only through proper processes such as Purchase Entry or Opening Entry.
For Example:
* "Qty " column defines the "Physical Stock" updating by user which updated as "89" Qty.
*"Current Stock" defines the Stock available in the System as "72" Qty.
When the configuration is Disabled:
- Users are allowed to increase stock quantities directly from the Stock Update screen. Sharma
- The system will not restrict manual upward adjustments.
- Stock can be increased without purchase or inward documentation, giving users more flexibility but reducing control.
For Example:
* "Qty " column defines the "Physical Stock" updating by user which updated as "90" Qty.
*"Current Stock" defines the Stock available in the System as "82" Qty.
Discrepancy of doing the Stock update by increasing the Stock
Discrepancy = Current Stock - Physical Stock
- Discrepancy=82-90 Qty
- This is a discrepancy (excess stock).
- The system assumes 8 additional units exist physically but were not recorded in system.
- The excess qty value will be reflected in profit and loss as difference in opening balance. the excess amount will reflected in account statement reports
Q48. What is "Load Order Rate in FIFO " Configuration do?
Purpose: FIFO (First In, First Out) means the stock that enters the system first is sold first. Supermarkets follow FIFO to avoid expiry losses, maintain accurate costing, and ensure older stock is sold before newer stock.
Load Order Rate in FIFO means each stock batch retains its own purchase rate based on when it was received, and sales are deducted in the same order. The rate of a batch remains unchanged until that batch is fully sold.
FIFO with Load Order Rate ensures older stock is sold first and sales are valued at the correct purchase rates.
Note: This settings were applicable on Sales bill , sales Order and Transfer out.
Example (Sugar – 1 kg pack):
- Day 1: 100 kg loaded @ ₹40/kg
- Day 5: 100 kg loaded @ ₹45/kg
- Day 10: 100 kg loaded @ ₹50/kg
When a customer buys 80 Qty, it is sold entirely from the first inward:
80 Qty× ₹40 = ₹3,200.
Remaining stock: 20 Qty @ ₹40, 100 Qty@ ₹45, 100 Qty@ ₹50.
When another customer buys 50 kg, FIFO applies automatically:
20 Qty @ ₹40 (₹800) + 30 Qty@ ₹45 (₹1,350) = ₹2,150.
FIFO with Load Order Rate ensures older stock is sold first and sales are valued at the correct purchase rates.
Q51. What does the “Remove BOM in Migration” configuration do?
BOM (Byte Order Mark) characters are not normal visible letters. They are special bytes added at the very beginning of a file to indicate encoding.
UTF-8 BOM for CSV
- Character (Unicode): U+FEFF
- Bytes (hex): EF BB BF
- How it may look when visible (incorrectly displayed)
When the “Remove BOM in Migration” configuration is enabled, any CSV files used during migration are saved without the Byte Order Mark (BOM) in UTF-8 encoding.
Note: This Configuration supports in all migration.
Purpose:
- Ensures compatibility with systems that may not recognize or handle BOM in UTF-8 files correctly.
- Prevents potential issues such as extra characters appearing at the start of the file or errors during data import.
Effect:
- CSV files will be standard UTF-8 without the BOM, making them remove and uploaded.
Q 52. Configuration: “SO Integration Needed”
This configuration is required for third-party Sales Order (SO) integration.
For more details or assistance with the setup, please contact the Support Team via Live Chat or email at
retaileasycloud-support@gofrugal.com
Q 53. Configuration: “PI Integration Needed”
This configuration is required for third-party Sales Order (SO) integration.
Q 54. Configuration: “TO Integration Needed”
This configuration is required for third-party Sales Order (SO) integration.
Q 55. Configuration: “PR Integration Needed”
This configuration is required for third-party Sales Order (SO) integration.
For more details or assistance with the setup, please contact the Support Team via Live Chat or email at
retaileasycloud-support@gofrugal.com
Q 57. What does “Load Shipment Based on Location” do in TruePOS?
Purpose:
The “Load Shipment Based on Location” configuration controls which shipment options are available in the Purchase Invoice based on the branch location and supplier settings. It helps streamline shipment selection and prevents incorrect shipment assignment.
Steps to "Load Shipment Based on location"
To Create Shipment:
Navigate to Master → Branch → Shipment ->Add Shipment
Fill the neccessary information in Shipment screen
2.To Access the “Supplier Vs Shipment” and Enable the Shipment for the Supplier.
- Go to Master → Branch → Supplier Vs Shipment
- Select the Location and Supplier from the dropdown, then click Search
- The system will display all Shipment addresses created from the Shipment menu
- Enable the required Shipment address for the respective Supplier
3. Purchase Invoice screen
- After completing the mapping in the Supplier Vs Shipment screen,
- Go to the Purchase Invoice screen.
- When you select the respective Supplier and Branch, only the enabled shipment addresses will be available for selection.
Q 58. What does the “GST Calculation Based On” configuration do?
This configuration determines whether GST is calculated based on the Billing Address or the Shipping Address of the customer when creating an invoice.
Available options:
- Billing Address
- Shipping Address
Billing Address:
GST is calculated based on the customer’s billing address.
Example: If the customer’s billing address is in the same state as the shop, the invoice will apply SGST and CGST based on billing address.
Note: If the customer uses E-Invoice, the IRN will be generated for the address based on the configured billing or shipping address.
Shipping Address: GST is calculated based on the customer’s shipping address.
Example: If this option is selected, GST on the invoice will be applied according to the shipping address. The "Customer Shipping address" belongs to different state so which will apply the "IGST" taxes for the invoices
Q 60. Configuration: “SB Integration Needed”
This configuration is required for third-party Sales Order (SO) integration.
For more details or assistance with the setup, please contact the Support Team via Live Chat or email at
retaileasycloud-support@gofrugal.com
Q 63. Bill Discount Mode – Configuration
Purpose:The Bill Discount Mode setting controls how discounts are applied on a bill.
Note:These settings are applicable only to Sales Bill, Sales Order, Delivery Note, and Sales Quotation.
This configuration provides three selectable options:
- Percentage
- Amount
- Both
Configuration Options
1. If "Bill Discount Mode " set as "Percentage"
When this option is selected, You can only enter the value in Disc% and which Bill amount will be calculated based on Bill percentage given.
2. If "Bill Discount Mode " set as "Amount"
When this option is selected, You can only Enter the value in Disc Amount which Bill percentage will be calculated based on Bill amount given.
3. If "Bill Discount Mode " set as "Both"
When this option is selected, the system allows configuration of both Disc% and Disc Amount. Based on user convenient you can either you can give "Disc%" / "Disc Amount.
Q64. Configuration: Item Discount Mode
Purpose : The Item Discount Mode configuration controls how discounts can be applied at the item level in the POS system.

Note:These settings are applicable only to Sales Bill, Sales Order, Delivery Note, and Sales Quotation.
Available Options
The configuration provides three discount options:
Both
Allows applying discounts using either percentage (%) or amount.
When this option is configured, the user can choose between:
Item Percentage Discount, or
Item Amount Discount
Percentage
Allows you to update the discounts only in Disc%(e.g., 10% off).
Amount
Allows you to update the discount only in Disc Amount (e.g., 50 currency)
Q65 - The configuration “Mandate customer selection for RRN” works as follows:
When this configuration is enabled, while performing a Sales Return with the tender type “RRN – Return Redemption Note”, selecting a customer becomes mandatory in order to proceed with the transaction.
Note: This configuration is applicable only in GoBill.

If the configuration “Mandate customer selection for RRN” is disabled, the behavior will be as follows:
While performing a Sales Return with the tender type “RRN – Return Redemption Note”, customer selection will not be mandatory.
The transaction can be completed without selecting a customer.
The system will allow the Sales Return to proceed normally even if no customer is mapped.
Q 66. The Configuration: “Show RRN balance - Gobill” Option does?
Purpose: The Show RRN Balance configuration controls whether the customer’s RRN balance is displayed in the GoBill application.
- When this configuration is enabled, GoBill automatically displays the available RRN balance for the selected customer on the Sales Bill screen.
- The RRN balance will appear immediately when the customer is loaded, helping the user quickly view and validate the balance during billing.
- This configuration is applicable only in GoBill .
Q67. The Configuration "Post TCS Amt as JO" Does?
Purpose : The Post TCS Amount as Journal Voucher configuration enables the system to automatically post the Tax Collected at Source (TCS) amount as a separate Journal Voucher in the accounts module. When this configuration is enabled and a purchase entry is made in TruePOS that includes a TCS amount, the TCS value is posted independently as a Journal Voucher, without affecting the main purchase accounting entry.
1.The Purchase Invoice is created by adding the applicable TCS amount to the invoice.

2.Verification – TCS as Journal Voucher in Accounts
Verify that the TCS amount is posted as a Journal Voucher in the Accounts module.
Navigate to Reports → General Ledger Report.
Select the required Location, Ledger, and Date Range.
Review the report to confirm that the TCS amount is reflected correctly as a separate Journal Voucher.

When Configuration "Post TCS Amt as JO" Is Disabled:
If the Post TCS Amount as Journal Voucher configuration is disabled, the system will not create a separate Journal Voucher for the TCS amount. In this case, when a purchase entry with TCS is made in TruePOS, the TCS amount will be accounted for within the main purchase entry itself, and no independent Journal Voucher posting will occur in the accounts module.

Verification – TCS Not Posted as Separate Journal Voucher
Verify that the TCS amount is not posted as a separate Journal Voucher in the Accounts module.
Navigate to Reports → General Ledger Report.
Select the required Location, Ledger, and Date Range.
Review the report to confirm that the TCS amount is included within the main purchase entry and that no separate Journal Voucher is created for the TCS amount.

Q 68. What does the “Show DMS Edition” configuration do?
When the “Show DMS Edition” configuration is enabled, the system will enabled for the DMS edition/version of the DMS (Dealer Management System) being used. This Configuration was customer specific ,which will not applicable for all customer.
If It was "DMS" Domain which will have the "Physical stock update" Menu instead of "Stock update Entry" and "Outlet Price Master" Menu can be accessed only for the DMS Edition.
Q 70. What does the “Allow Less Than Selling” configuration do?
Purpose:
This configuration controls whether users are permitted to sell items below the predefined selling price. It is typically used to manage discounts, price negotiations, or special cases like damaged stock or clearance sales.
When Enabled the "Allow Less Than Selling" Configuration" Users can sell products at a price lower than the set selling price during billing.
Note: This Settings is applicable only on Sales Order , Sales Bill & Delivery Note only.
When Disabled "Allow Less Than Selling" Configuration , The system restricts billing below the selling price, ensuring price control.

Q 72.What does the “Generate Transaction Unique Number” configuration do?
This configuration enables the generation of a unique transaction number. The number is generated based on the transaction prefix defined by the user. For a detailed explanation, please refer to the attached help document: Transaction Prefix
Note: For IRN E-Invoice users, the Transaction Unique Number can be configured to generate a unique invoice number.
You can configure a unique transaction number for the following transaction types:
- Sales
- Sales Return
- Purchase
- Purchase Return
- Transfer Out
- Transfer In
- Sales Order
- Purchase Order
- Wastage
- Quotation
Q 73. The Configuration"Sales/Reprint Screen Invoice to be" will do
This configuration is applicable only to customers who use the “WhatsApp SMS Invoice” feature.
It determines how the invoice should be delivered when performing a Sales or Reprint operation in the POS.
The configuration provides the following choices:
- Print
- Print and SMS
- SMS
Based on Configuration :
1. If "Sales/Reprint Screen Invoice to be " configured as “Print”
- Only a printed invoice will be generated.
- No SMS/WhatsApp message will be sent.
2. If "Sales/Reprint Screen Invoice to be " configured as “Print & SMS”
- When creating a new invoice or reprinting an existing one:
- The system will print the invoice, and
- Simultaneously send the invoice via SMS/WhatsApp.
3. If "Sales/Reprint Screen Invoice to be " configured as “SMS”
- The system will only send the invoice via SMS/WhatsApp.
- No printed copy will be generated.
Q 61. The Configuration "PO Integration Needed "
This configuration is required for third-party Purchase Order (SO) integration.
For more details or assistance with the setup, kindly contact the Support Team via Live Chat or email at
truepos-support@gofrugal.com.
Q 78. What does the “Show Zero Rates Details of Registered Customer in GSTR B2B” configuration do?
When the “Show Zero Rates Details of Registered Customer in GSTR B2B” configuration is enabled, the system will include zero-rated transactions for registered customers in the GSTR B2B report.
- Zero-rated sales (where the tax rate is 0%) will be shown in the GSTR B2B report for registered business customers.
- This helps ensure compliance with tax reporting requirements by accurately reflecting all transactions, including those with no tax.
- To capture and display zero-rated sales for registered customers in the GST .
Navigation Path: Outward B2B in GSTR-1
Path: Login to TruePOS → Tools → GST E-Filing → Dashboard → GSTR-1 → Outward B2B
This path is used to view, verify, and manage B2B outward supply details for GSTR-1 filing.
When the “Show Zero Rates Details of Registered Customer in GSTR B2B” configuration is enabled, the system will include zero-rated transactions for registered customers in the GSTR B2B report.
When the “Show Zero Rates Details of Registered Customer in GSTR B2B” configuration is disabled, the system will not include zero-rated transactions for registered customers in the GSTR B2B report.
Q 79. What does the “Set GoBill as Default for Sales Operation” option do?
Purpose:The “Set GoBill as Default for Sales Operation” option ensures that Sales order , Sales Bill & Sales Return transactions are performed only through GoBill.
*When this option is enabled, users cannot access the Sales screen in TruePOS and must use GoBill for all billing activities.Refer the Screenshot.
* If this configuration "Set GoBill as Default for Sales Operation" is disabled
Purpose: Users will be able to use both GoBill and the TruePOS Sales screen. This means sales billing can be carried out from either platform without restriction.
Q 80. What does the “Schedule Sales Posting” configuration do?
If Enabled "Schedule Sales Posting" All sales transactions are posted to the Accounts module at the scheduled (end-of-day) time instead of immediately.
Real-time scenario: If transaction volume is high during business hours, sales posting can be scheduled for day end to ensure smoother system performance.
Disabled: Sales transactions are posted to the Accounts module immediately at the time they are created.
Real-time scenario: Each sales invoice is posted to accounts in real time without waiting for a scheduled run.
Q81. Schedule TFA Sync
Purpose:
The Schedule TFA Sync configuration controls the automatic synchronization of TFA (Tax Filing / Financial Authority) data between TruePOS and the TFA system at scheduled intervals. It ensures that tax-related data remains updated and consistent without manual intervention.
When “Schedule TFA Sync” is Enabled
The system automatically syncs TFA data at predefined time intervals.
Real-Time Scenario:
A supermarket generates invoices throughout the day. With Schedule TFA Sync enabled, the system automatically syncs all invoice and tax data to TFA at scheduled times (for example, every night). The accounts logs in the next day and finds all data already updated and ready for review or filing.
When “Schedule TFA Sync” is Disabled
Schedule syncing does not occur.
In TFA , We can manually click on "Sync" to Sync the data.
Real-Time Scenario:
If the configuration is disabled, the user can run the TFA sync with upto date.
Q 82. What is the configuration “Post sales data to SAP based on session details” and why is it used?
Purpose: This configuration is designed to post sales data to SAP at the session level instead of individual bill level. It is not applicable to all customers and is enabled only for customer-specific requirements. Currently, this configuration is used by the UPL Africa customer.
Real-Time Scenario:
In a real-time business scenario, the customer performs container-based sales while travelling (for example, selling goods in rural or remote areas).
- The sales representative starts a session before beginning the journey.
- During travel, especially in rural locations where internet connectivity is not available, invoices are created and stored offline.
- All sales transactions made during this period are mapped to the same open session.
- Once the sales are completed and the representative reaches a location with internet access, they close the session.
- At the time of session closure, the system validates all session-based sales records.
- After successful validation, the entire session’s consolidated sales data is posted to SAP in a single session-level entry.


