Packing
Creating a Base Unit
- Go to Master > Packing
- Press F3 to create a new Pack
- Select type as 'Base Unit'
- Set the name of the Pack
- Type the no. of units
- Press F6 to save the pack
Creating a Derived Unit
- Press F3 to create a new pack
- Set the type as Derived Unit
- Set the name of the Pack
- For Base unit, select the pack that is the base unit of this pack
- Type the number of base units
- Press F6 to save the pack
Note: A derived unit can be made from another derived unit. Also, a single base unit can have multiple derived units
Enabling Packing Configuration in Product Master
- Go to Tools > Options > Options
- Type 'Unit Pack' in the search box and press ENTER
- Enable the Unit Pack option by hitting the SPACEBAR
- Save and Exit
Configuring Packing for a Product in Product Master
- Go to Master > Product
- Type the product name for which you want to configure packing
- Press F4 to Modify
- Go to Pack & Tax tab
- Here you can set the Sales Packing, Purchase Packing, Report Packing and Final Packing of the product
- Press F6 to save
Packing in Purchase Entry
While making a purchase entry, select a product. The Packing column is automatically populated.
Packing in Sales Bill
While making a sales bill, on selecting a product, the Packing column is automatically populated with the configuration set in the product master for that product. You can also change the packing as per your wish.
Packing in Reports
The QTY of products in all reports will be in terms of the packing unit that you have set in the product master for the respective products.
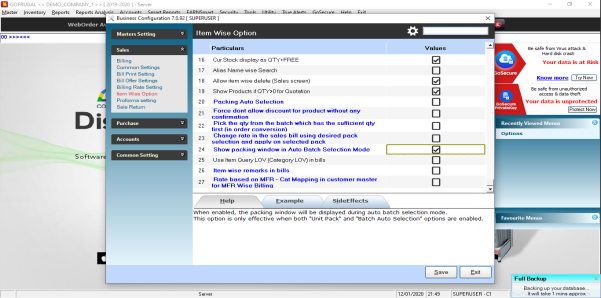
Show Packing Window In Auto Batch Selection Mode
Purpose: This option is effective when auto batch option and unit pack is enabled, The purpose of enabling this option is the different pack name should be show in billing screen. If customer is using auto batch selection when unit pack is enabled, the pack name will not be shown it will directly take from the product master in that case it will be difficult to handle and if it is enabled,the different pack names will be show in billing screen.
Step 1: Tools->Options->Options

Step: 2 In Sales under item wise option enable the option called show packing window in Auto Batch Selection Mode (Option number 24)

Related Articles
Product Master
Steps Go to Master > Product On the left hand side you have a list of all the products in your database. You can sort them based on the filters such as Product Name Wise, Product Code Wise, etc. You can also apply a manufacture filter. On the right ...Tax Master
Here explaining how to create new tax master. 1. Go to Masters-->Tax. 2. Click New button or Press F3 button to create New Tax. 3. Choose Vatsales or CST sales Vatsales-->For creating local tax CSTSales-->For creation interstate tax 4. Type the print ...How to do year end process in ManageEasy [DE]?
Year Begin Process in ManageEasy Purpose : The Gofrugal ManageEasy Year Begin process helps businesses seamlessly close the previous financial year and start a new one by carrying forward the current stock and outstanding balances and resetting ...Advance Search in Masters
Purpose and Benefits of Advance Search in Masters: The purpose of advance search is that, search can be done at any kind which will load the details based on the search. It is not necessarily that the first letter has to be searched. The benefits of ...Product Category
Product Category Master Go to Master > Product Category To create a new Category, Press F3 Type the name of the Product Group (mandatory) Set the other parameters according to your business needs Press F6 to save the category For modifying a ...