General Business Configuration
Purpose:- The configurations present in the General tab allows to enable or disable functionalities that are common to most of the screens of TruePOS and not specific to any particular module.
Steps to access General Business Configurations:-
1. Navigate to Tools -> Configuration -> Business Configuration
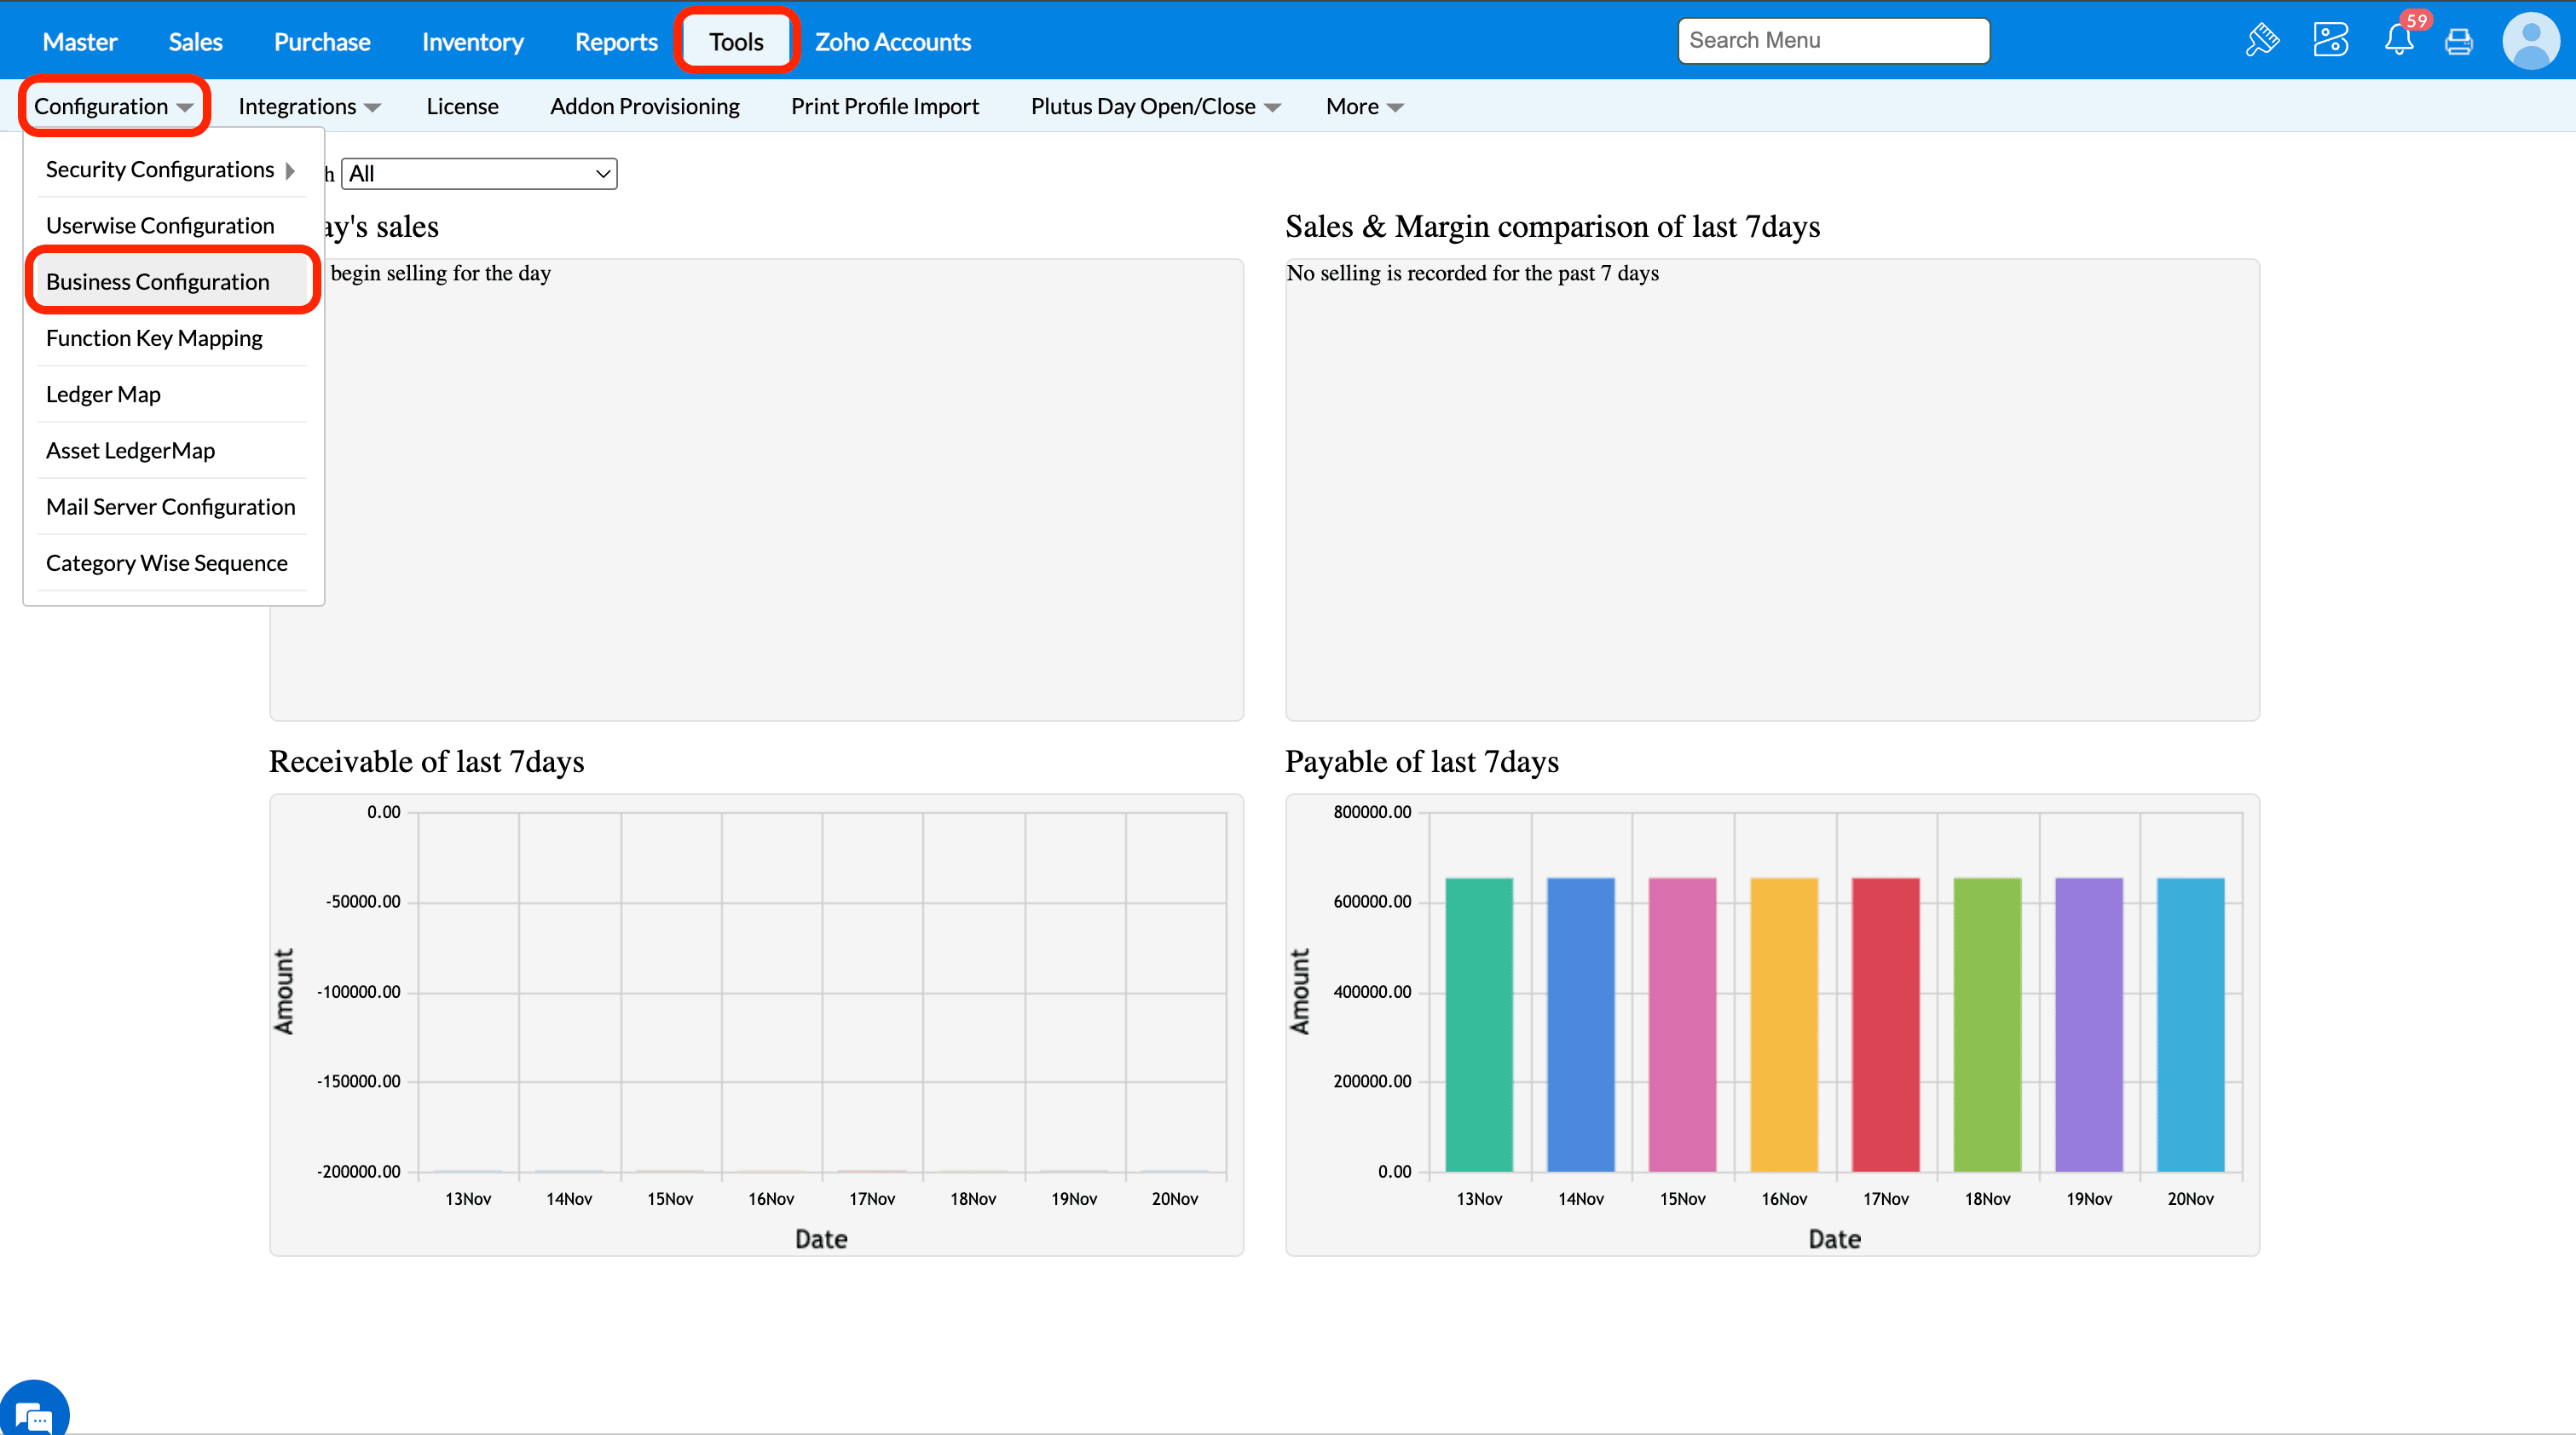
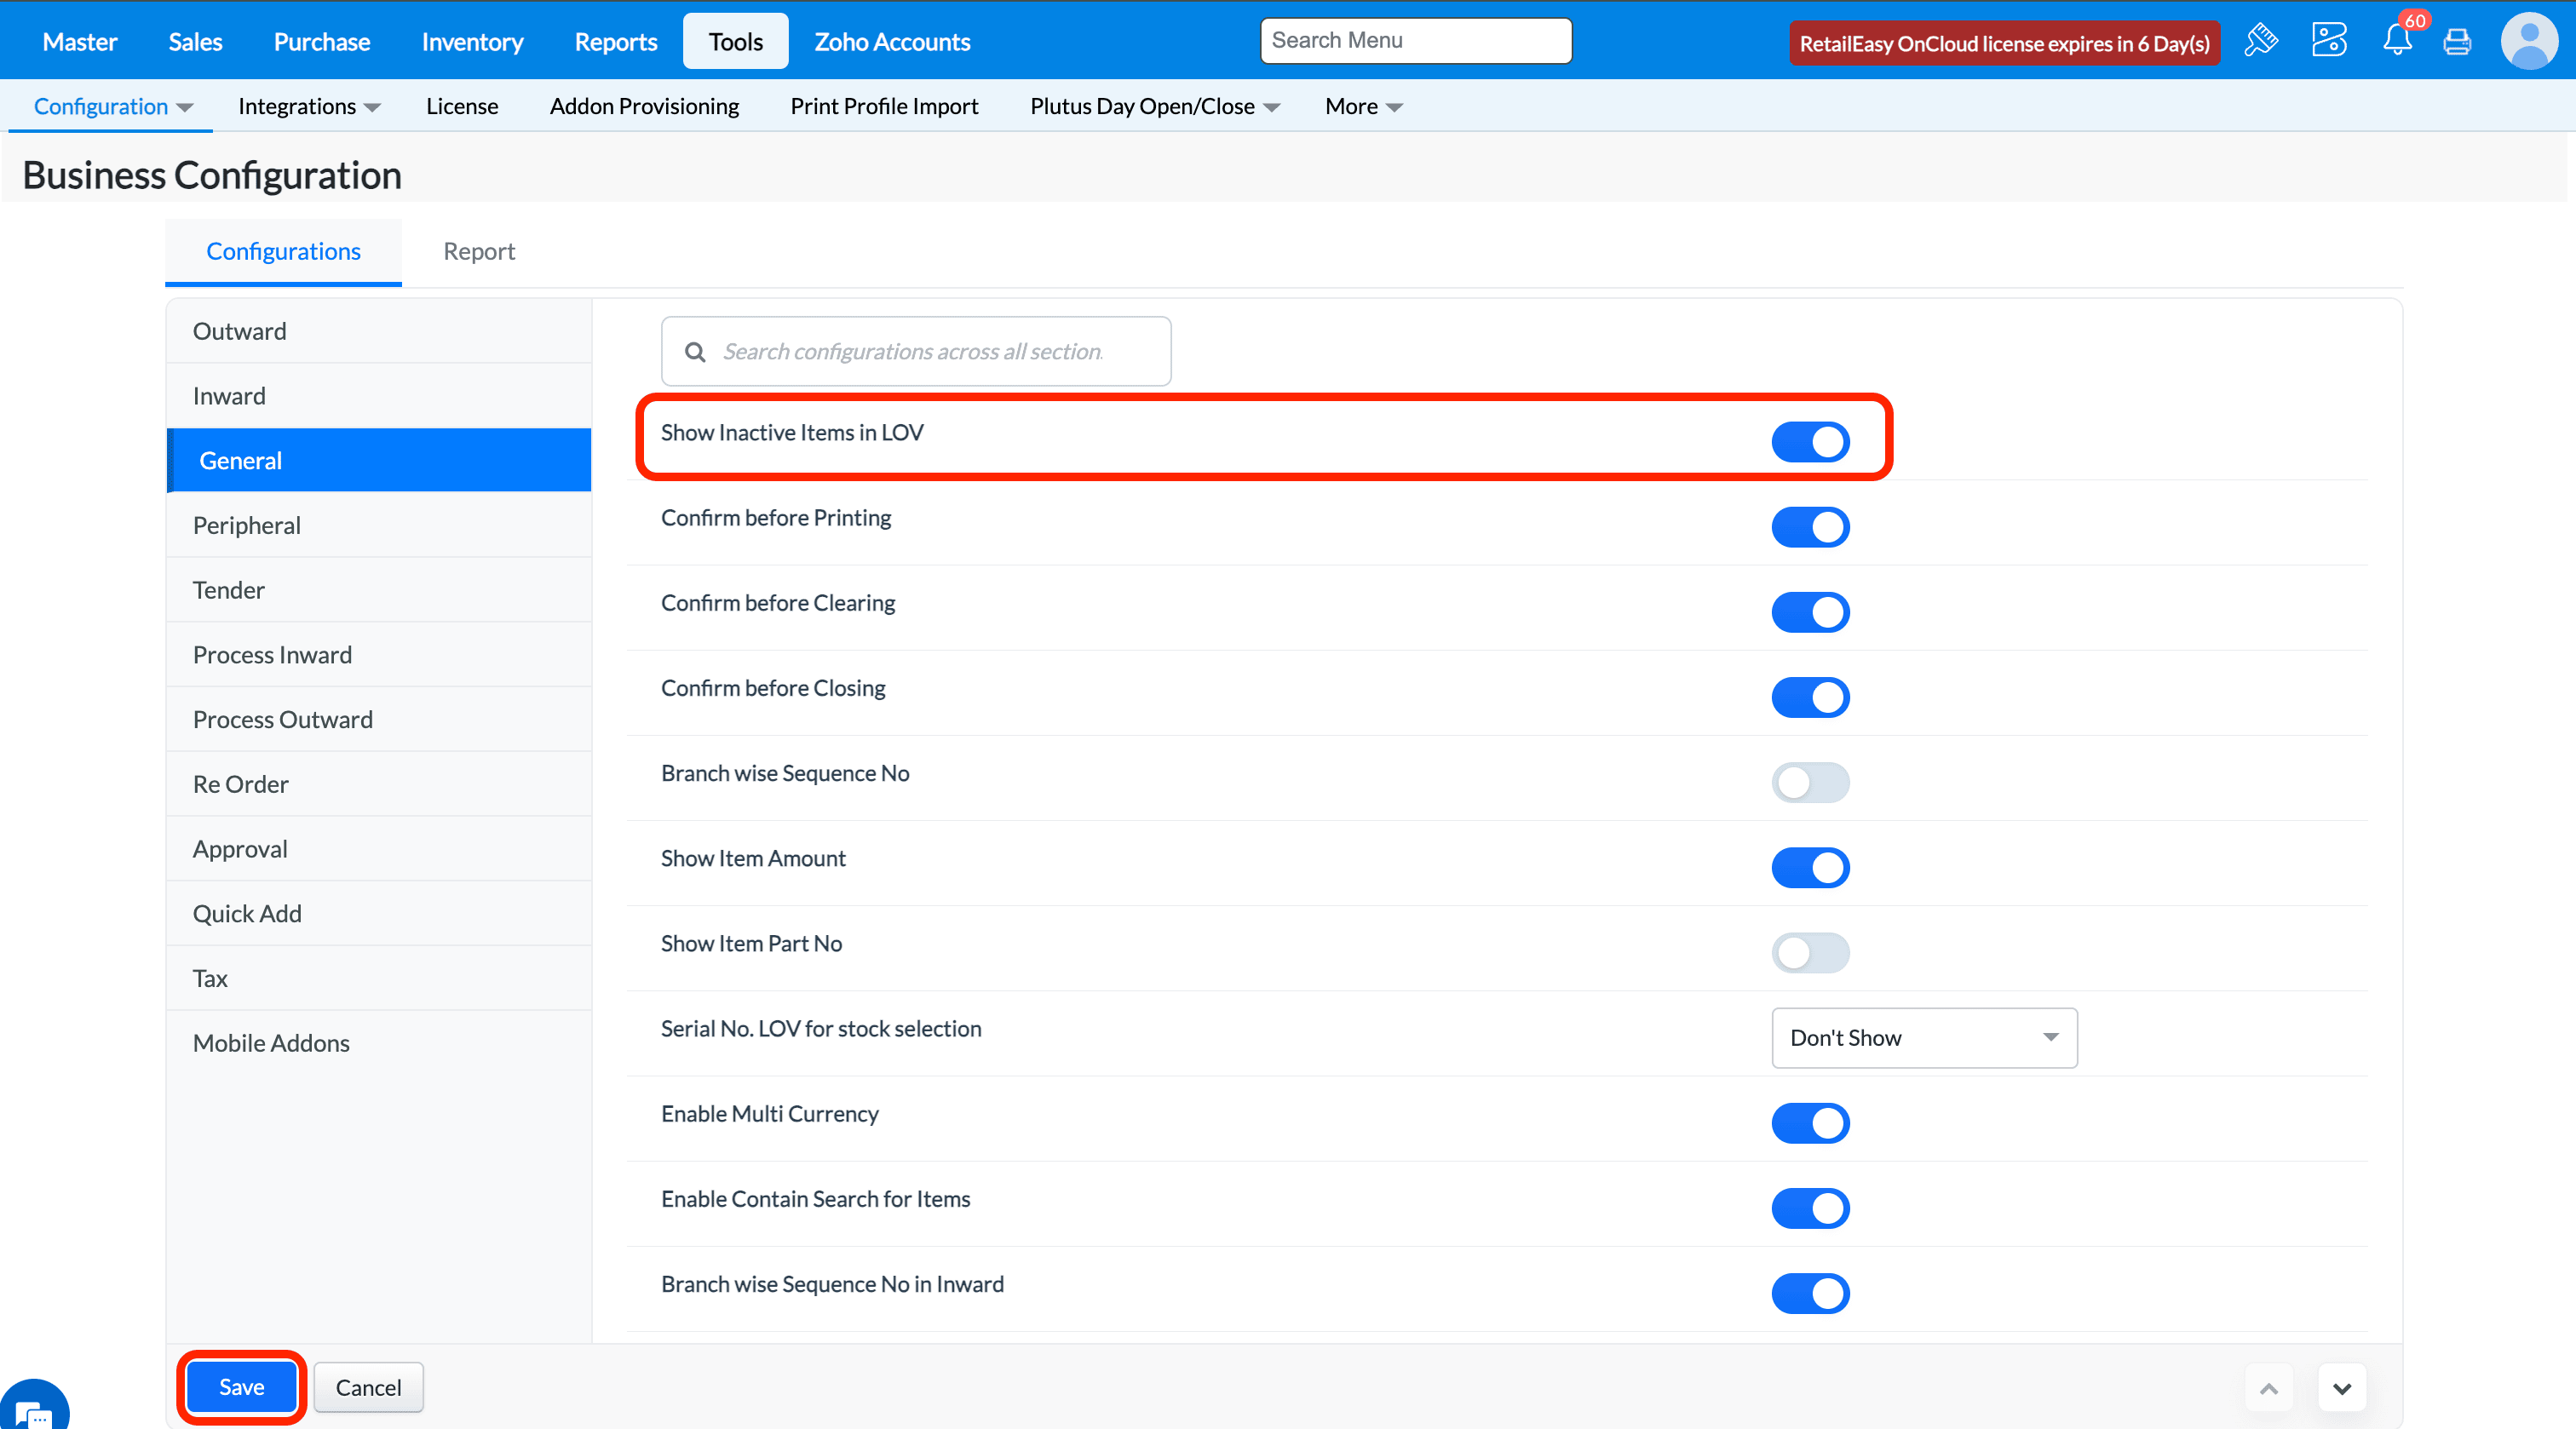
2. Under the Configurations tab, click on the General tab and all the configurations under this tab will be listed.
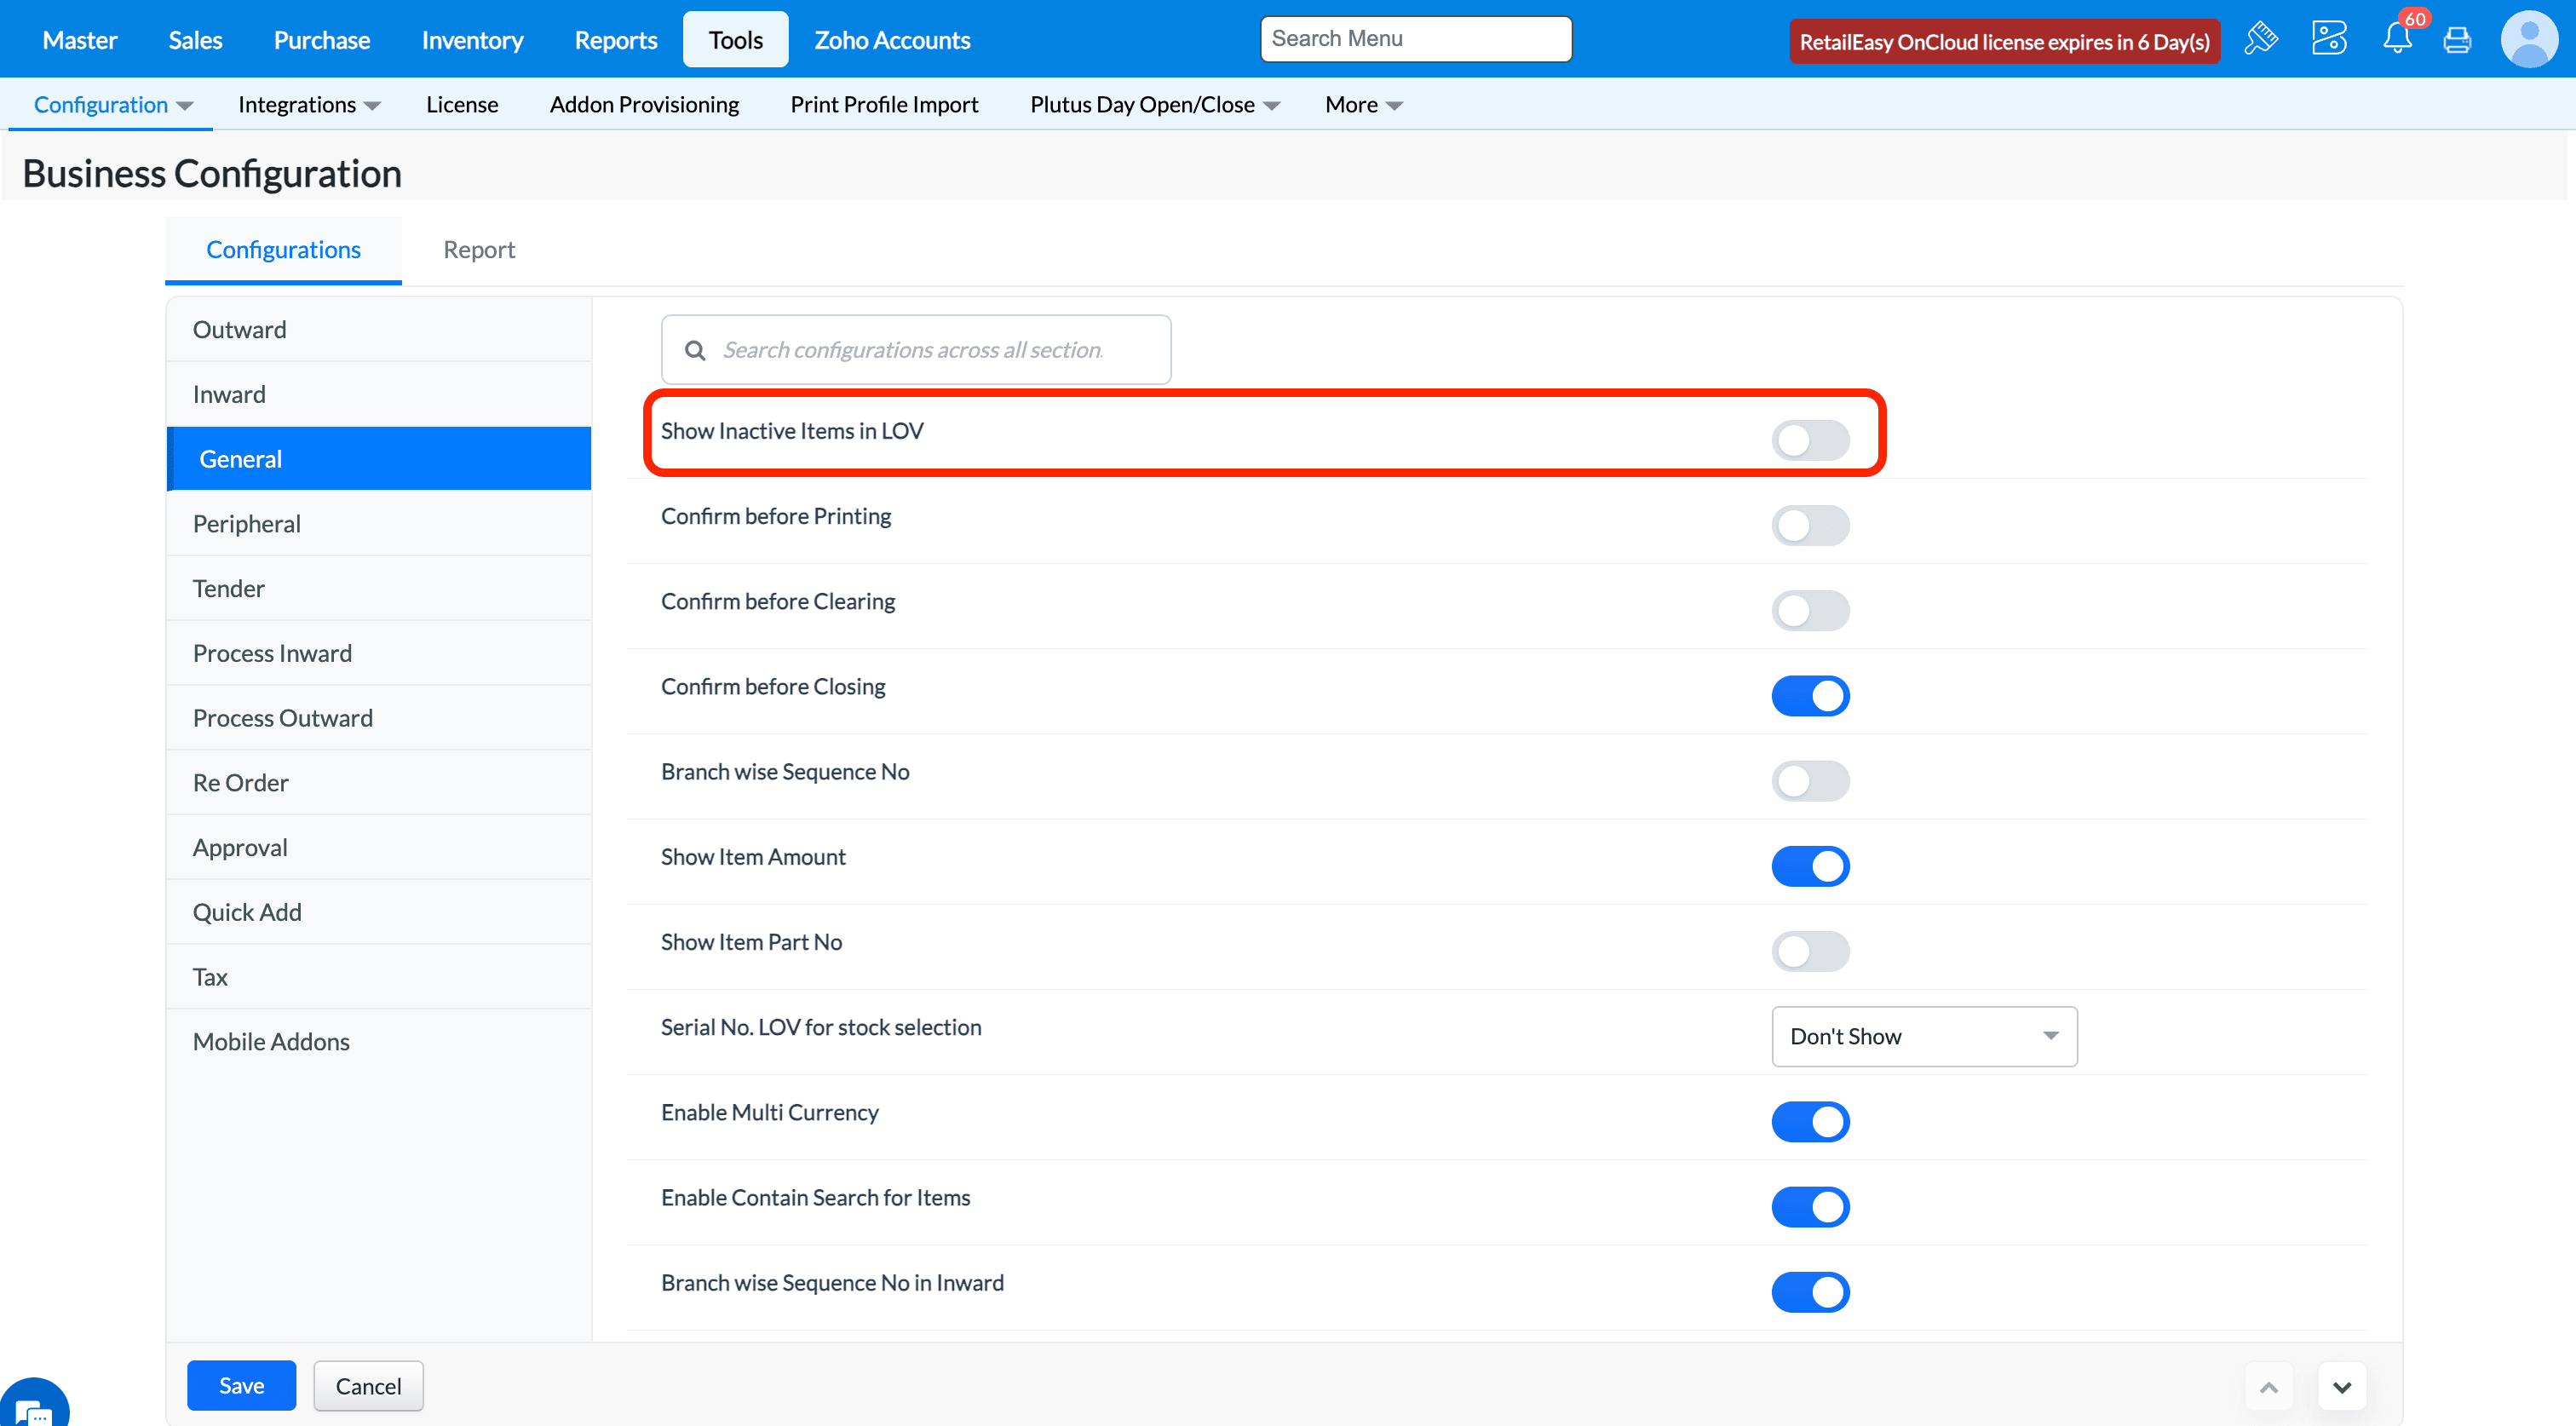
Q1.What does the "Show inactive Items in LOV"?
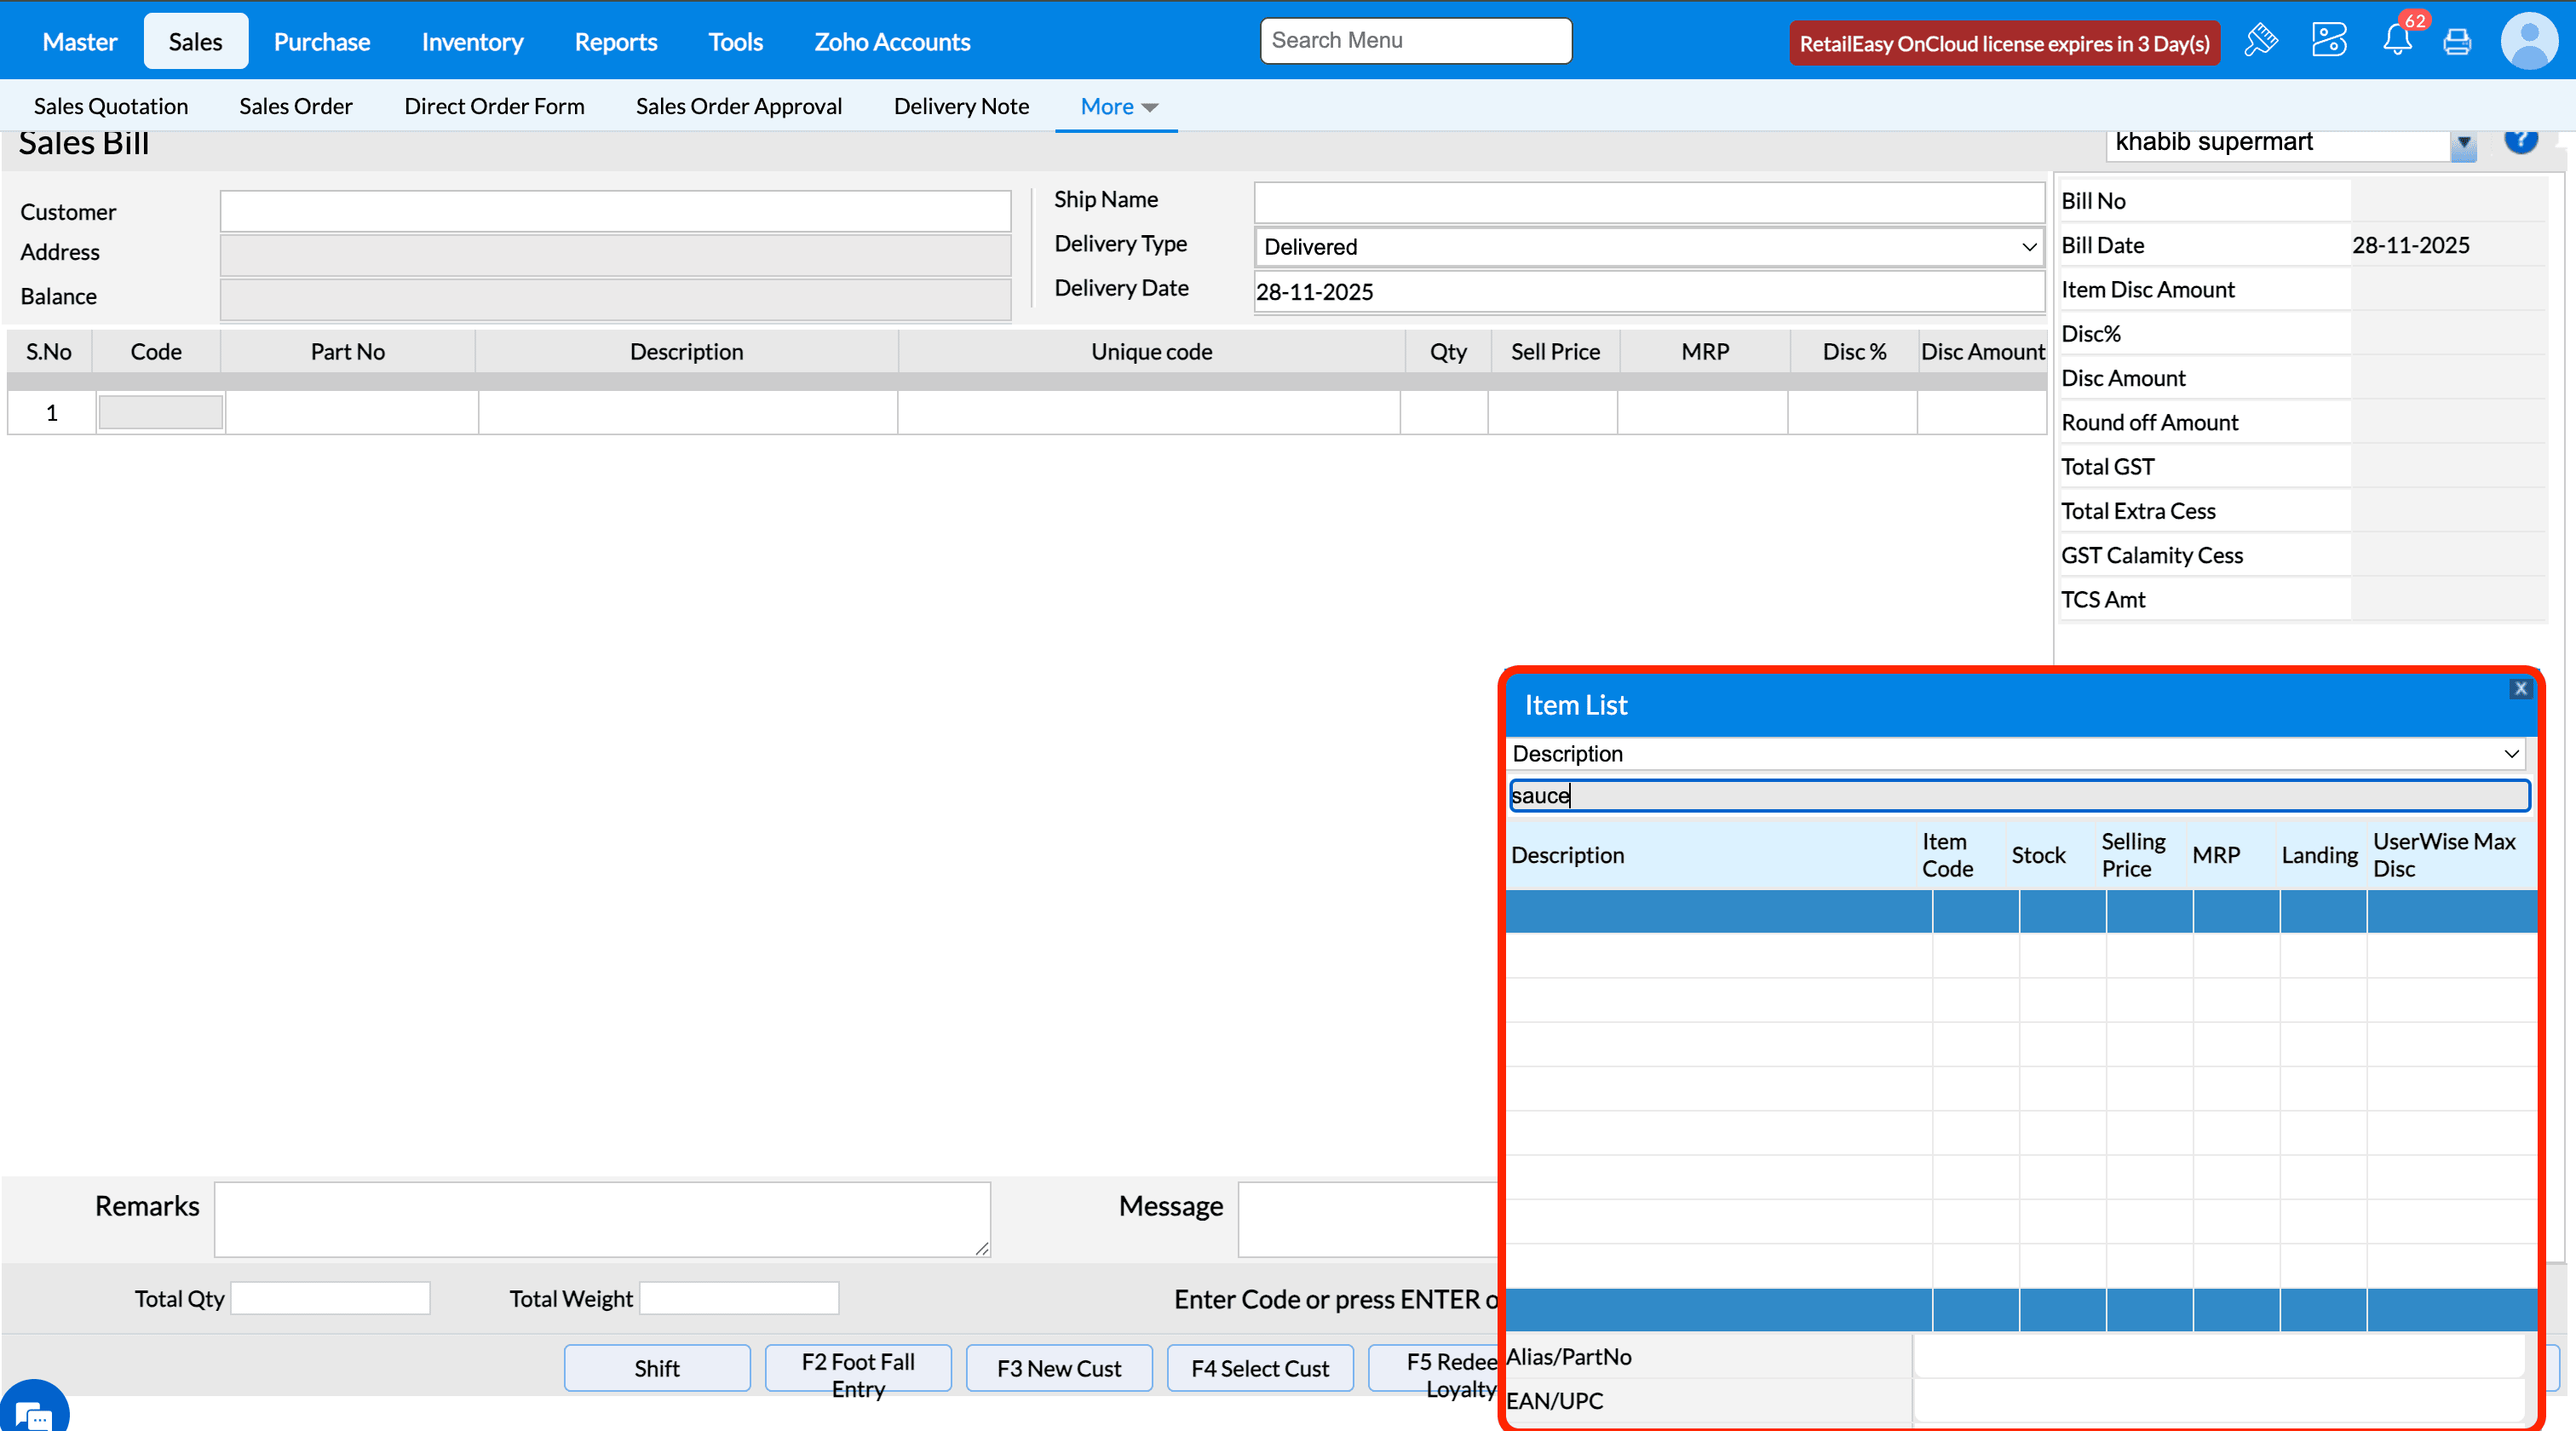
A1. Selecting this checkbox will cause to list out all the inactive items as well in item lov of transactions screens along with active items.
In Item Master screen, look for an inactive item and in any transaction screen, select ENTER key and open the item list lov and search for that inactive item.
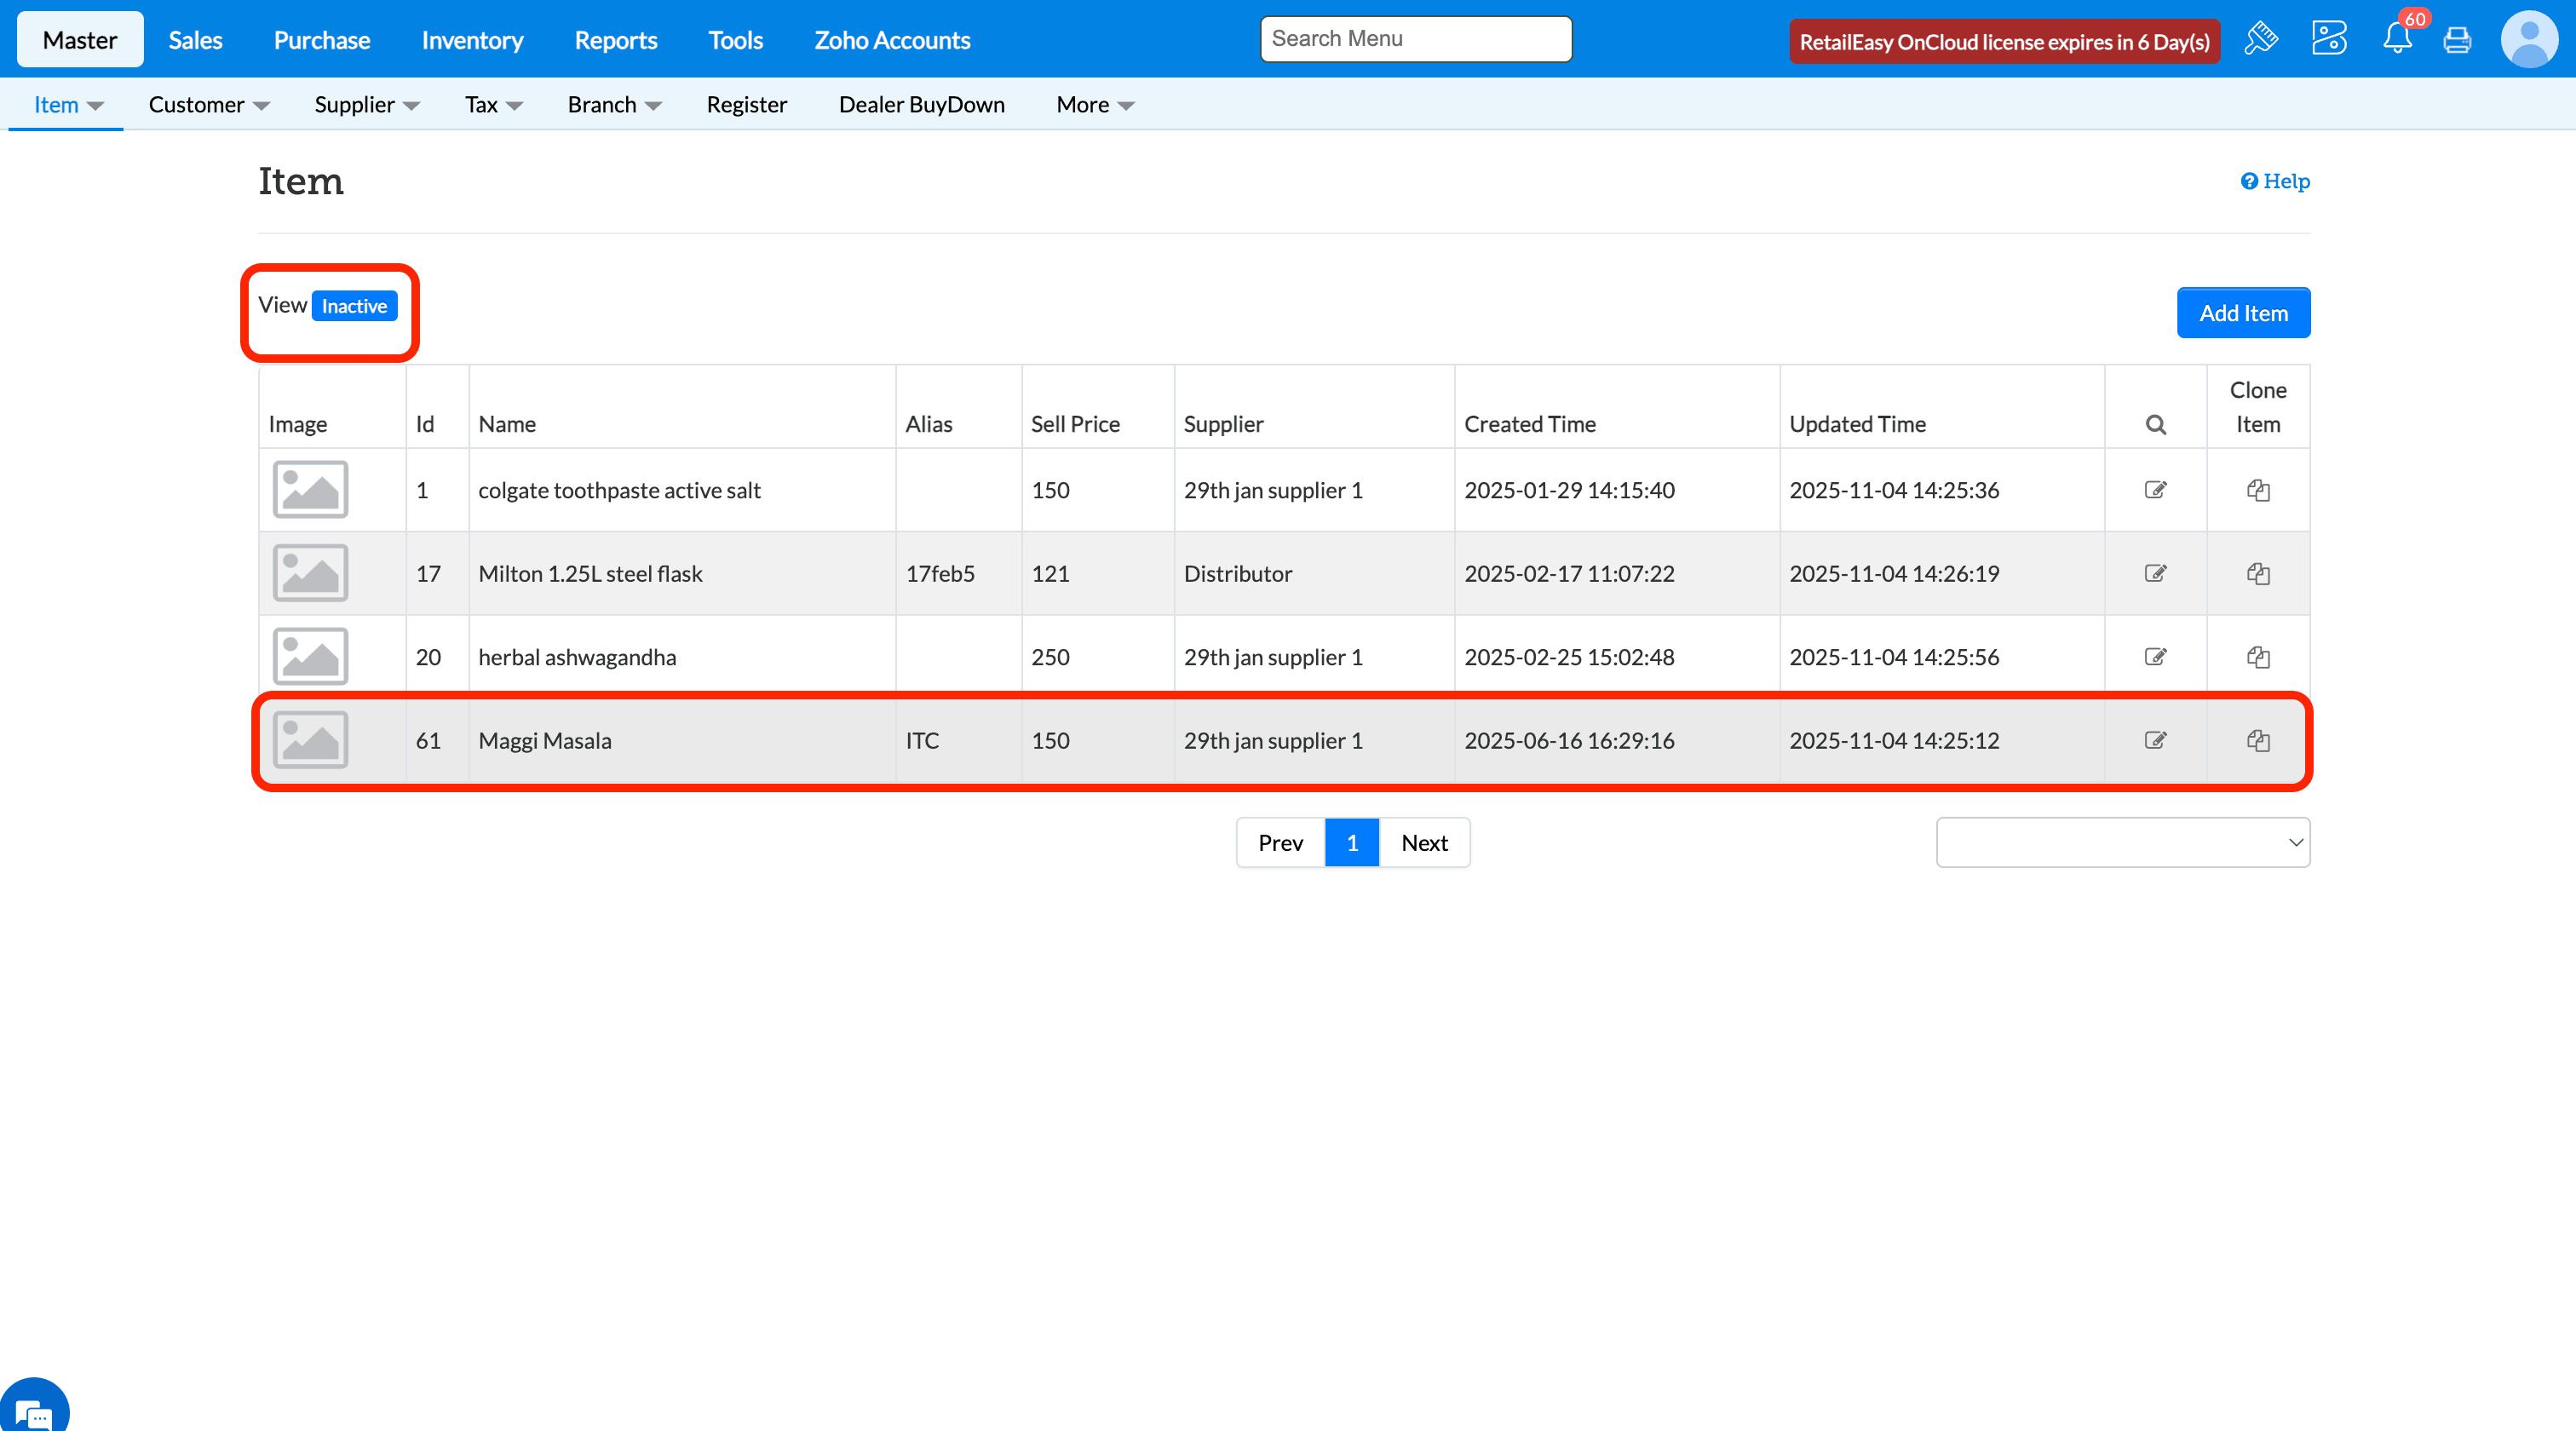
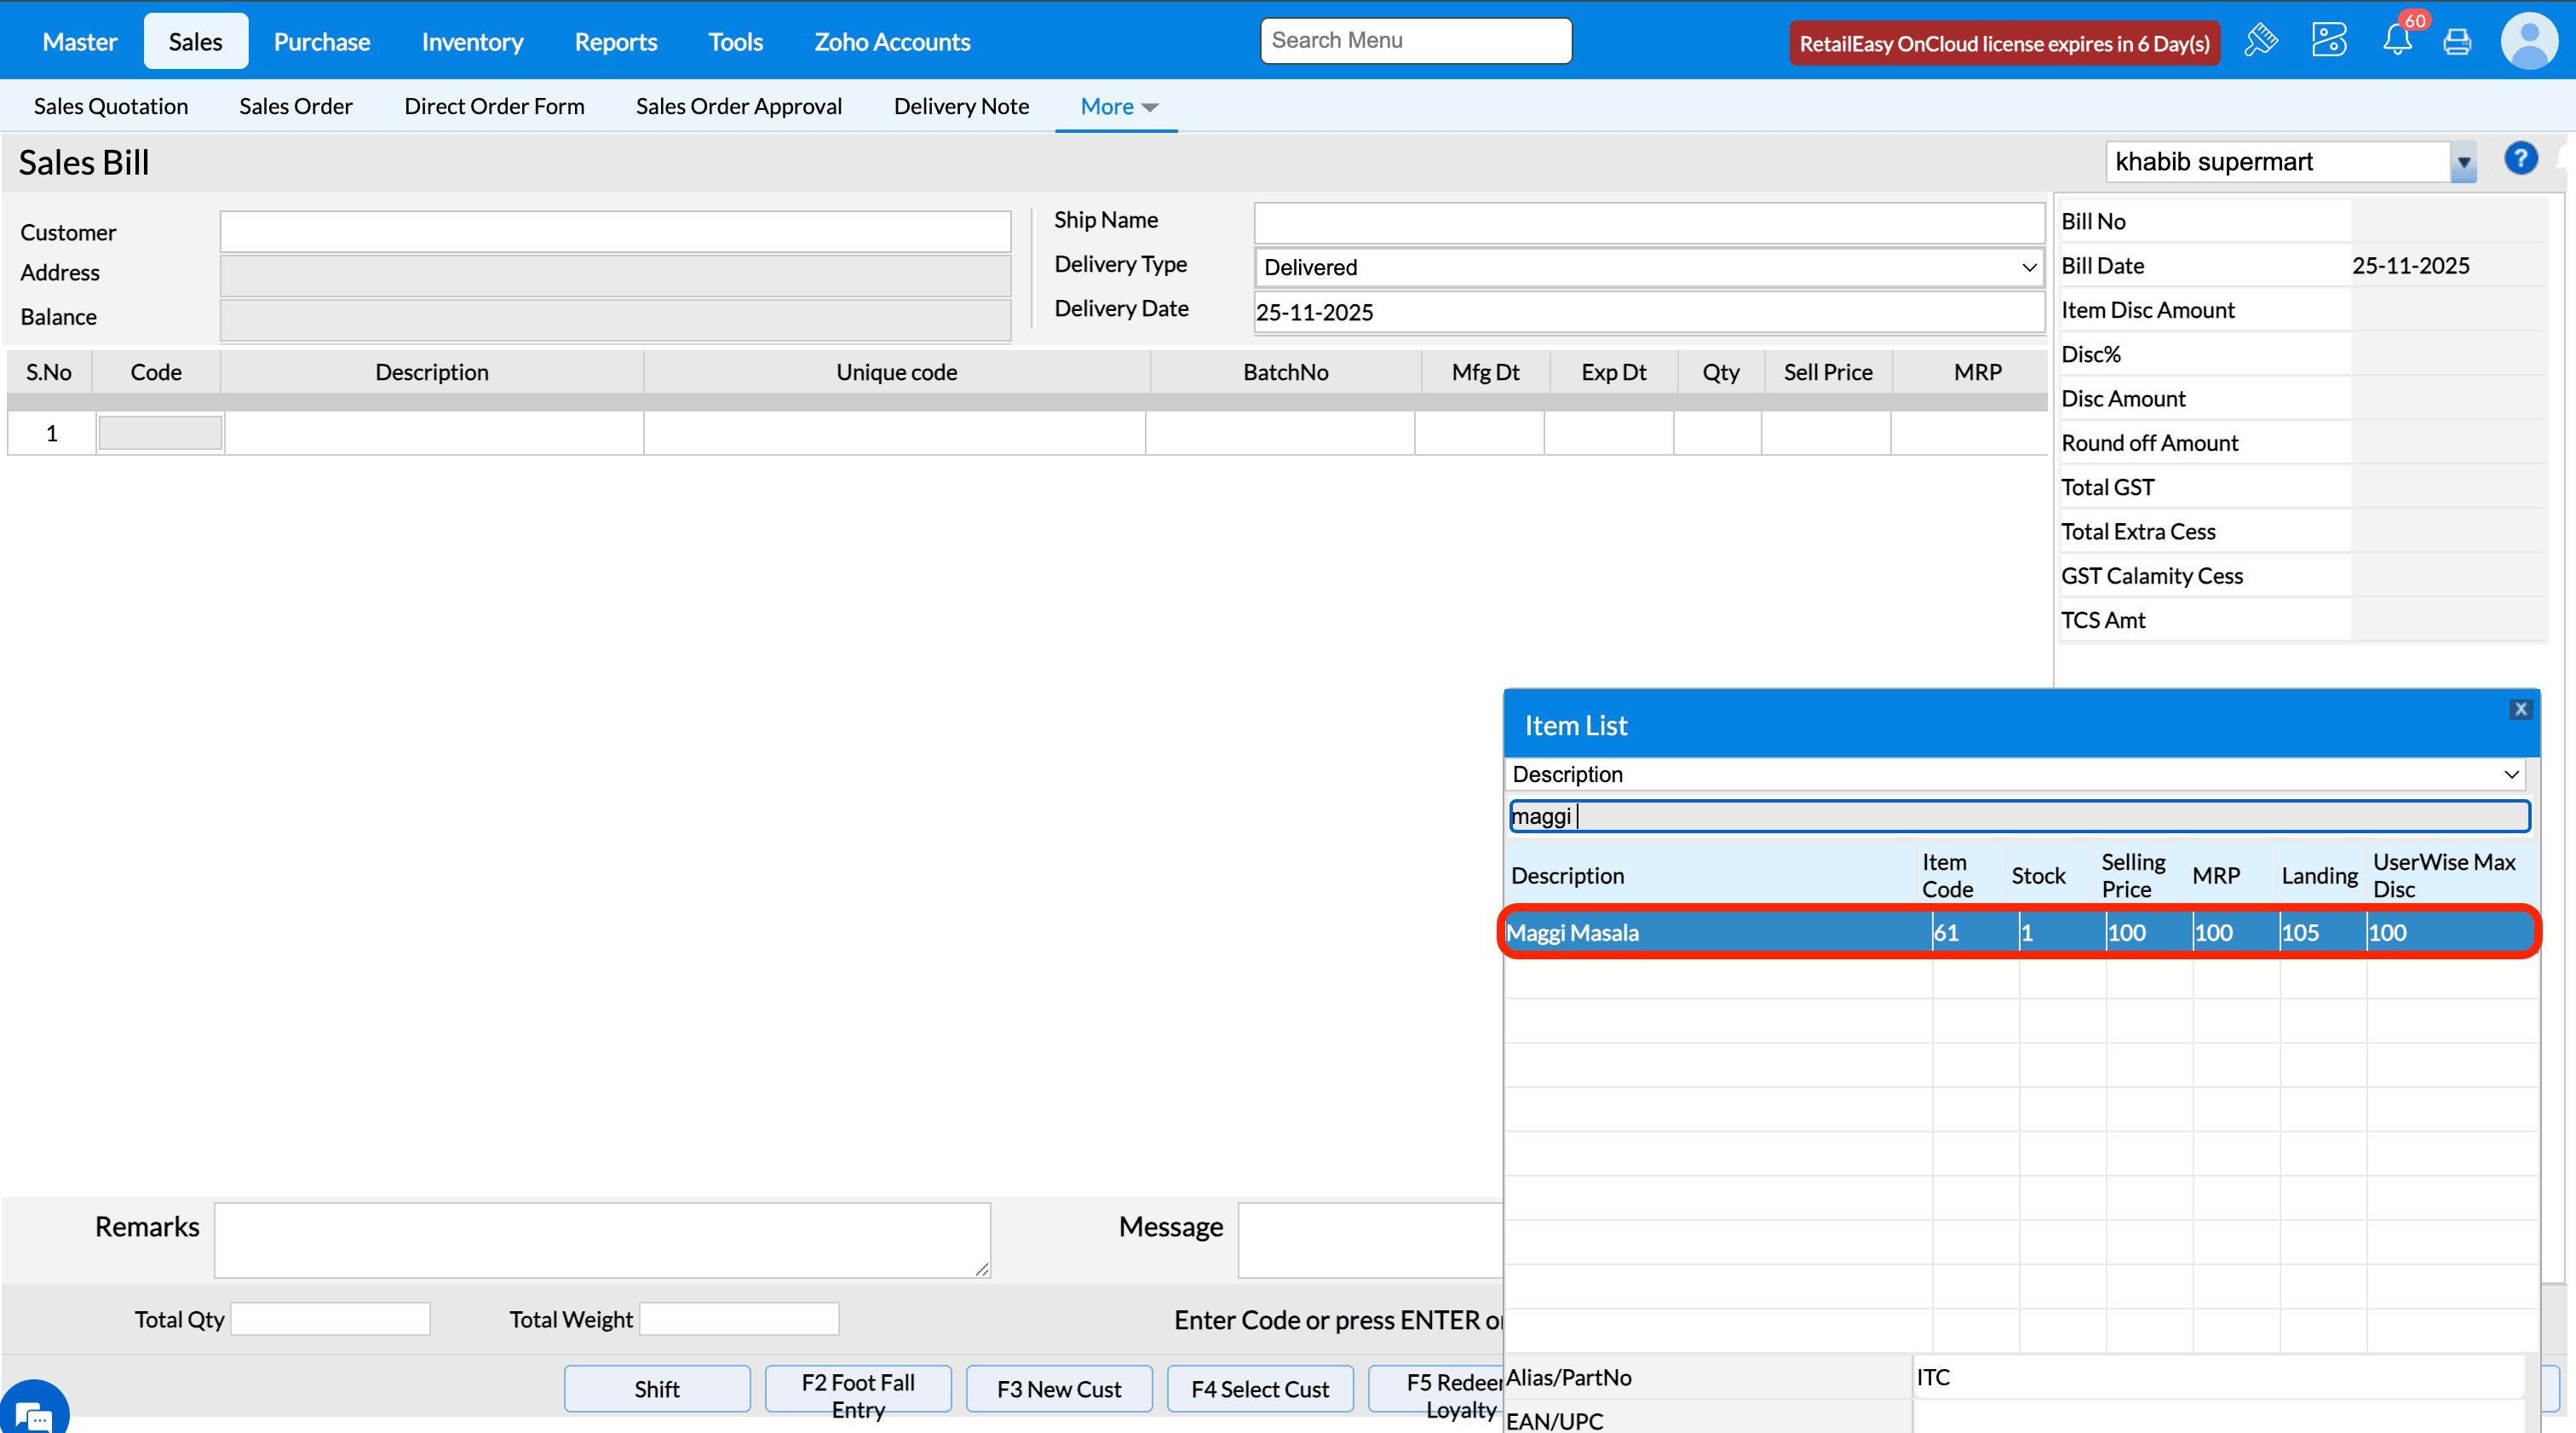
If the configuration is disabled and inactive items is searched it won't list in the lov.
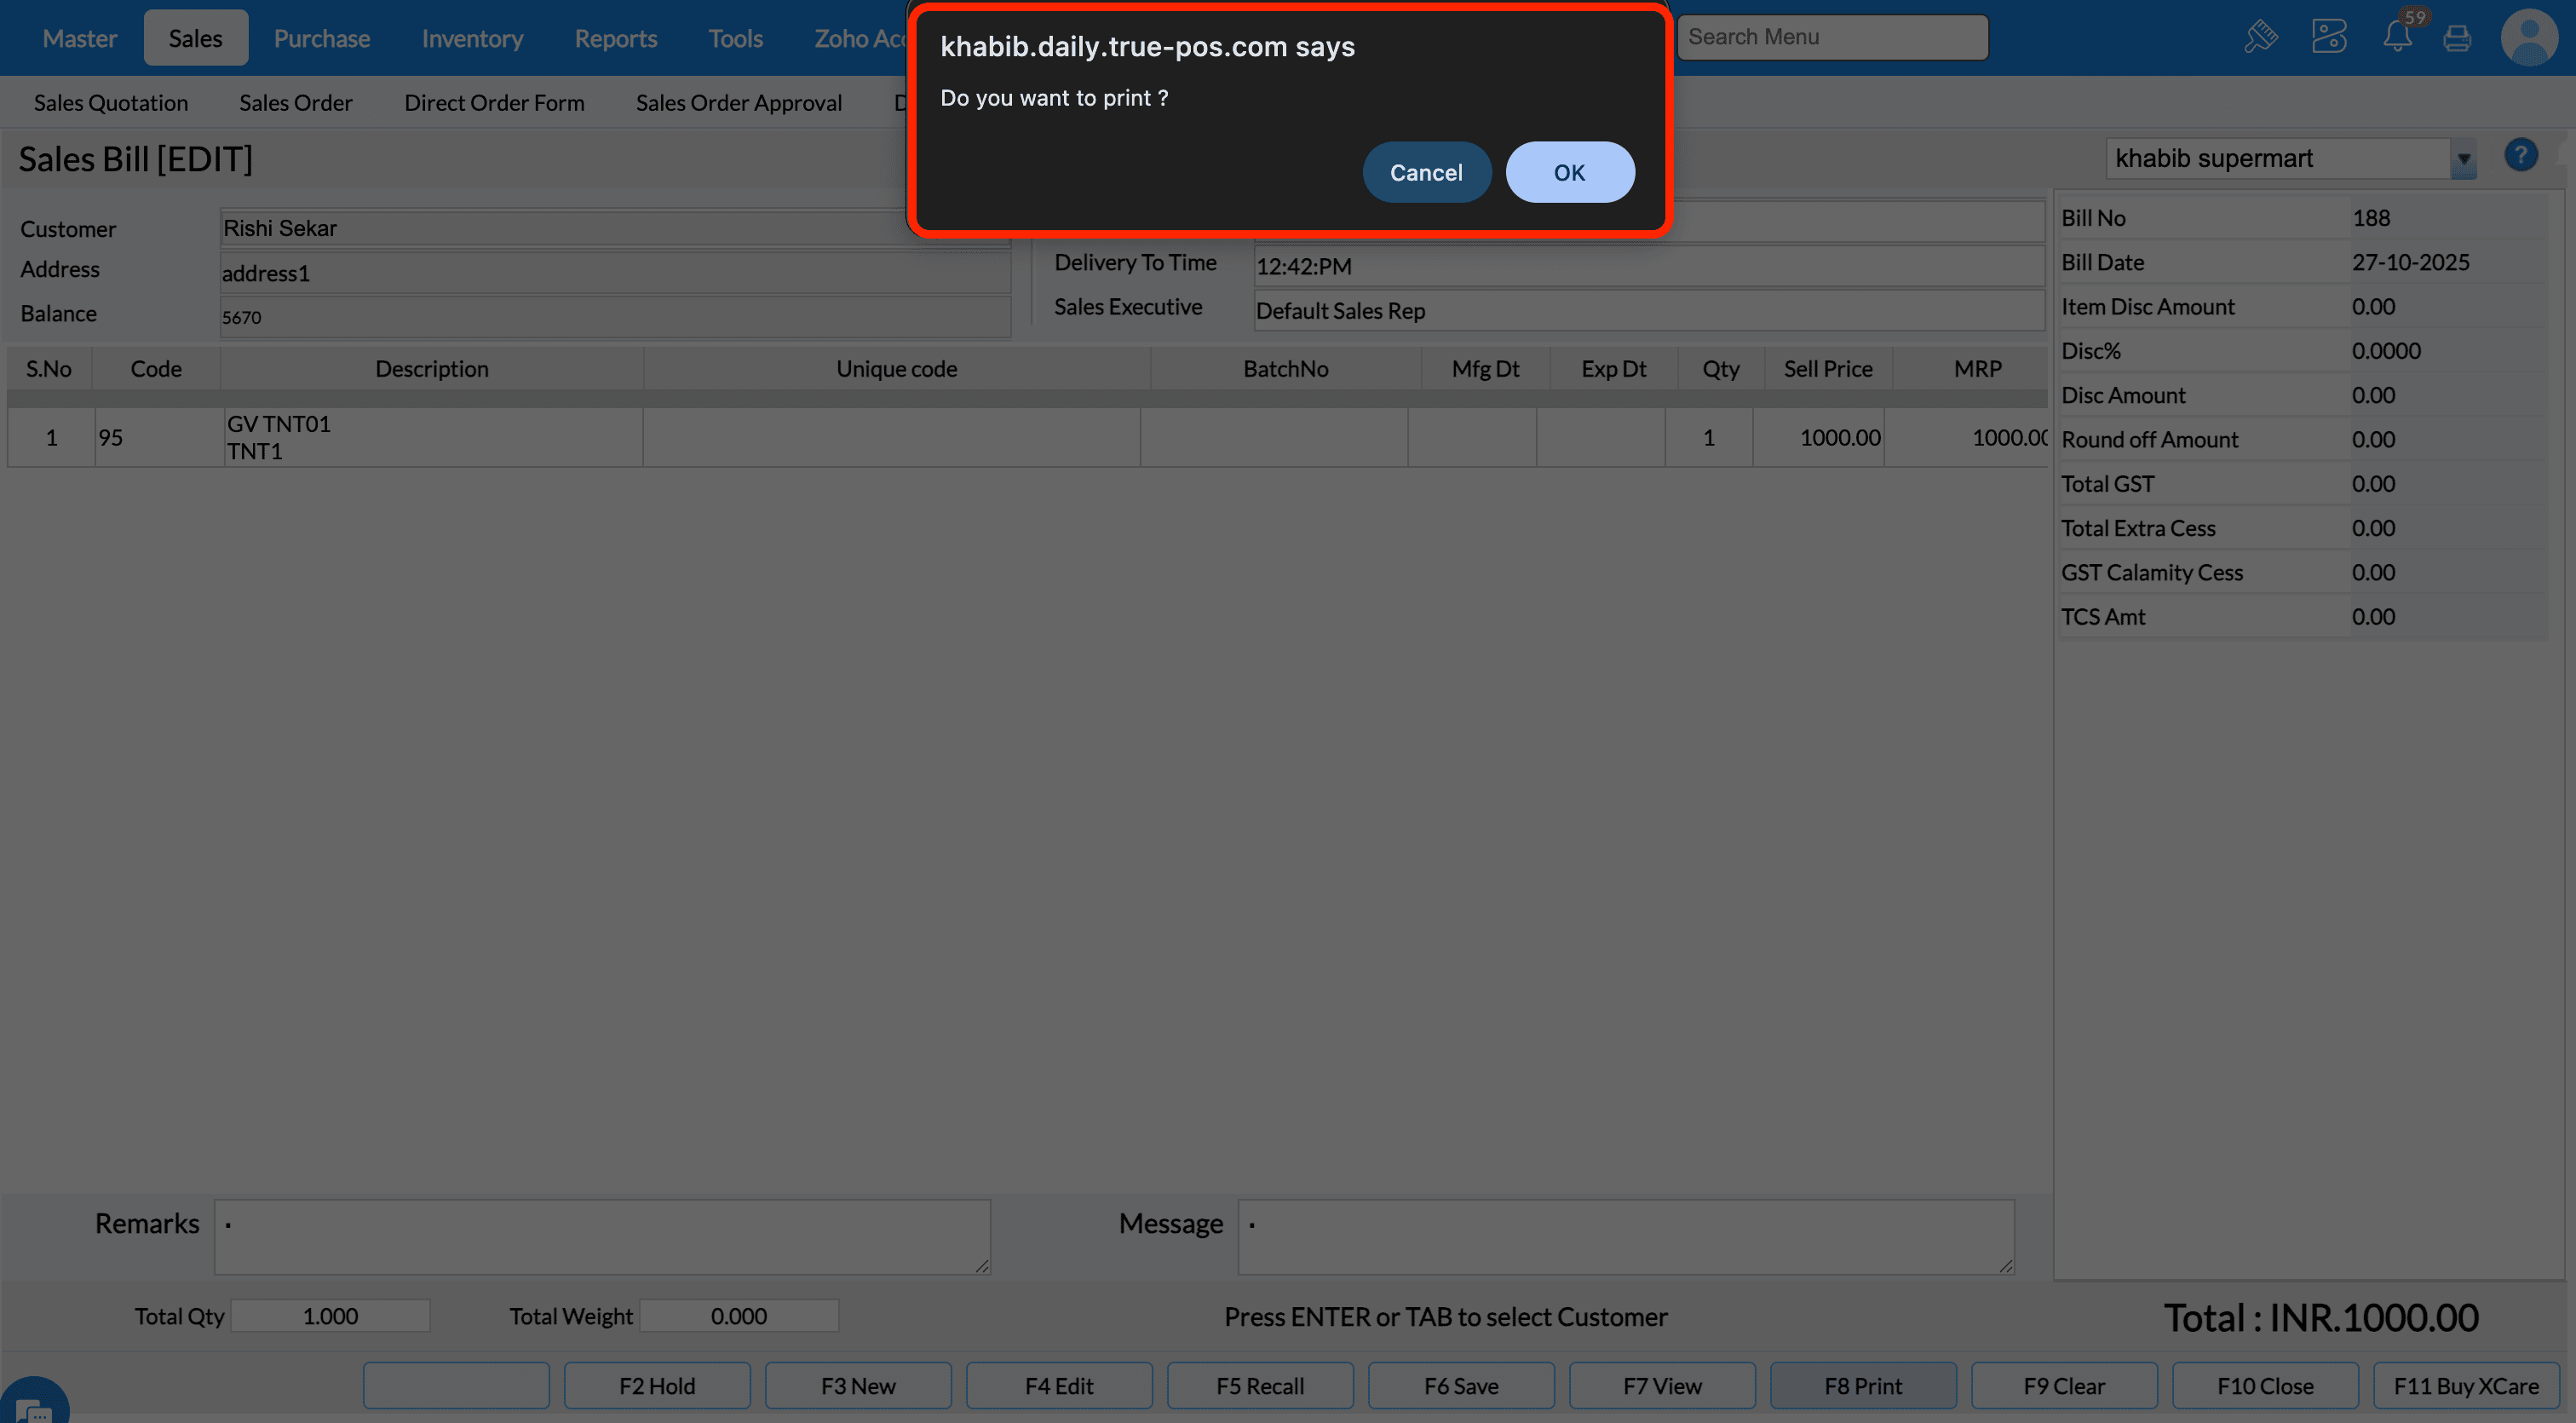
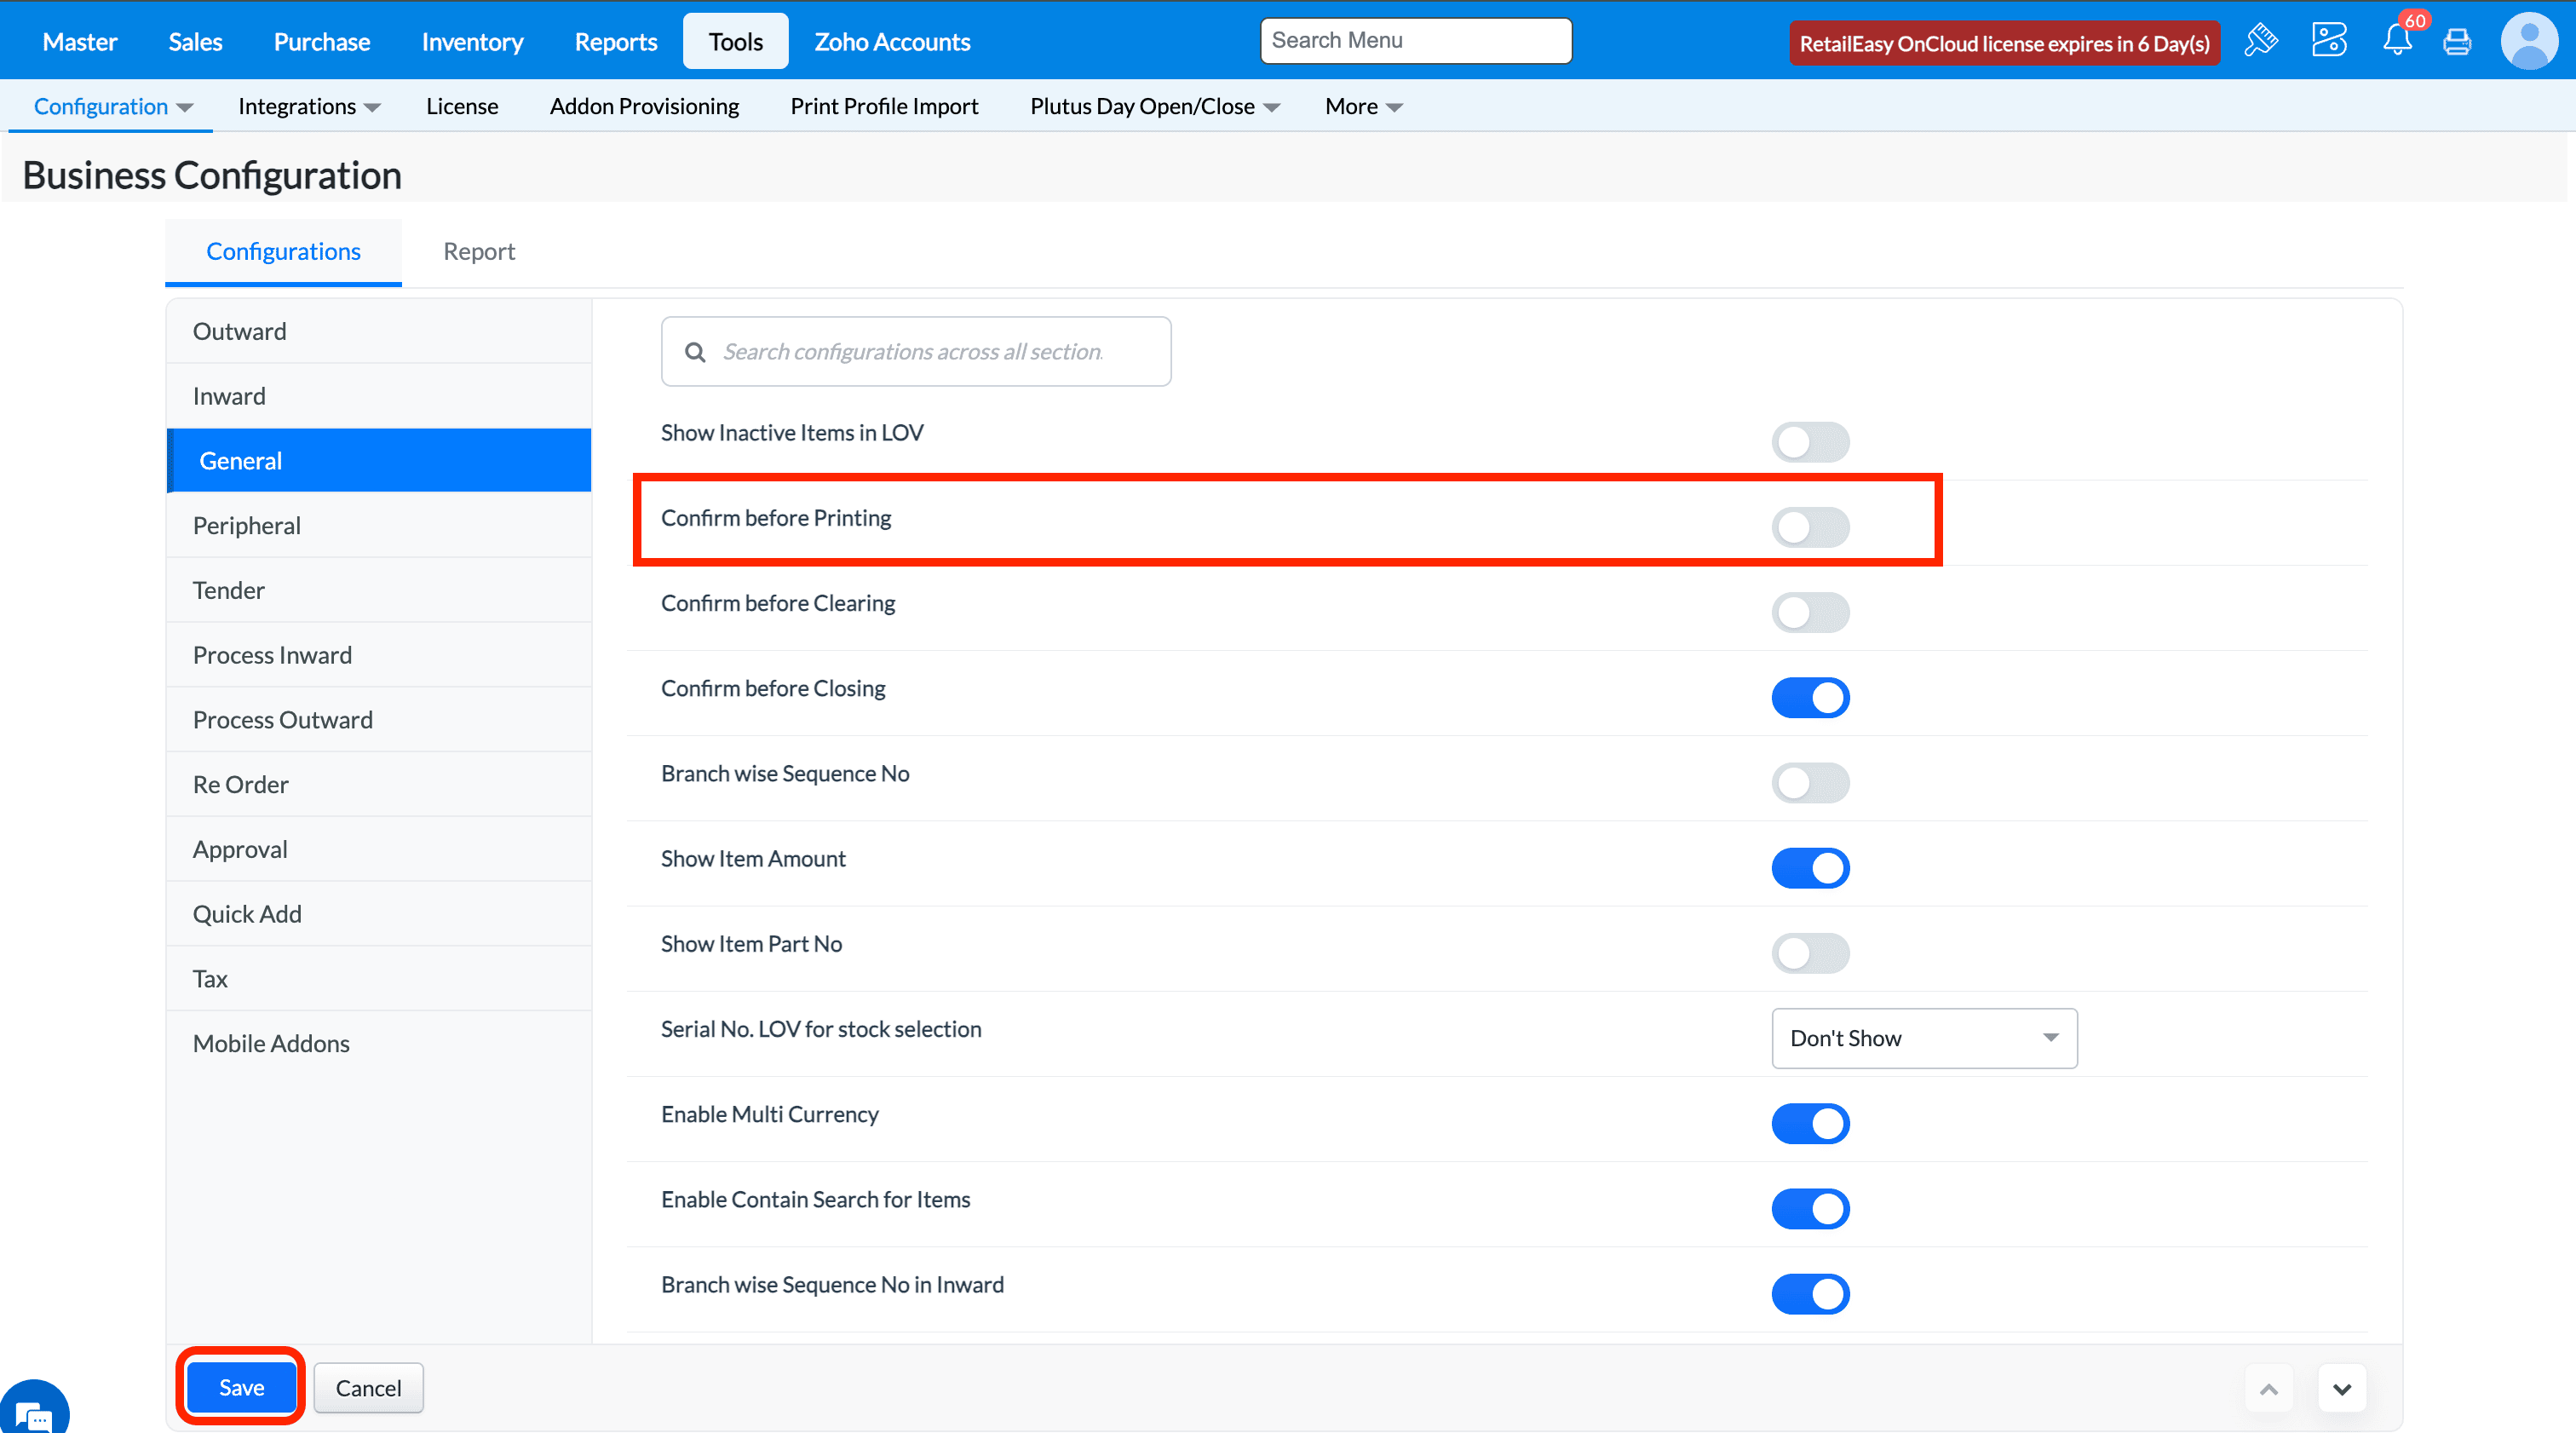
Q2. What does the “Confirm before Printing” option do?
A1. If you select this check box, when you press F8 to print documents (such as Sales Bill, Goods Inward Note, etc.), TruePOS will display a “Do you want to print?” confirmation message.
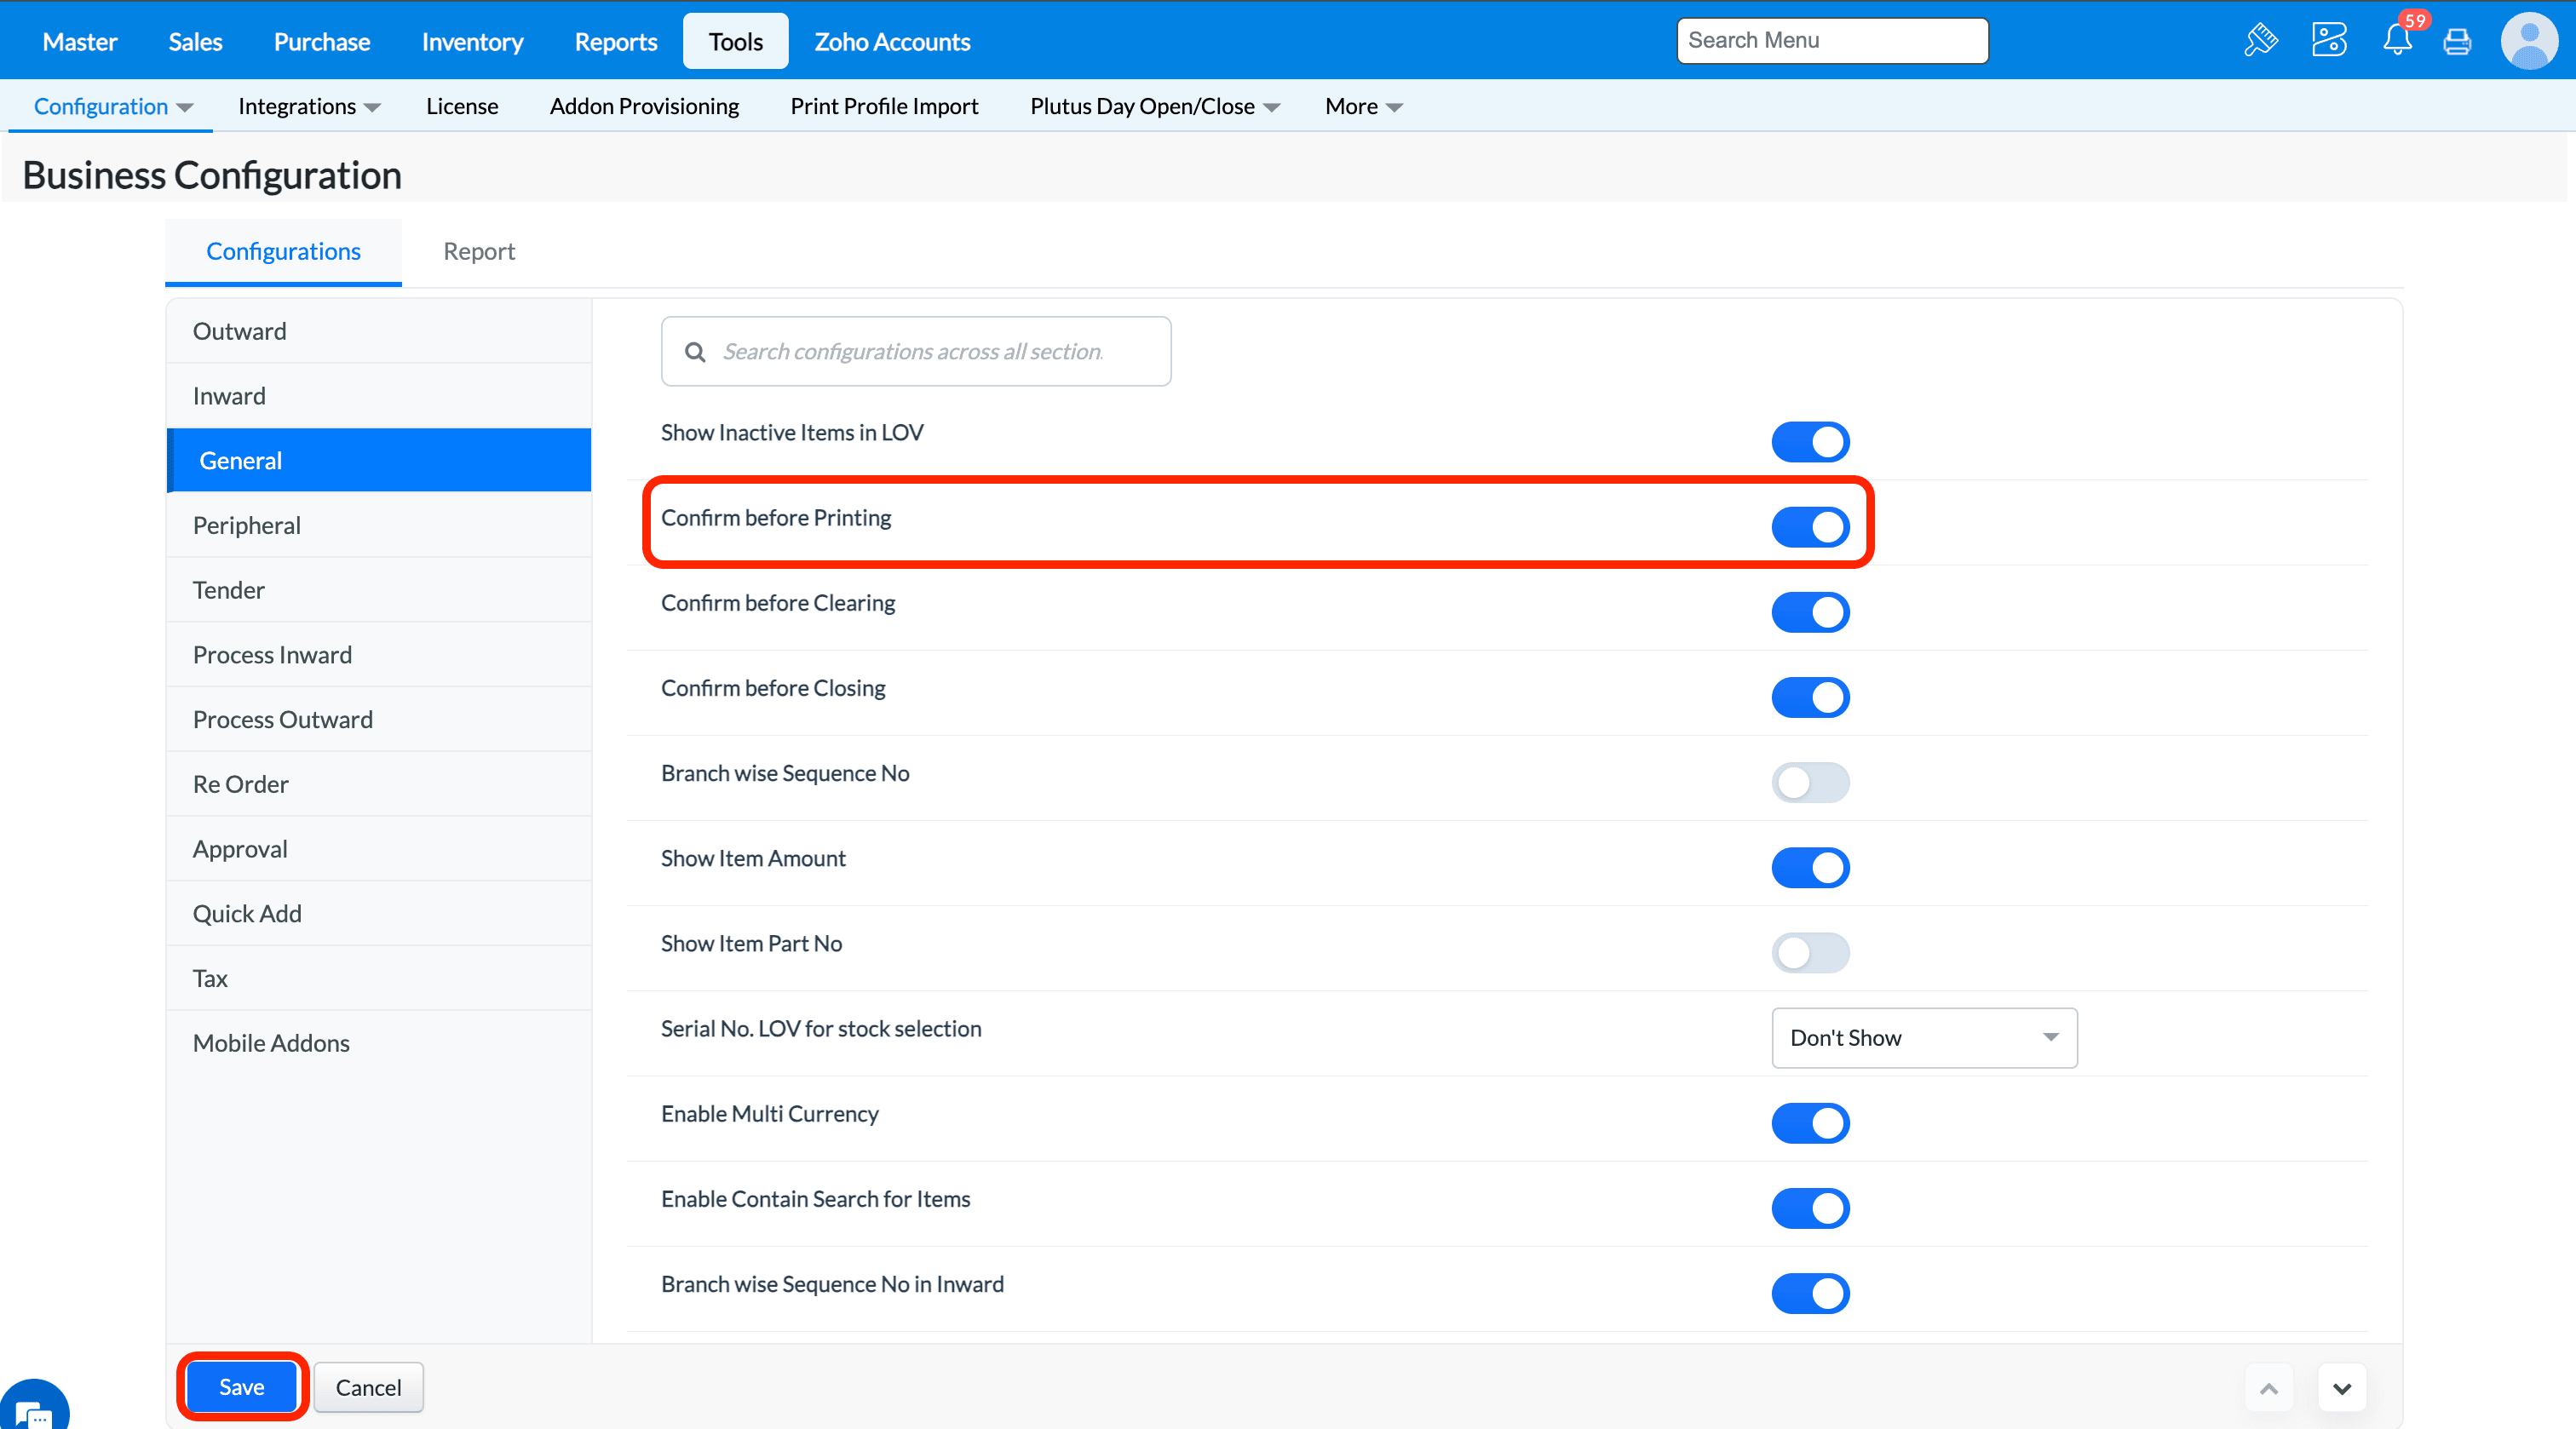
Enable this configuration to ask for confirmation message whenever print function is used in Sales Bill, GIN, Sales Return and so on.
If you disable this configuration, then it won't ask for the confirmation message whenever print function is called and proceed to print.
Q3. What is the “Confirm before Clearing” option?
A2. Selecting this check box will cause TruePOS to display a “Do you want to clear?” confirmation when you press F9 to clear values from the current screen (e.g., Sales Bill screen). If you clear this check box, clearing occurs immediately without confirmation.
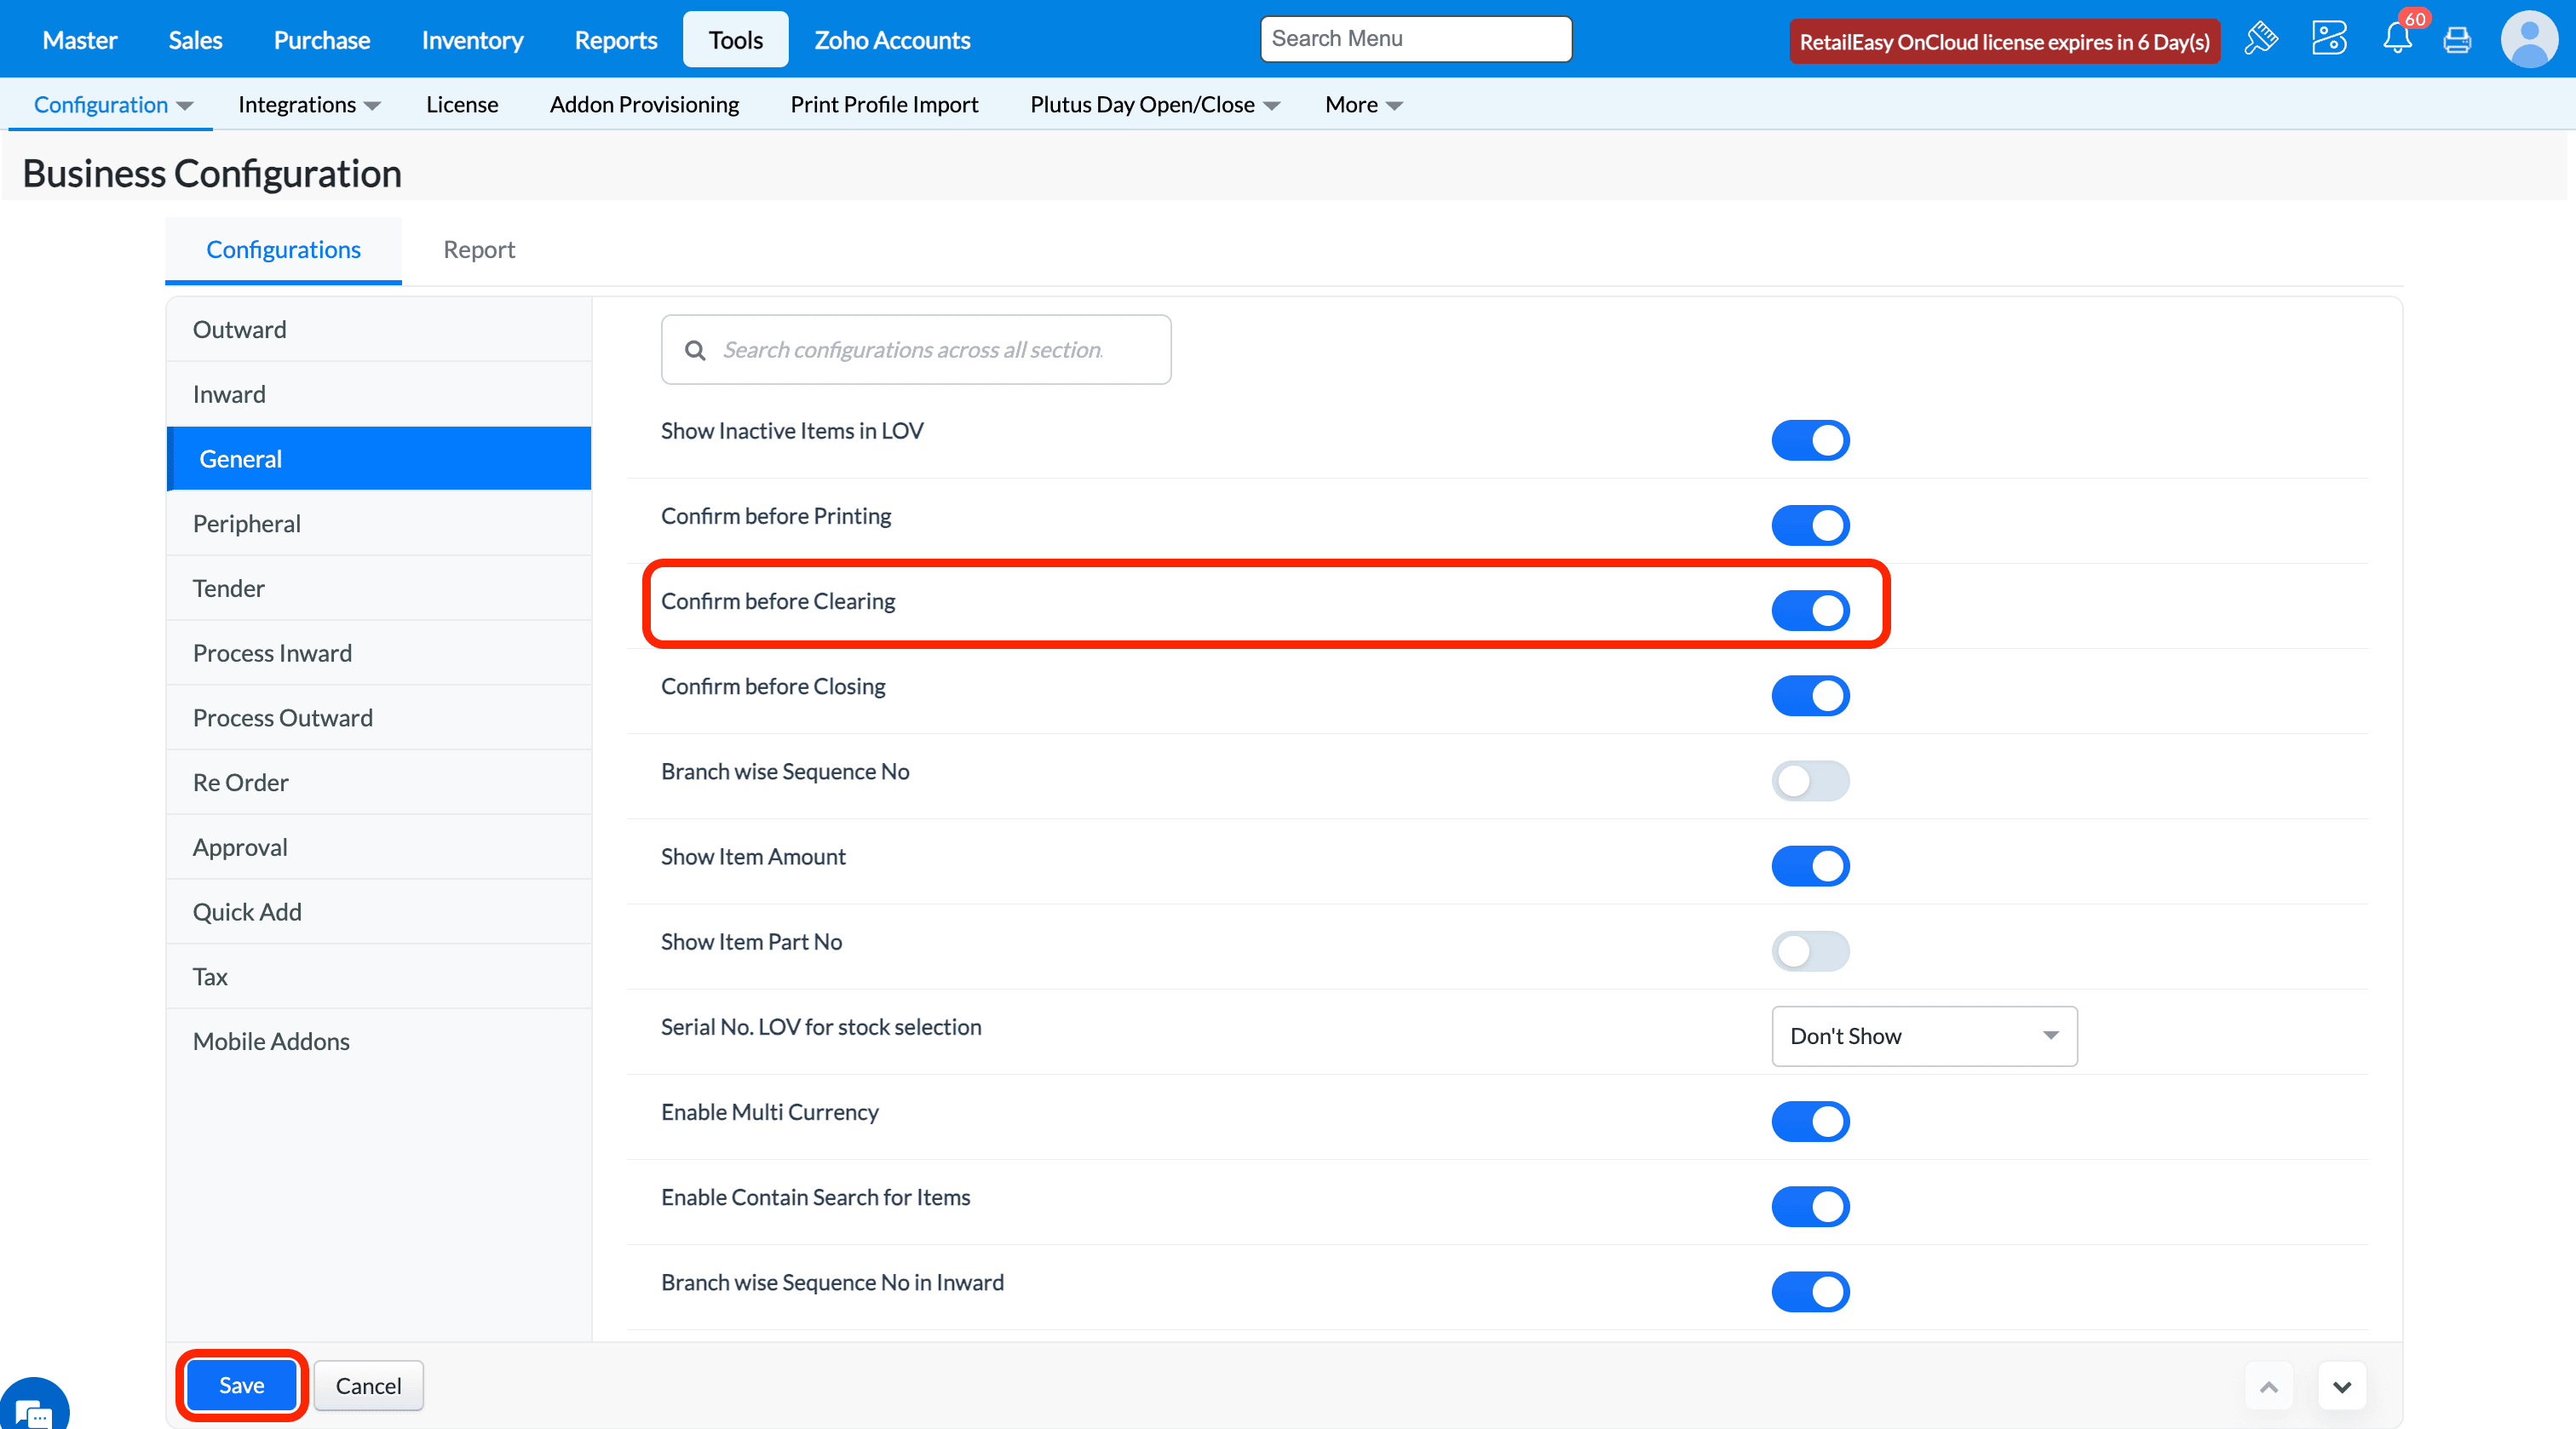
Enable this configuration to ask for confirmation message whenever clear function is used in transaction screens.
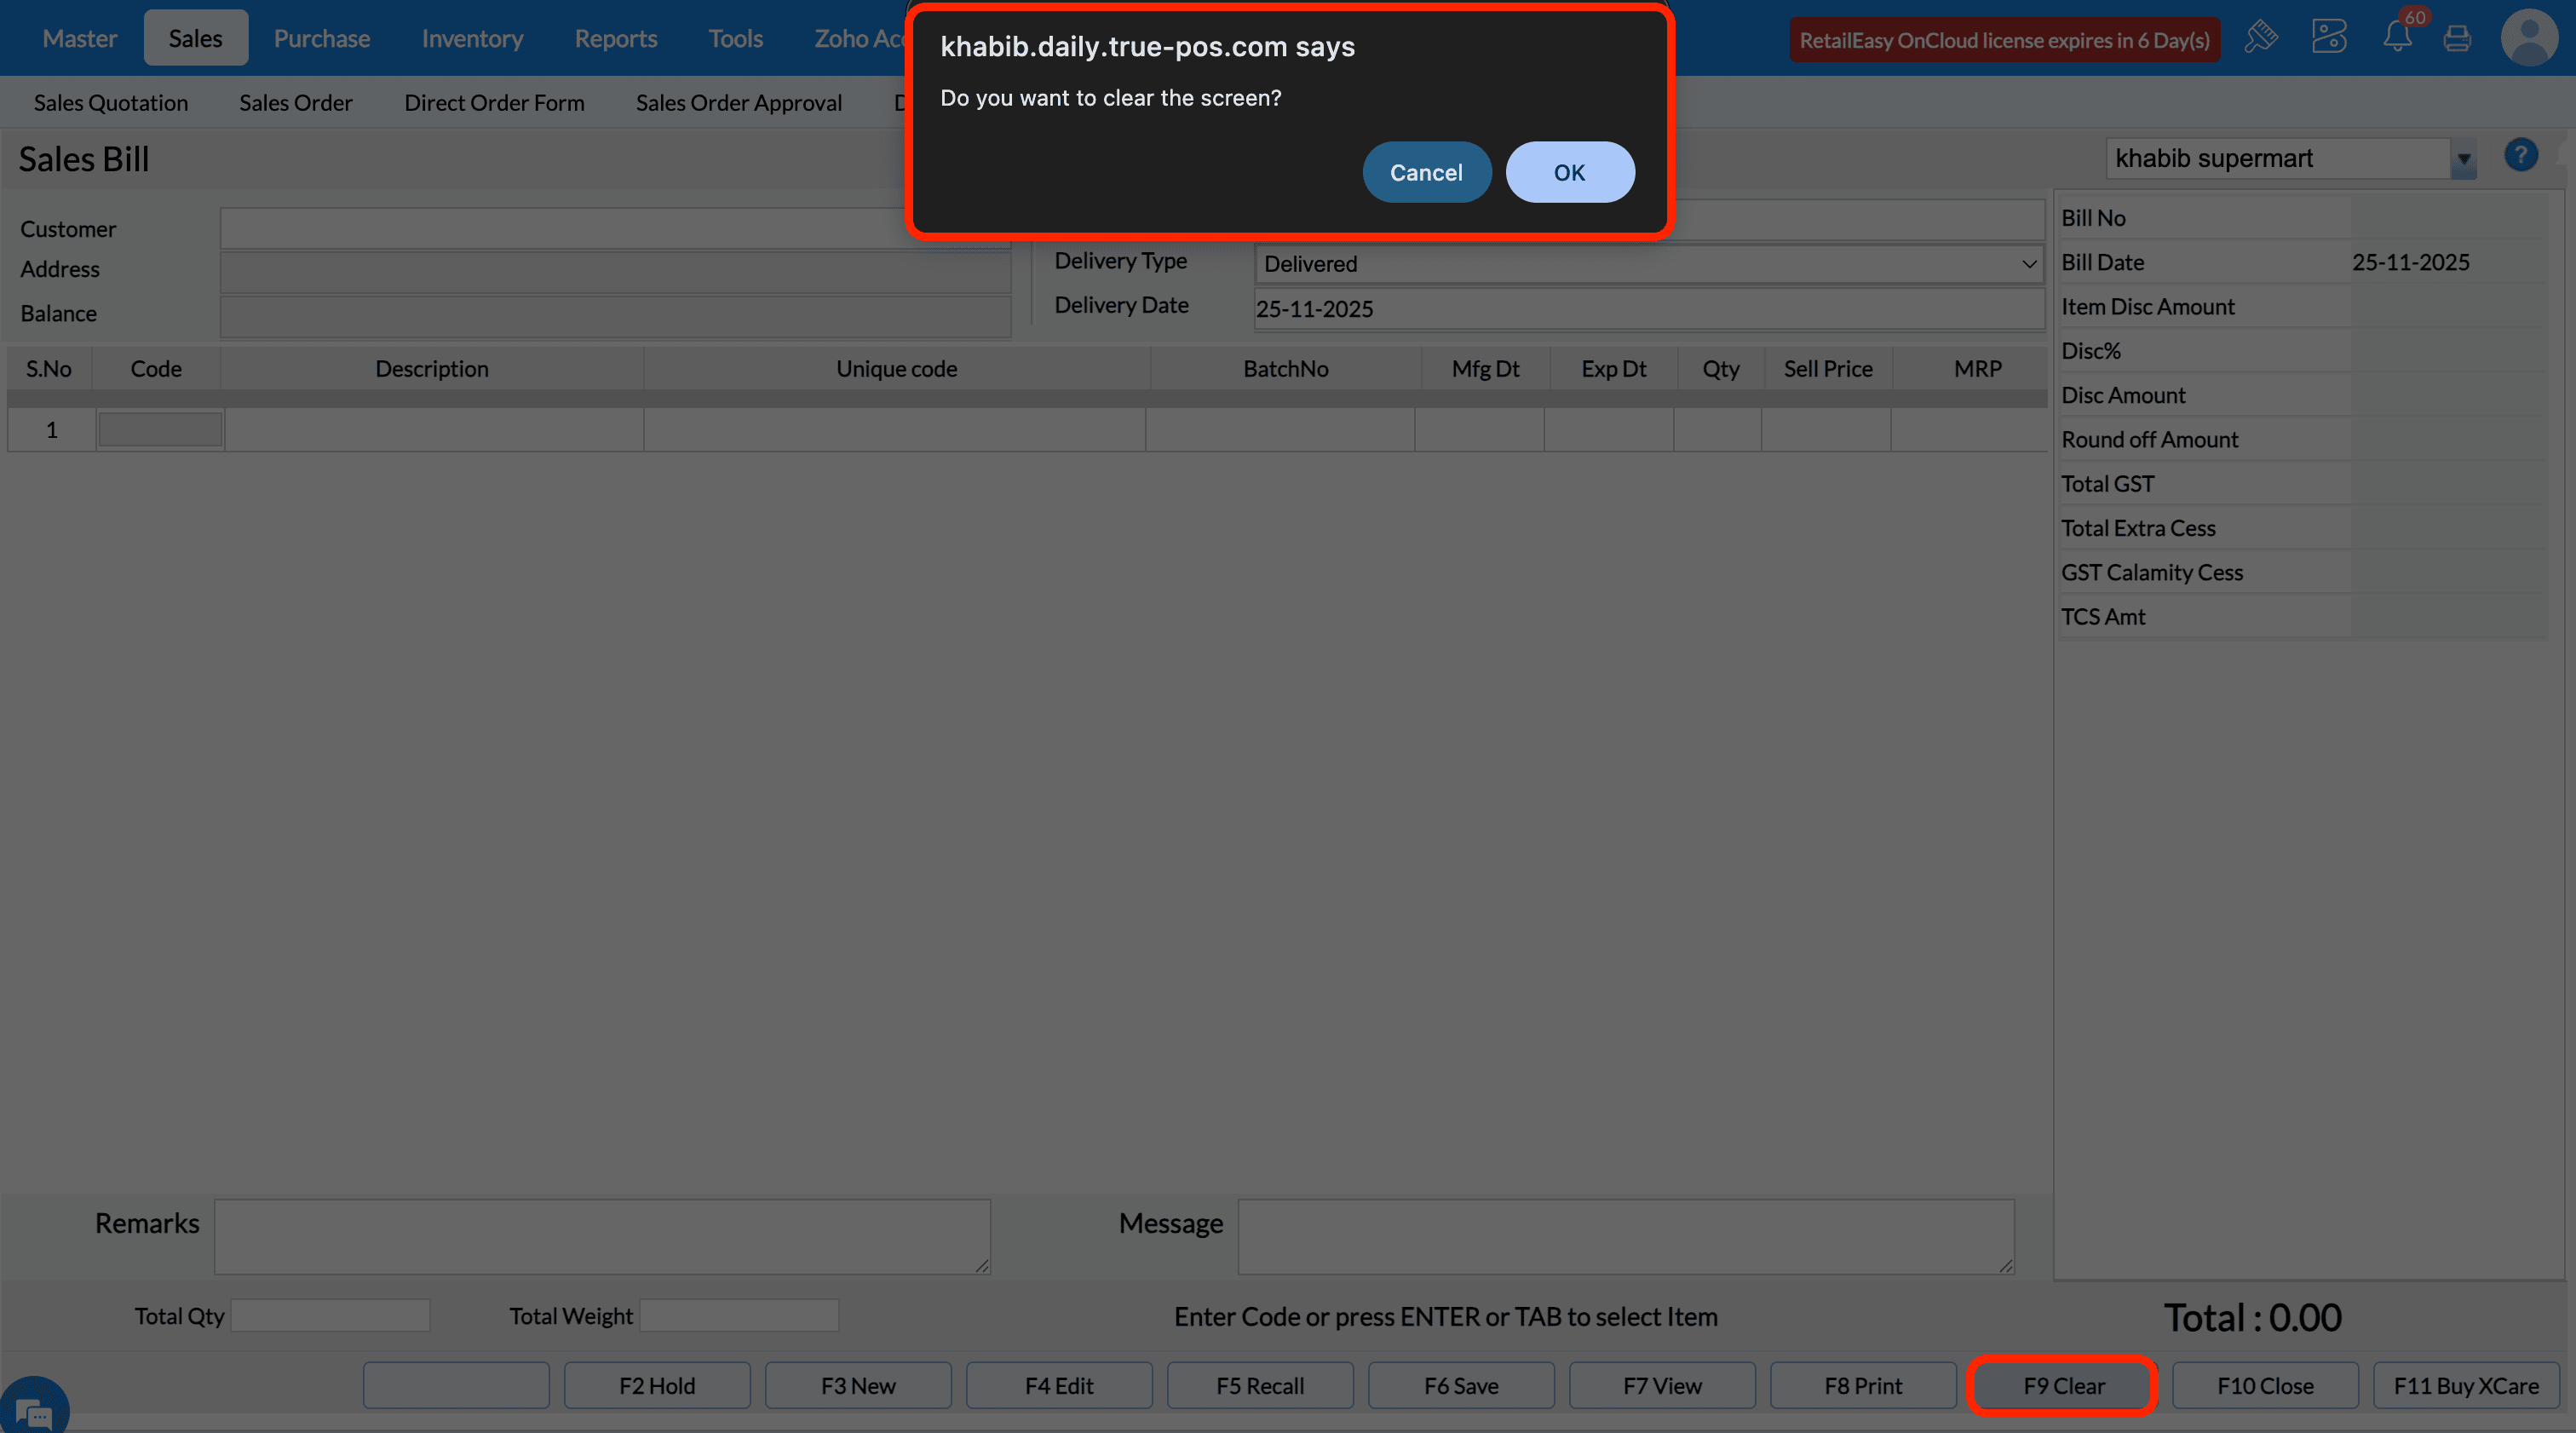
If this configuration is disabled, then it won't show the confirmation message when clicked clear function key F9 and system will proceed to clear the data from the screen.
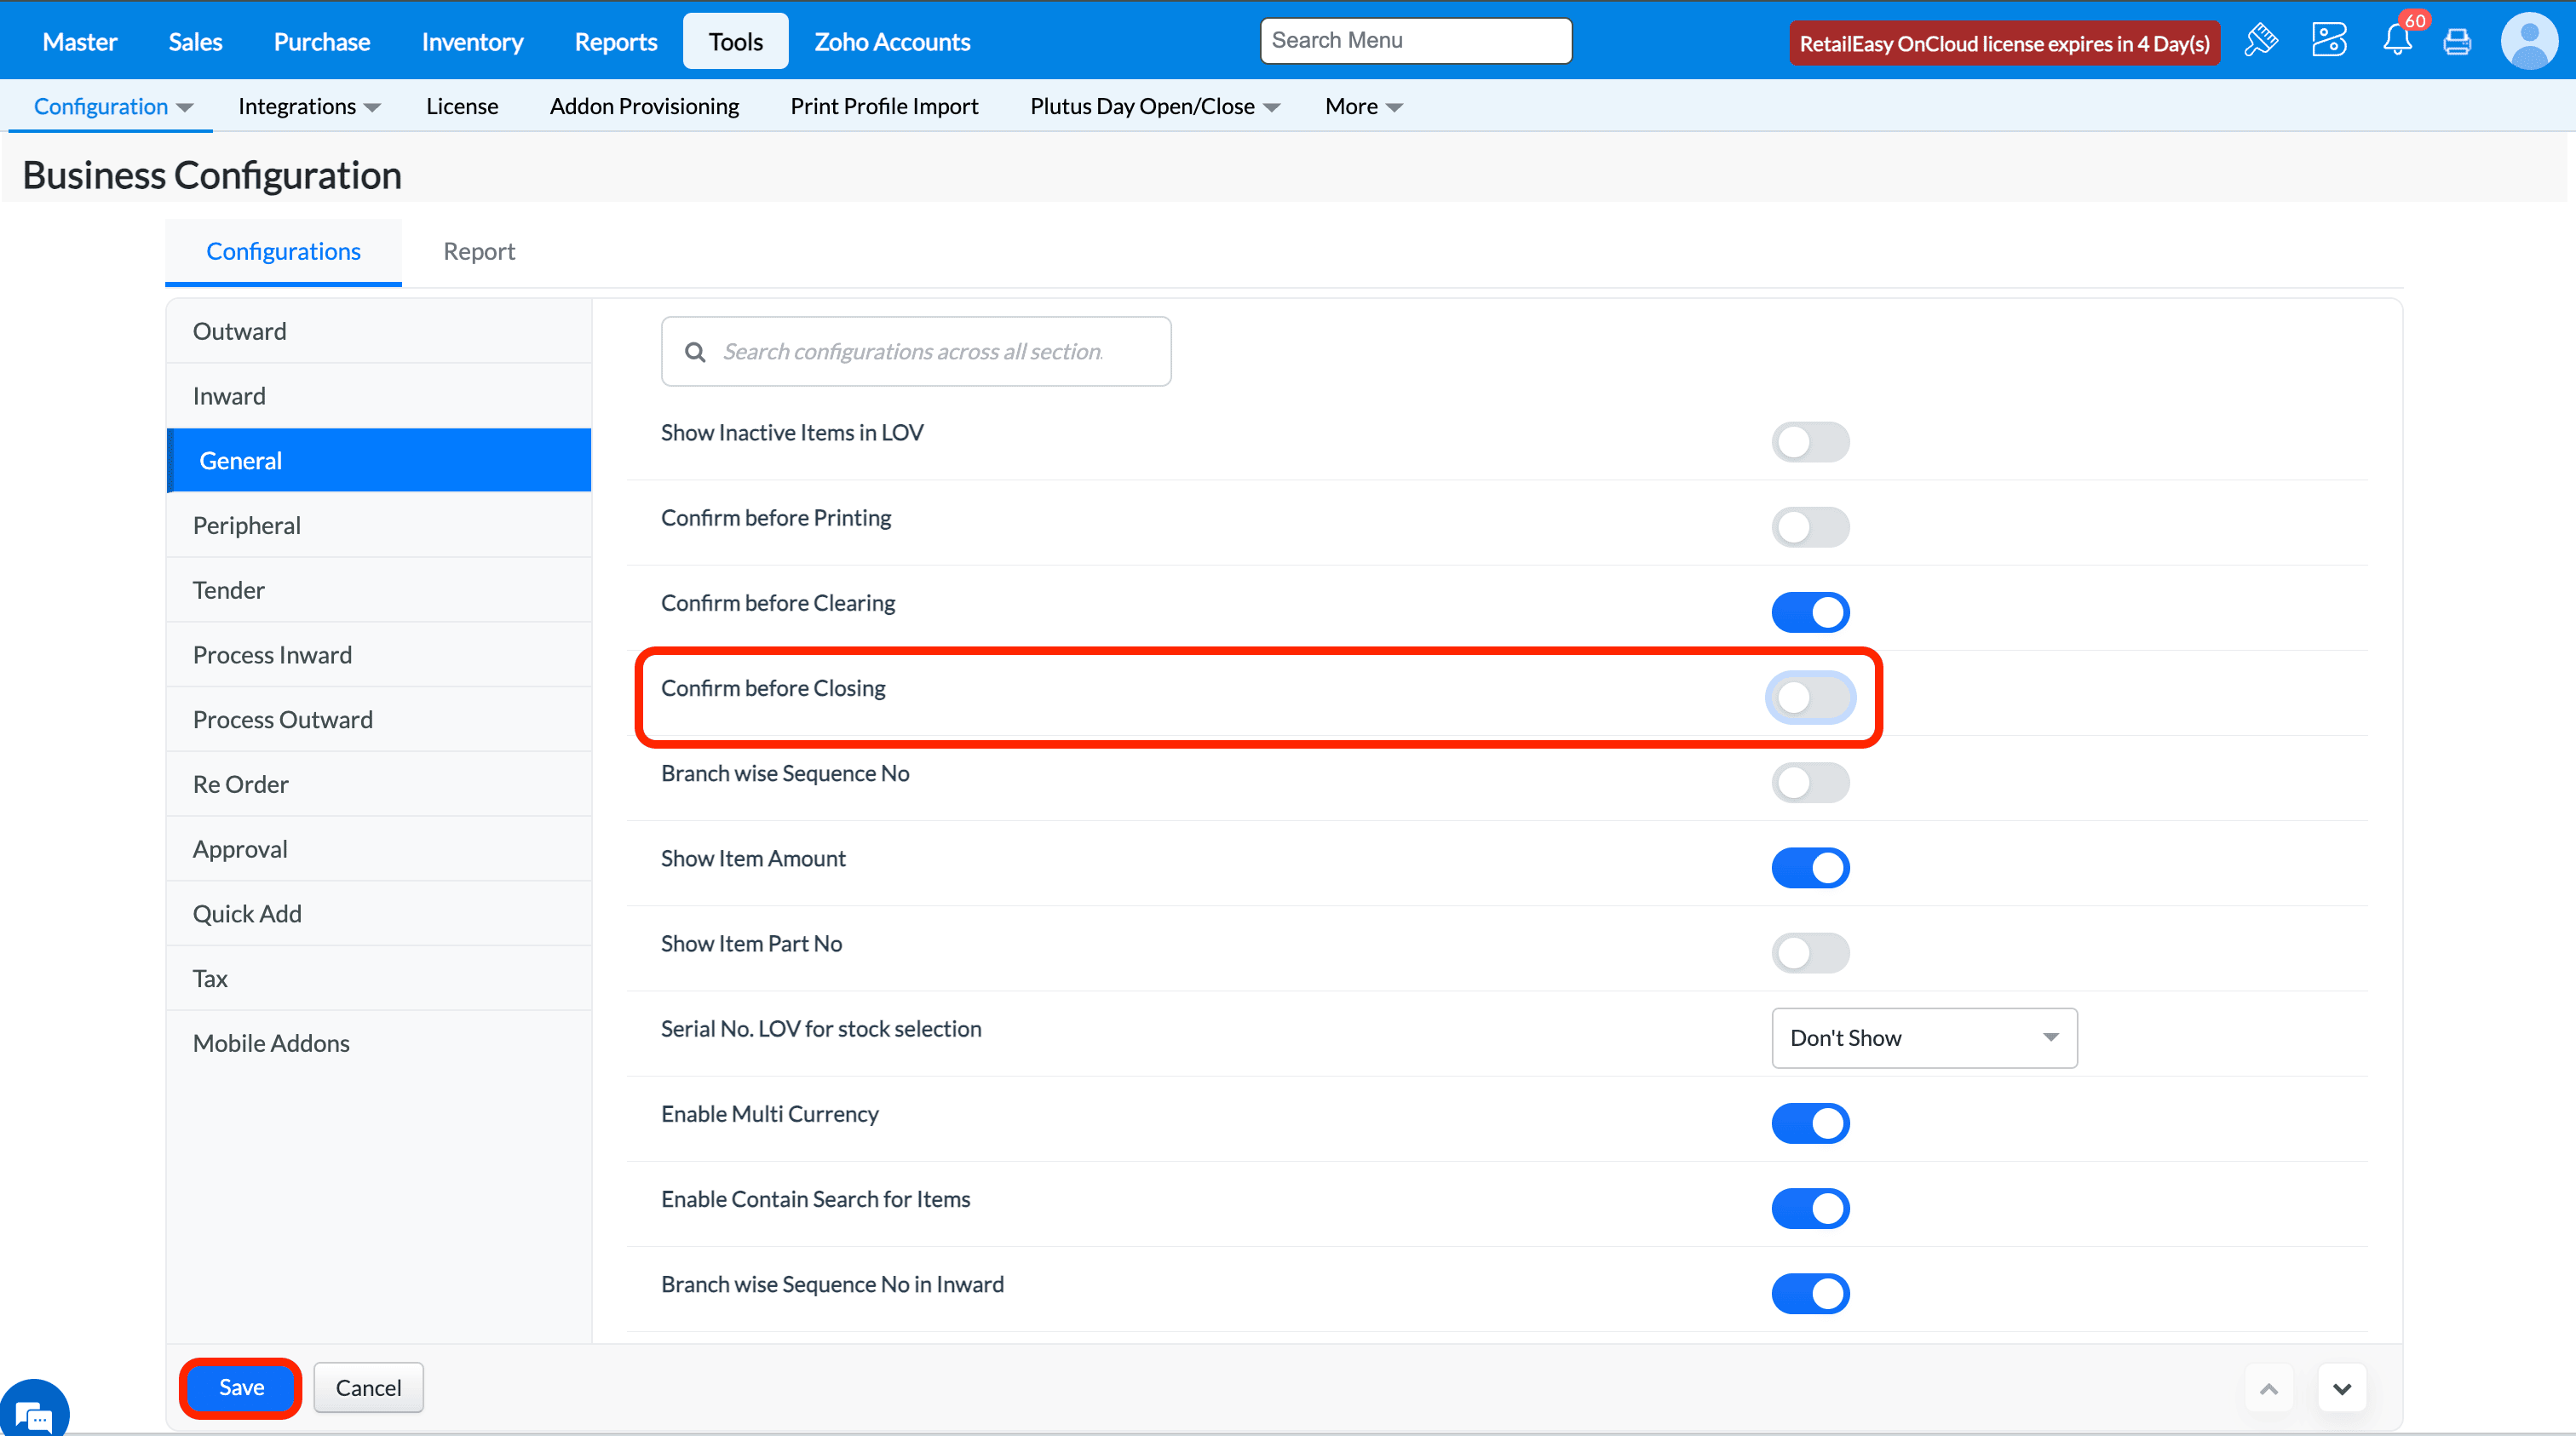
Q4. What does the “Confirm before Closing” option do?
A4. When you select this check box, pressing F10 to exit from the current screen will prompt a “Do you want to close the screen?” confirmation message.
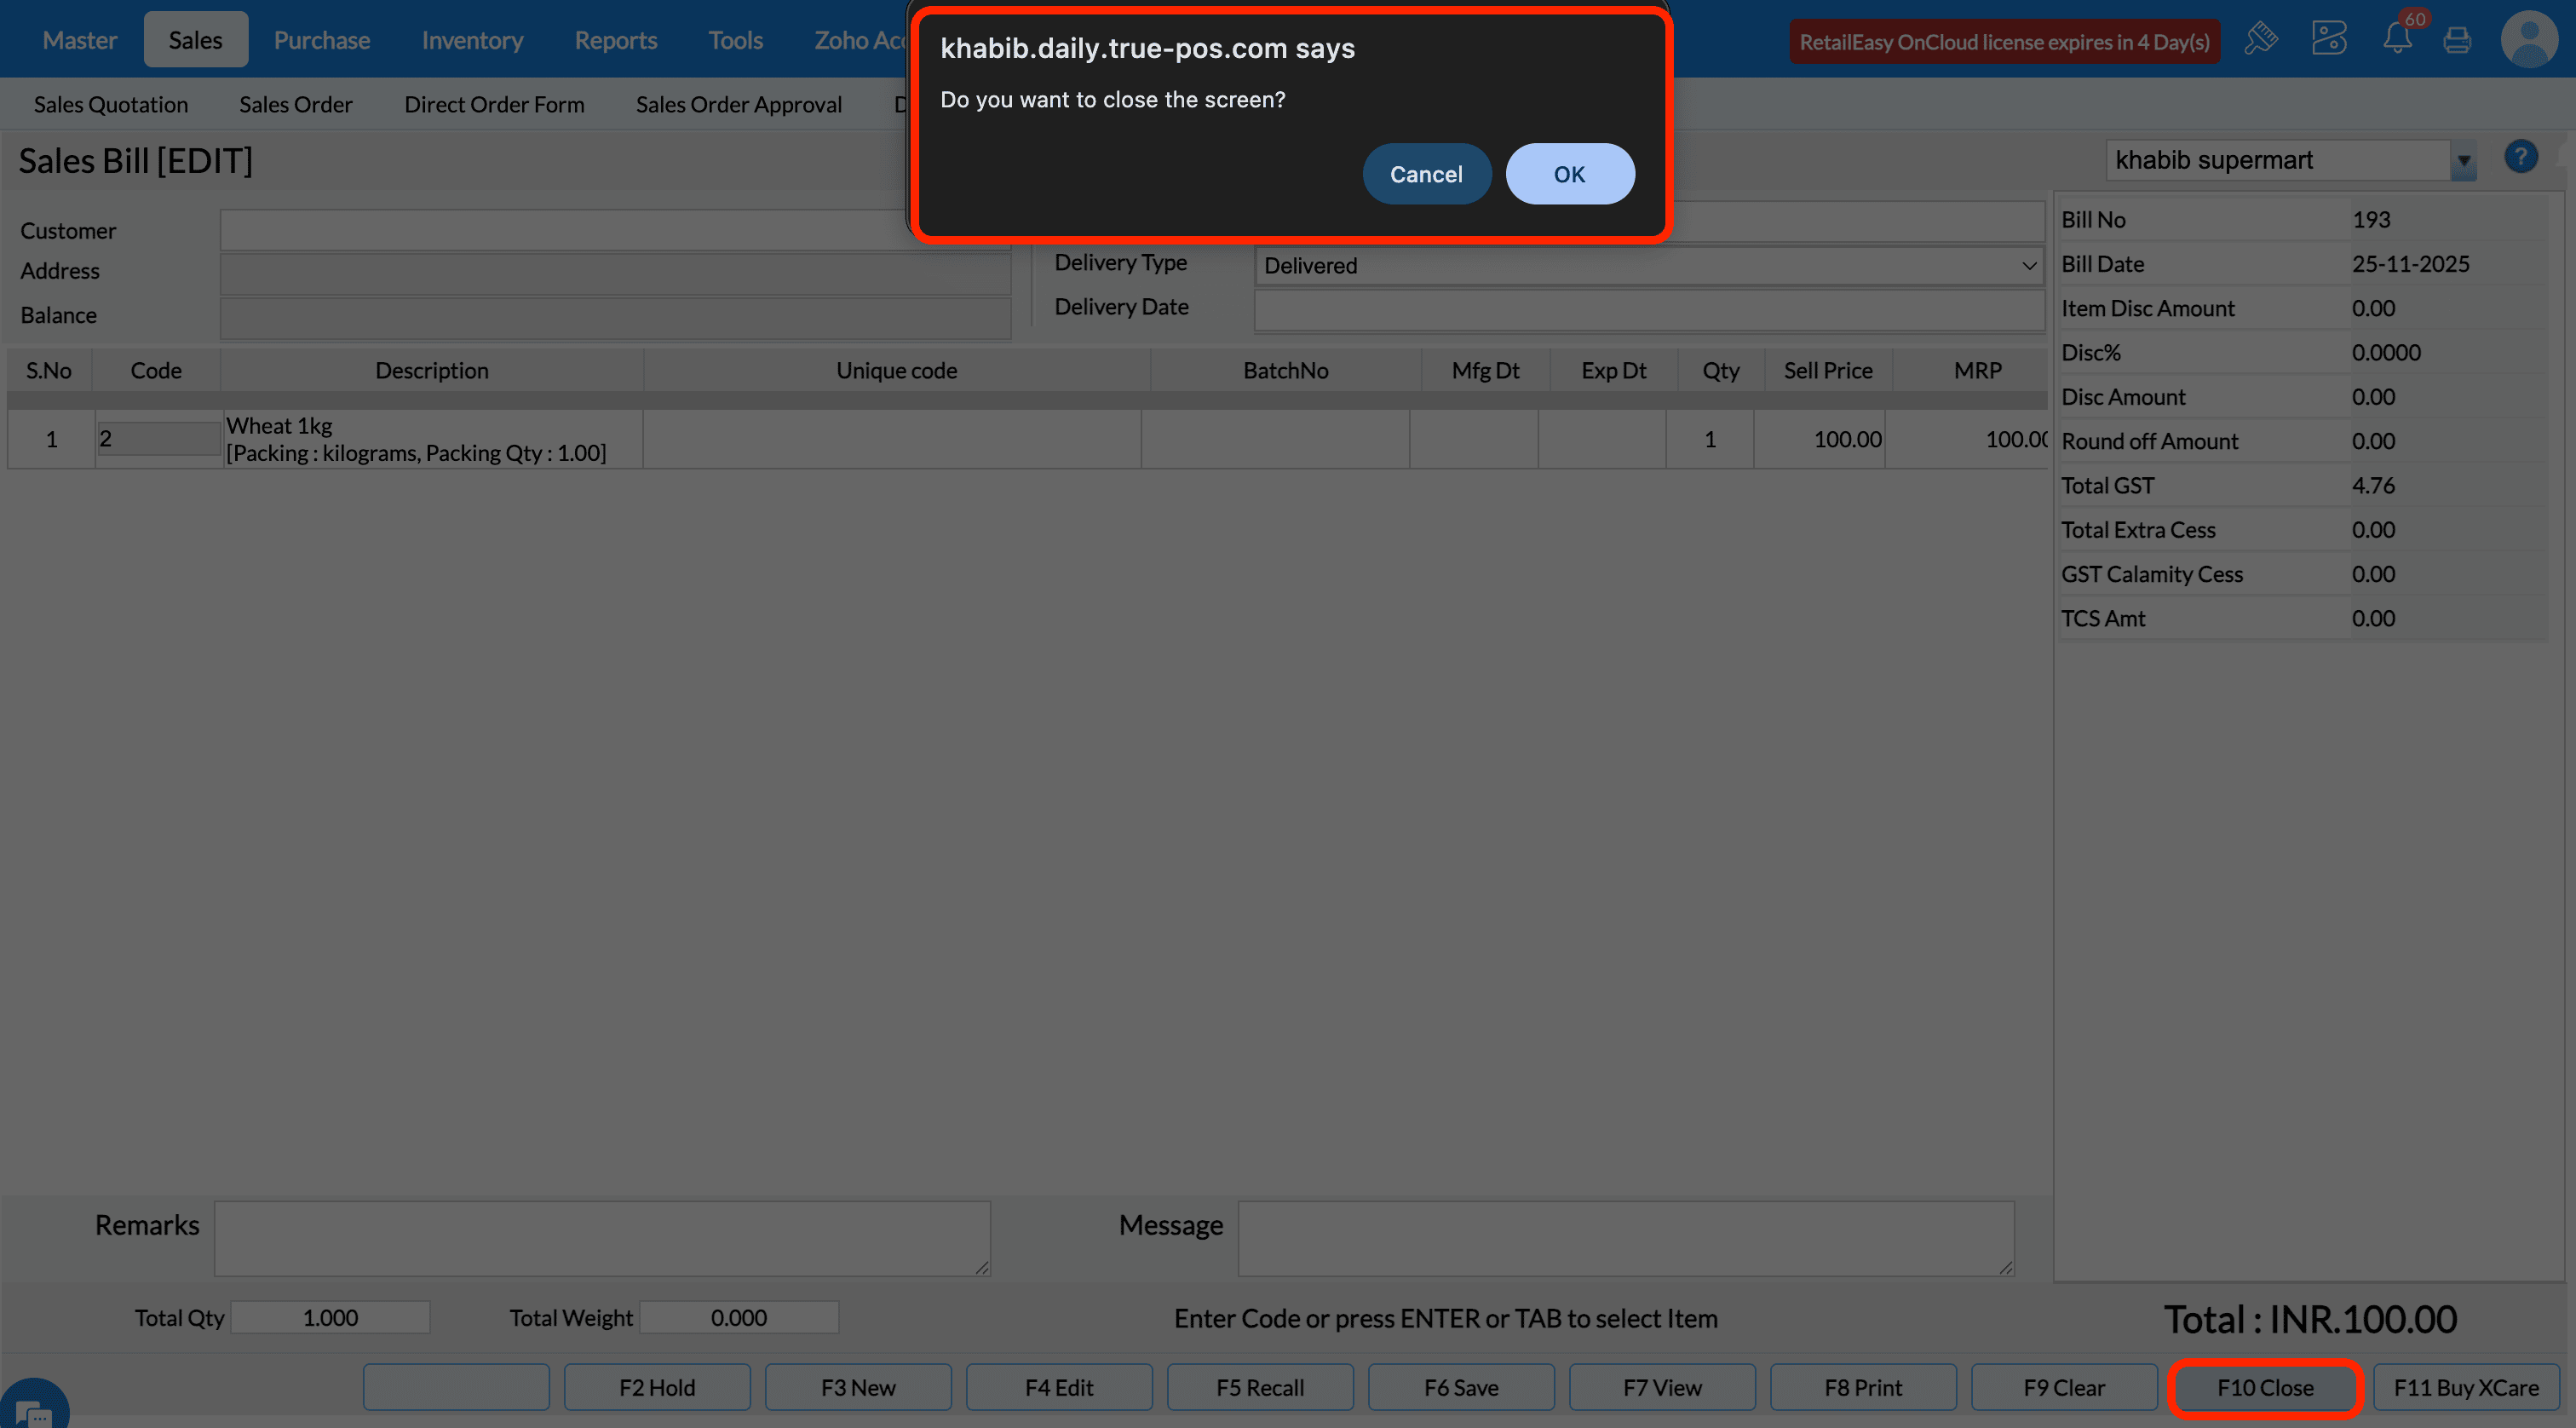
If you clear the check box, the screen will close without any confirmation.
Q5. What does the 'Branch wise Sequence No configuration do?
A5. The purpose of this configuration is to decide whether to have a separate(independent) series of sequence number for transactions (such as Purchase Order Number, Receipt Number, Invoice Number, Sales Order Number and so on) available in different branches or have consecutive sequence numbering irrespective of branches. If the configuration is enabled then the transactions will have a separate series of sequence number branch wise.
If the configuration is disabled then the transactions made in consecutive branches will have running number sequence.
Q6. What does the “Show Item Amount” configuration do?
A6. When this check box is selected, an Amount field (showing the item’s amount) will be displayed in all screens of Purchase, Inventory and Sales modules.
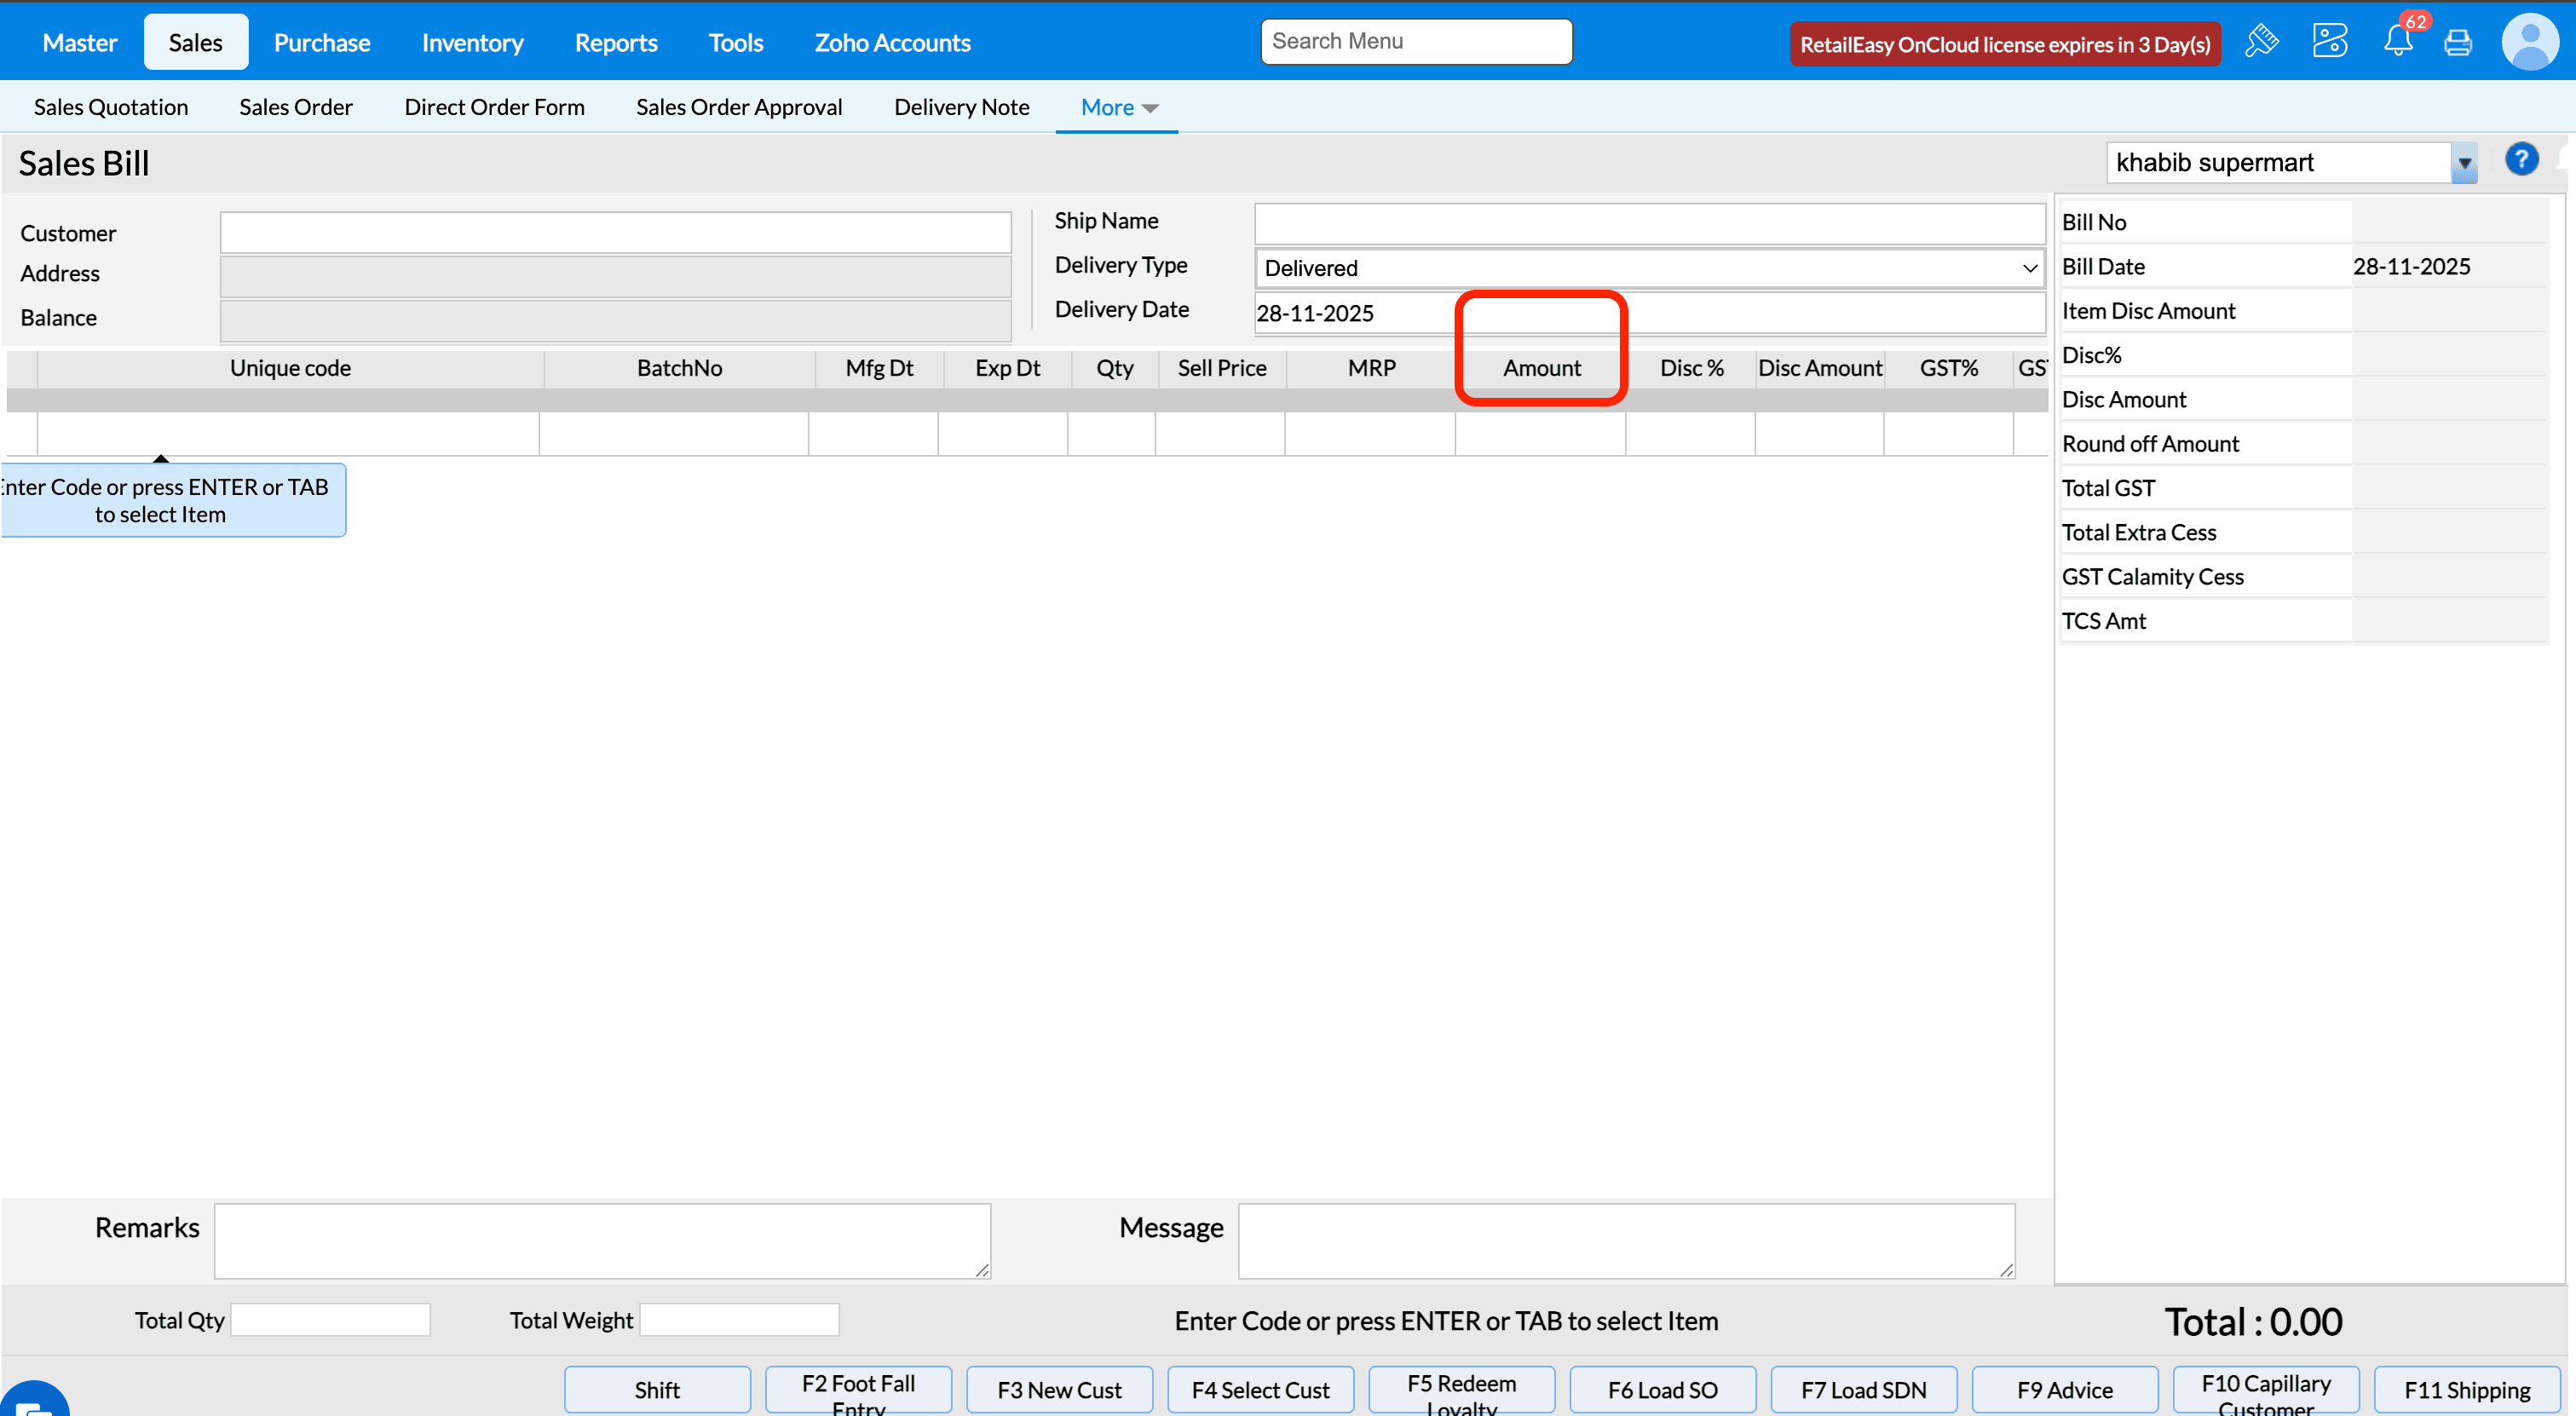
If configuration is cleared, the Amount column is hidden.
If configuration is disabled, messages will not display as popup dialogs. Ex., sales bill will get saved without any confirmation message and screen gets cleared for next bill entry.
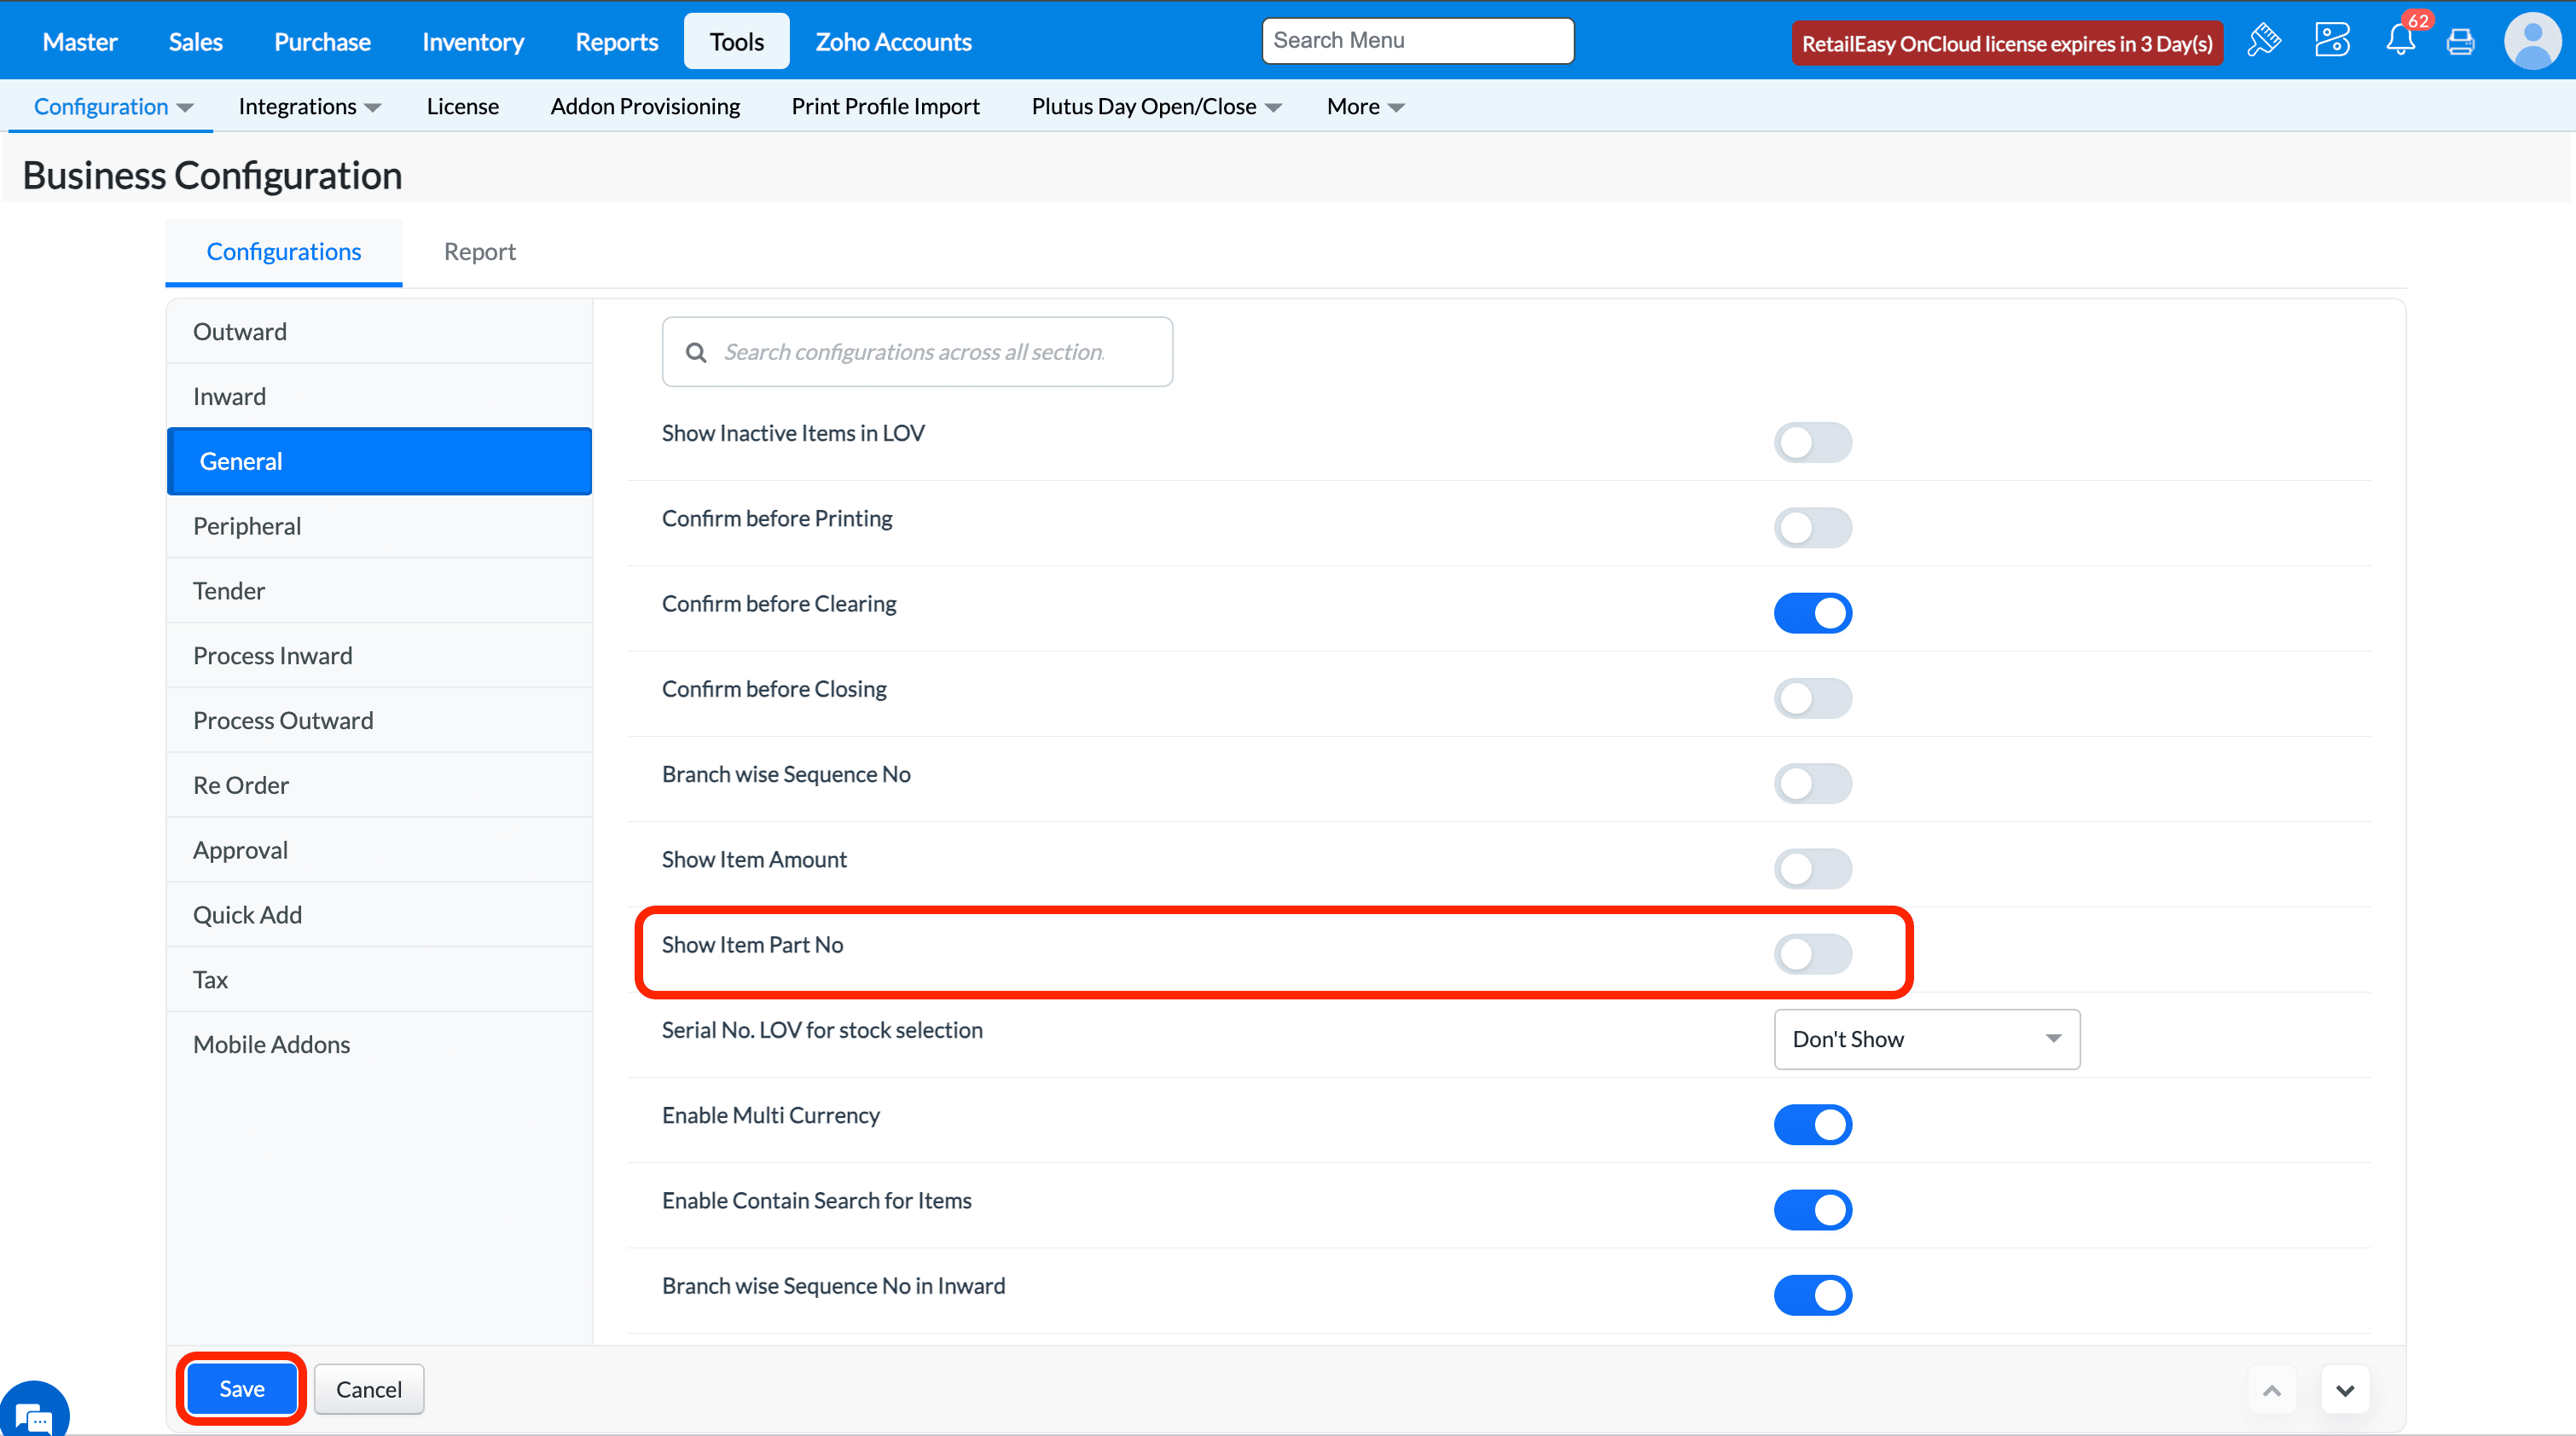
Q7. What is the “Show Part No” option?
A7. If selected, the Part Number of the item is displayed whenever you scan or enter an item code in Purchase or Sales modules.
If configuration is disabled, the Part No field is hidden.
Q16. What does the 'Enable Multi Currency' configuration do?
A16. The use of this configuration is to ensure at the time of purchase or sales can be done in other currency for particular supplier or customer respectively when coupled with other configurations.
Please refer below help documents to implement the functionality in detailed.
Q17. What does the “Serial No. LOV for stock selection” option do?
Purpose - When this option is enabled, it allows flexible serial number selection during stock transactions. Users can either scan the serial number directly, enter it manually without opening the list, or select it from the List of Values (LOV), making serial number handling faster and more convenient.
a. If you Select the Option Don't Show in Serial No. LOV for stock selection Than Serial Number Will Not Show in the Sales Bill Screen for serialized Item Stock LOV.
b. If you Select the Option Show in Serial No. LOV for stock selection Than Serial Number Will Show in the Sales Bill Screen for serialized Item Stock LOV.
c. If you Select the Option Don't Show While scanning Alone in Serial No. LOV for stock selection Than Serial Number Will Scan in the Sales Bill Screen for serialized Item.
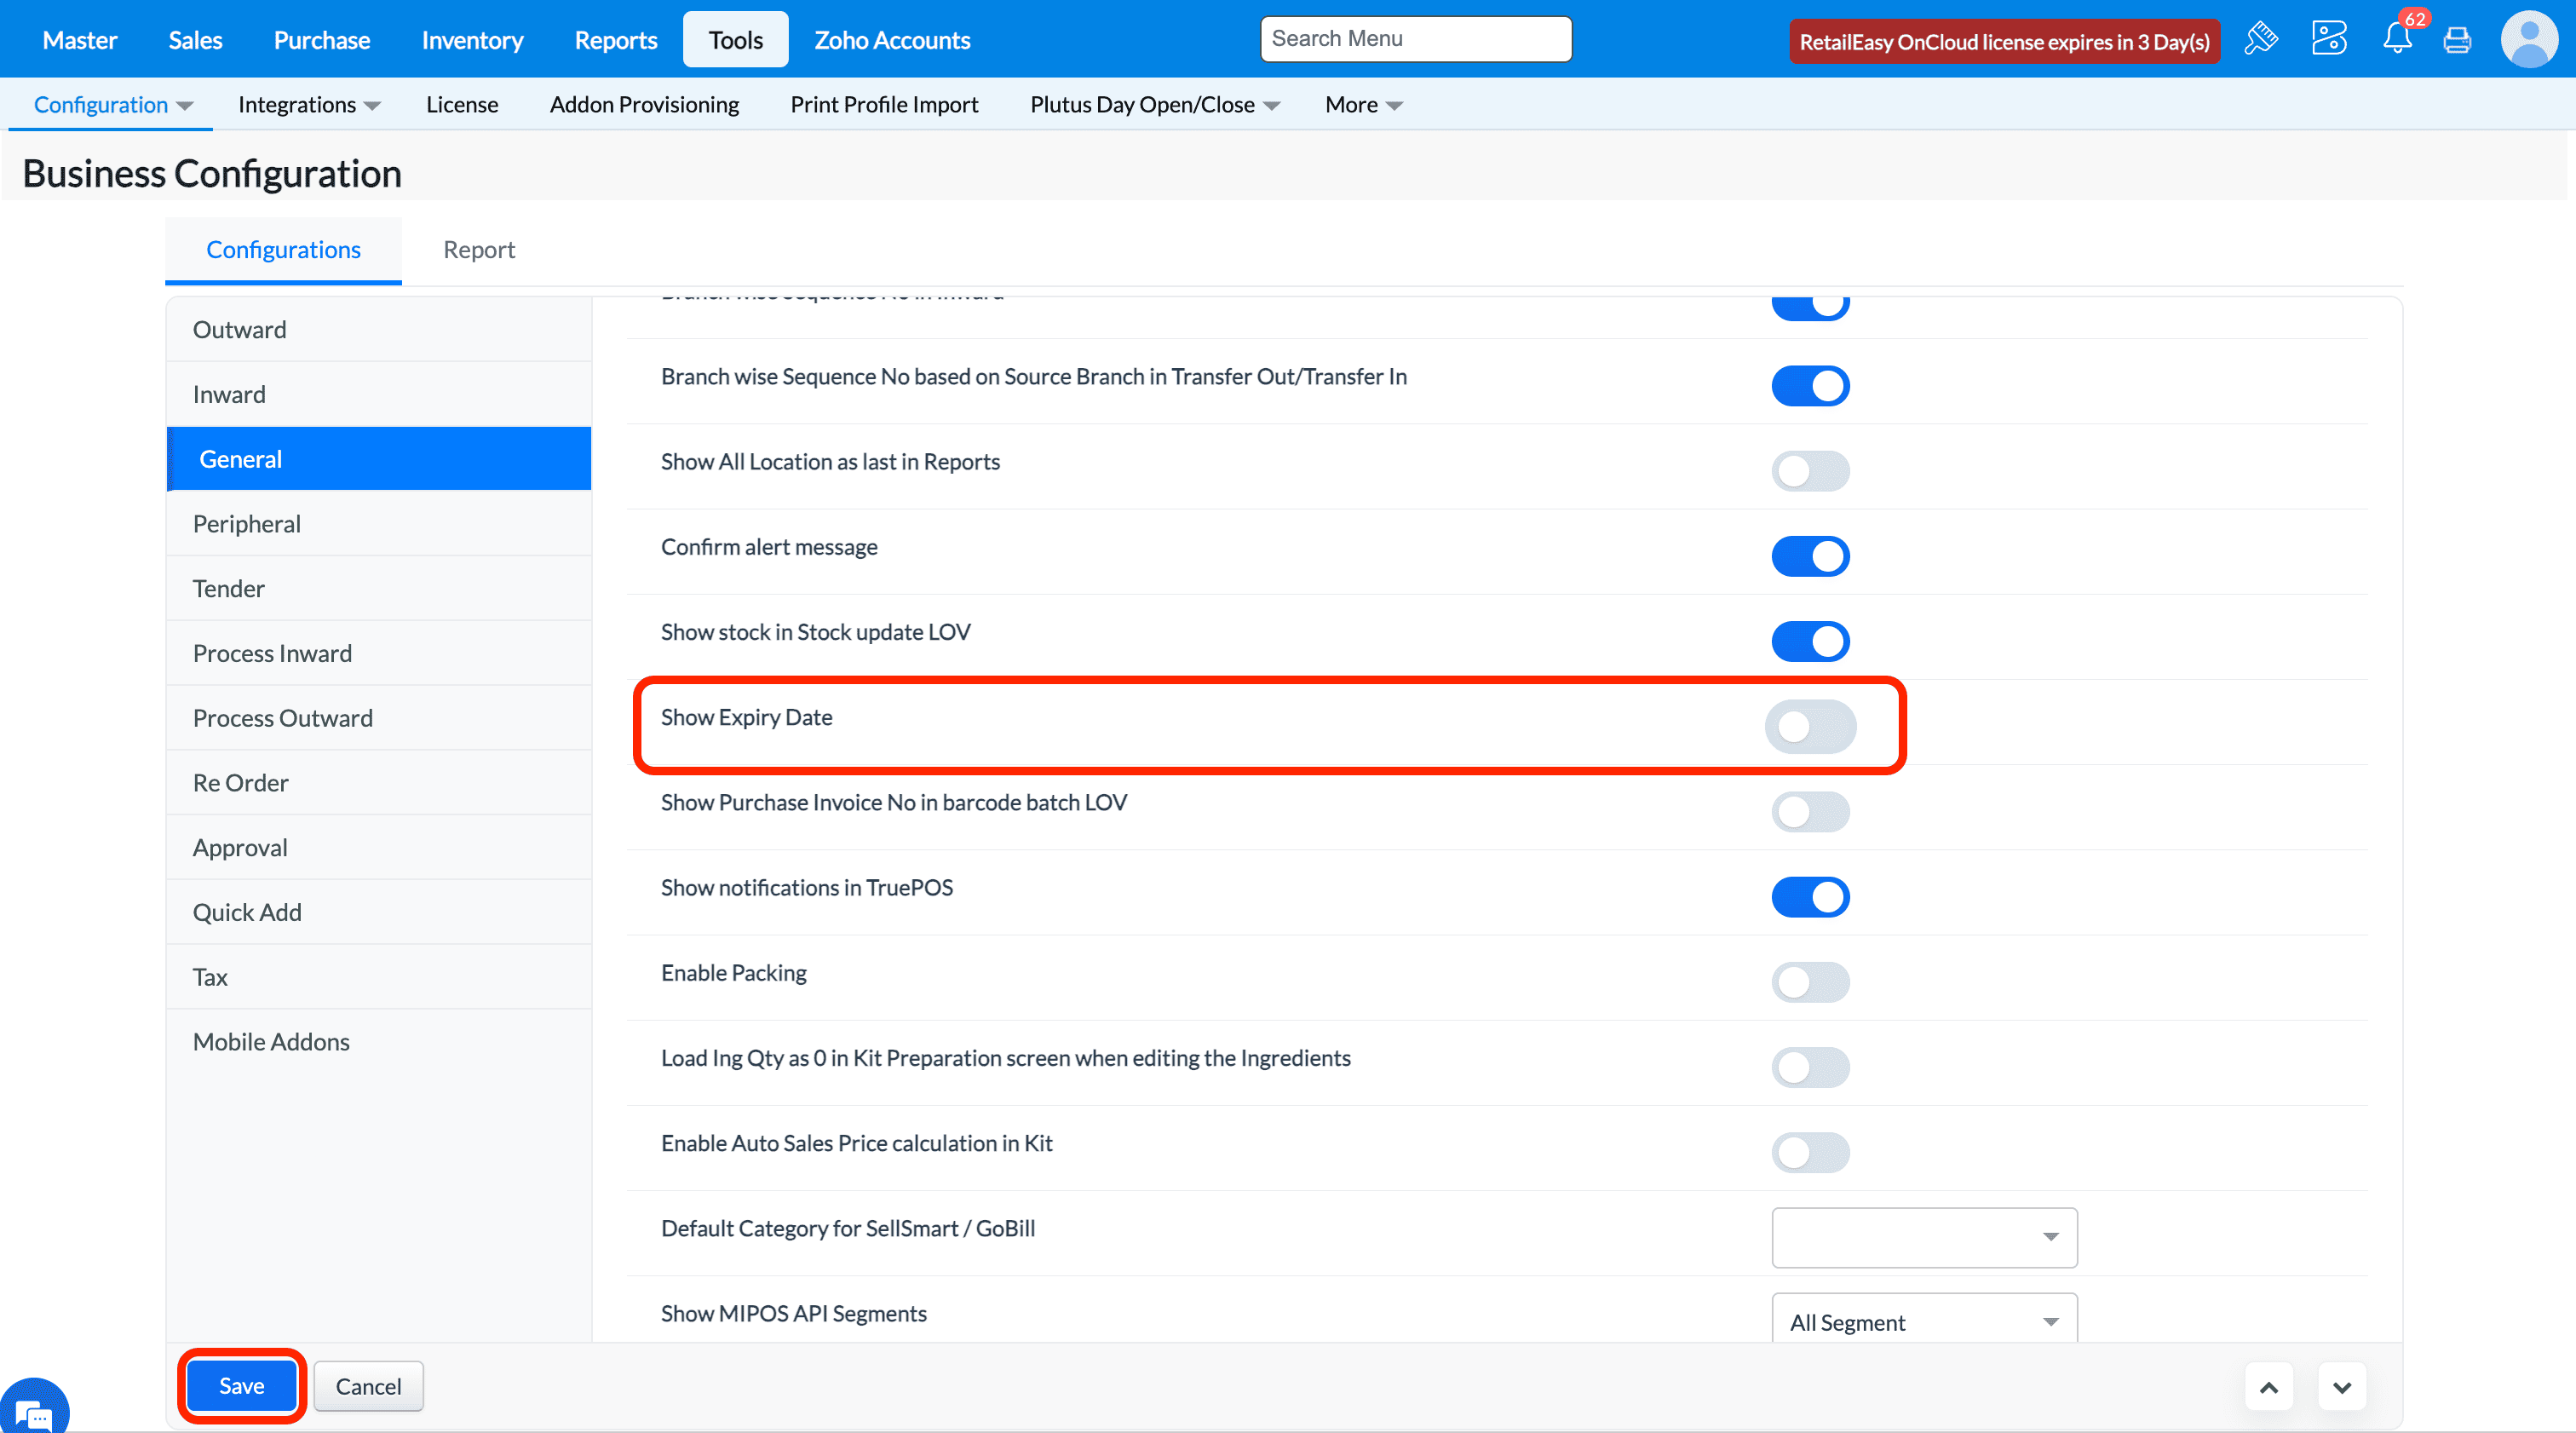
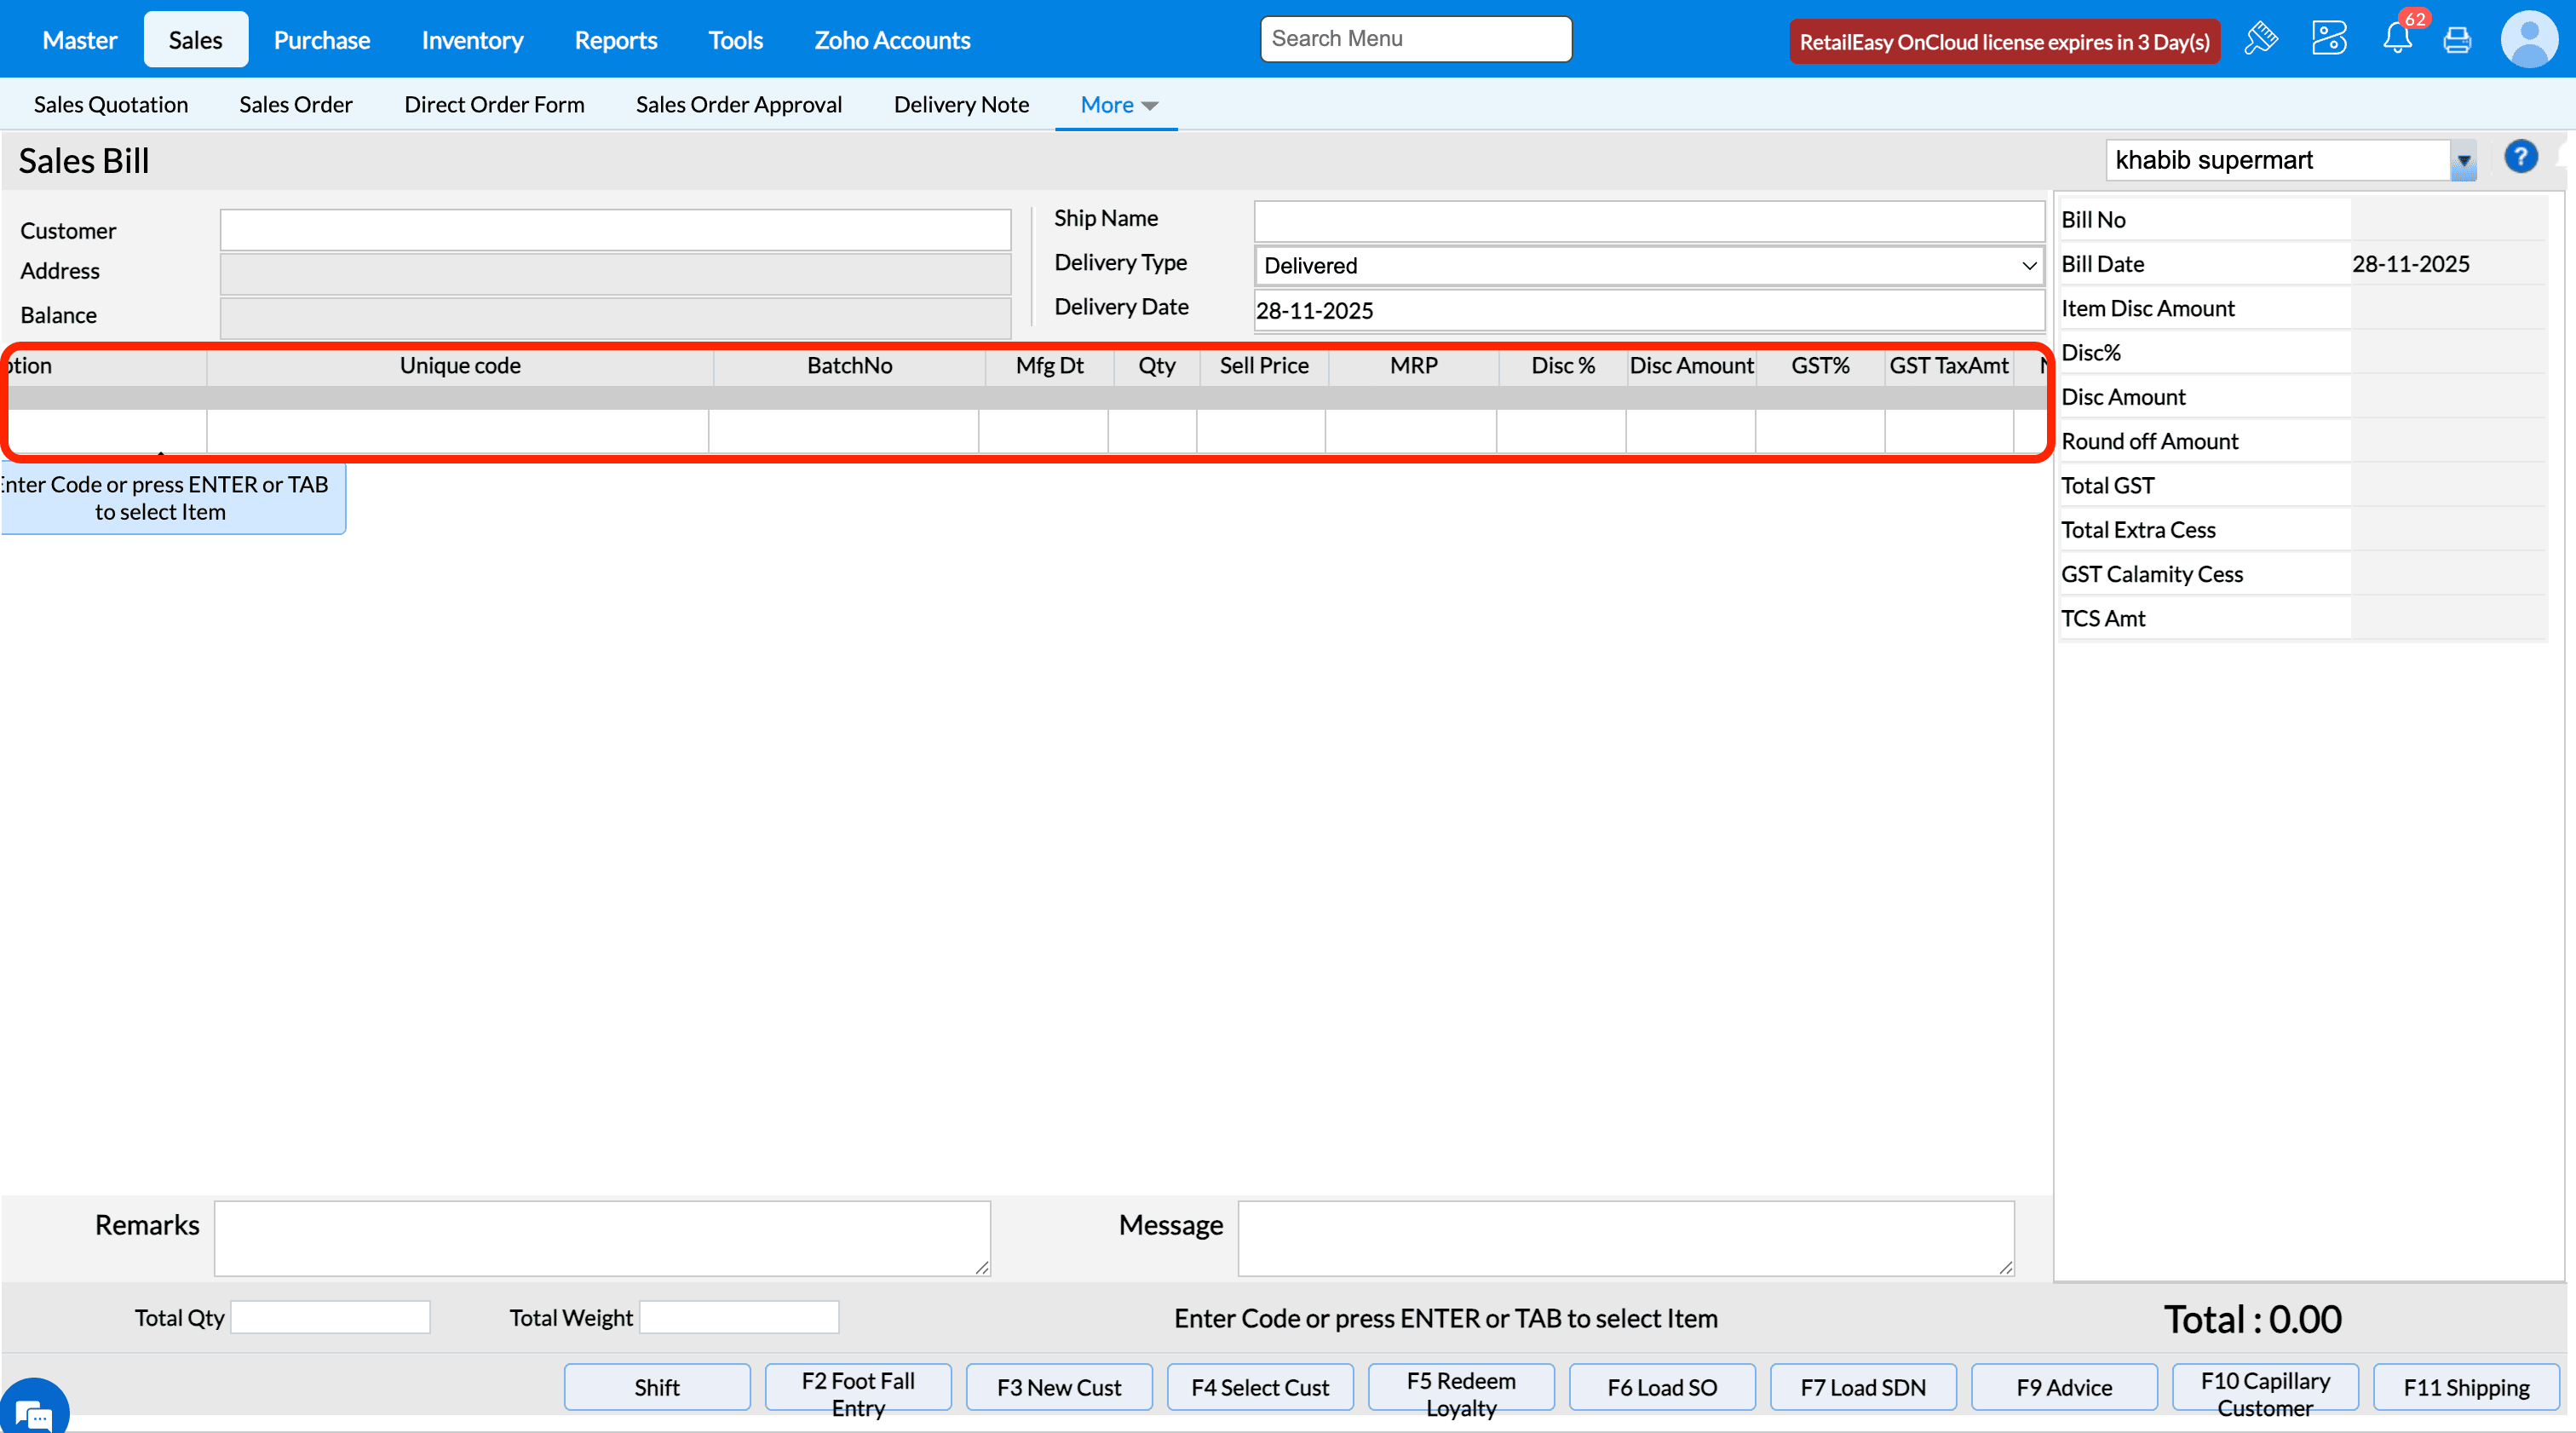
Q24. What does "Show Expiry Date" configuration do?
A24. If the configuration is enabled, then Expiry Date field will be displayed in all transactions screen.
If the configuration is DISABLED, then Expiry Date field will not be displayed in any of the transactions screen.
Q25. What does the 'Show Purchase Invoice No in barcode batch LOV' configuration do?
A16. The use of this configuration is to ensure if we need to display purchase invoice no of the batch when trying to print barcode in barcode printing screen. If the configuration is enabled, then the purchase invoice number will display in batch lov of item in barcode printing screen.
If the configuration is disabled, then the purchase invoice number will not display in batch lov of item and show empty in barcode printing screen.
Q26. What does the 'Show notifications in TruePOS' configuration do?
A18. The use of this configuration is that when enabled, system will display the different notifications receieved for various branches on various operations.
If the configuration is disabled, then system will not display any notifications received for any branch.
Q27. What does the “Enable Packing” option do?
Purpose - When the Enable Packing option is enabled, users can select different Units of Measure (UOM) during inward and outward transactions. The system will update the stock based on the selected UOM, allowing flexible stock handling according to packing or unit variations.
Prerequisites - If You Want to Transaction of Item Based on Packing in that case in Item Base UOM, Sub UOM and there Conversion value Must Need to Provide.
Master >> Item >> UOM Vs Item Mapping
* If we enable this configuration then at time of inward / outward transaction you can select the packing option.
1. In Sales Bill Transaction Screen Packing Option Will enable.
2. Inward Screen Packing Option Will enable.
* If We Disable this configuration then at time of inward / outward transaction you can Not select the packing option By Default UOM Will Take in the Transaction Screen.

1. Sales Bill Screen No Packing Option.
2. Inward Screen no packing Option.
Q28. What does the 'Load Ing Qty as 0 in Kit Preparation screen when editing the Ingredients' configuration do
A22. The use of this configuration is to let system load the actual ingredient quantity at the time of edit operation during kit preparation or not load the quantity during edit.
If this configuration is enabled then when tried to edit ingredient items during kit preparation, then quantity will not be loaded in screen.
If this configuration is disabled then when tried to edit ingredient items during kit preparation, the actual quantity will be loaded in screen.
Q32. What does the 'Hide offer columns in transactions' configuration do?
A32. The use of this configuration is to let system decide whether to display itemwise scheme discount related columns like Scheme Disc %, Scheme Amt,
Scheme Others, Scheme Cash in sales transaction screens. If the configuration is enabled, then item scheme discount related columns will not be visible.
If the configuration is disabled, then item scheme discount related columns will be visible.
Q33. What does the 'Enable auto mail (Sales,PO)' configuration do?
A33. The purpose of this configuration to decide whether to send an email automatically in csv format to customer or supplier when a sales or purchase order is made.
Note - We can import the invoice in csv format to any other software or purchase
How to send the invoice in CSV format
Step 1: Go Master->Customer ->Customer
Step 2: Click on Add New Customer
Step 3: Enter the valid email id
Step 3:Choose the Mail type as CSV and click on Save
To enable the configuration
Step 4:Go to Tools->Configuration->Business Configuration
Step 5: Search with auto mail and click on Enable auto mail (Sales,PO) and click on Save button
To make a sales bill
Step 6: Choose the customer and make a invoice and click on Save button
Step 7: Choose the payment and click on OK
Step 8: You will receive the mail in mentioned mail id from shipping address given
Q34. What does "Show Mfg Date" configuration do?
A34. If the configuration is enabled, then Mfg Dt field will be displayed in all transactions screen.
If the configuration is disabled, then Mfg Dt field will be displayed in all transactions screen.
Q35. What does "Show Batch No" configuration do?
A35. If the configuration is enabled, then BatchNo field will be displayed in all transactions screen.
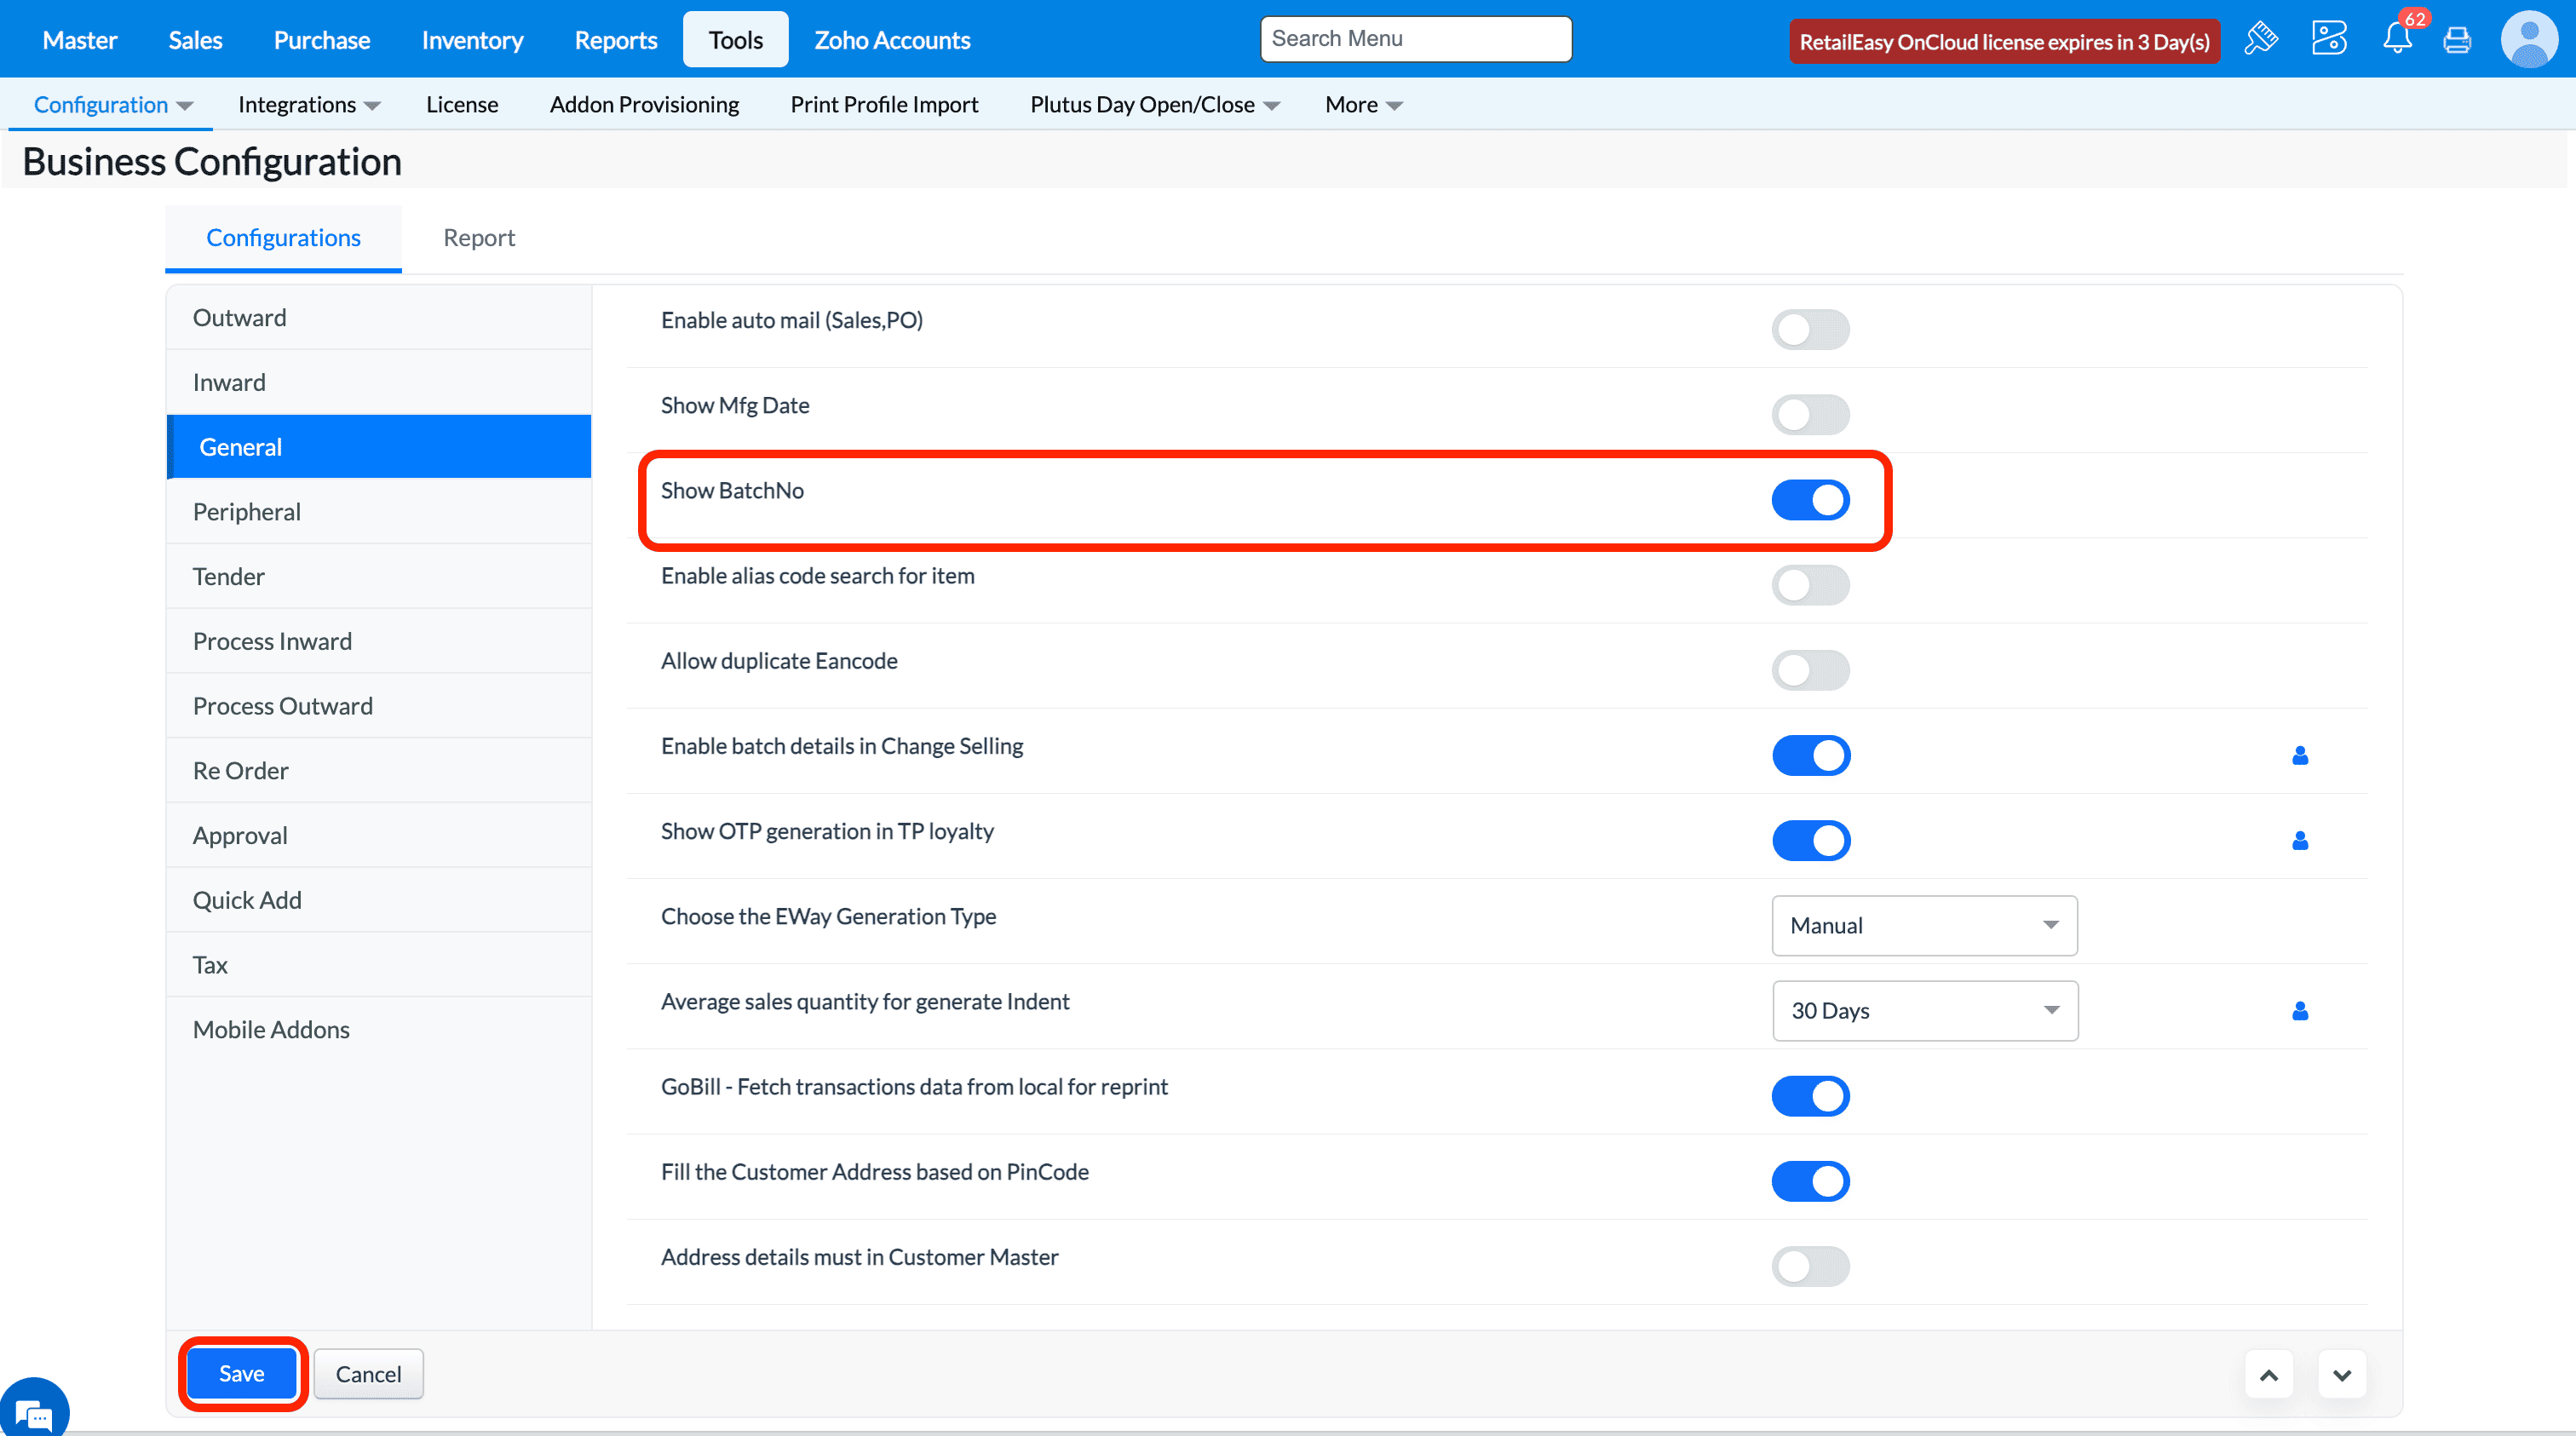
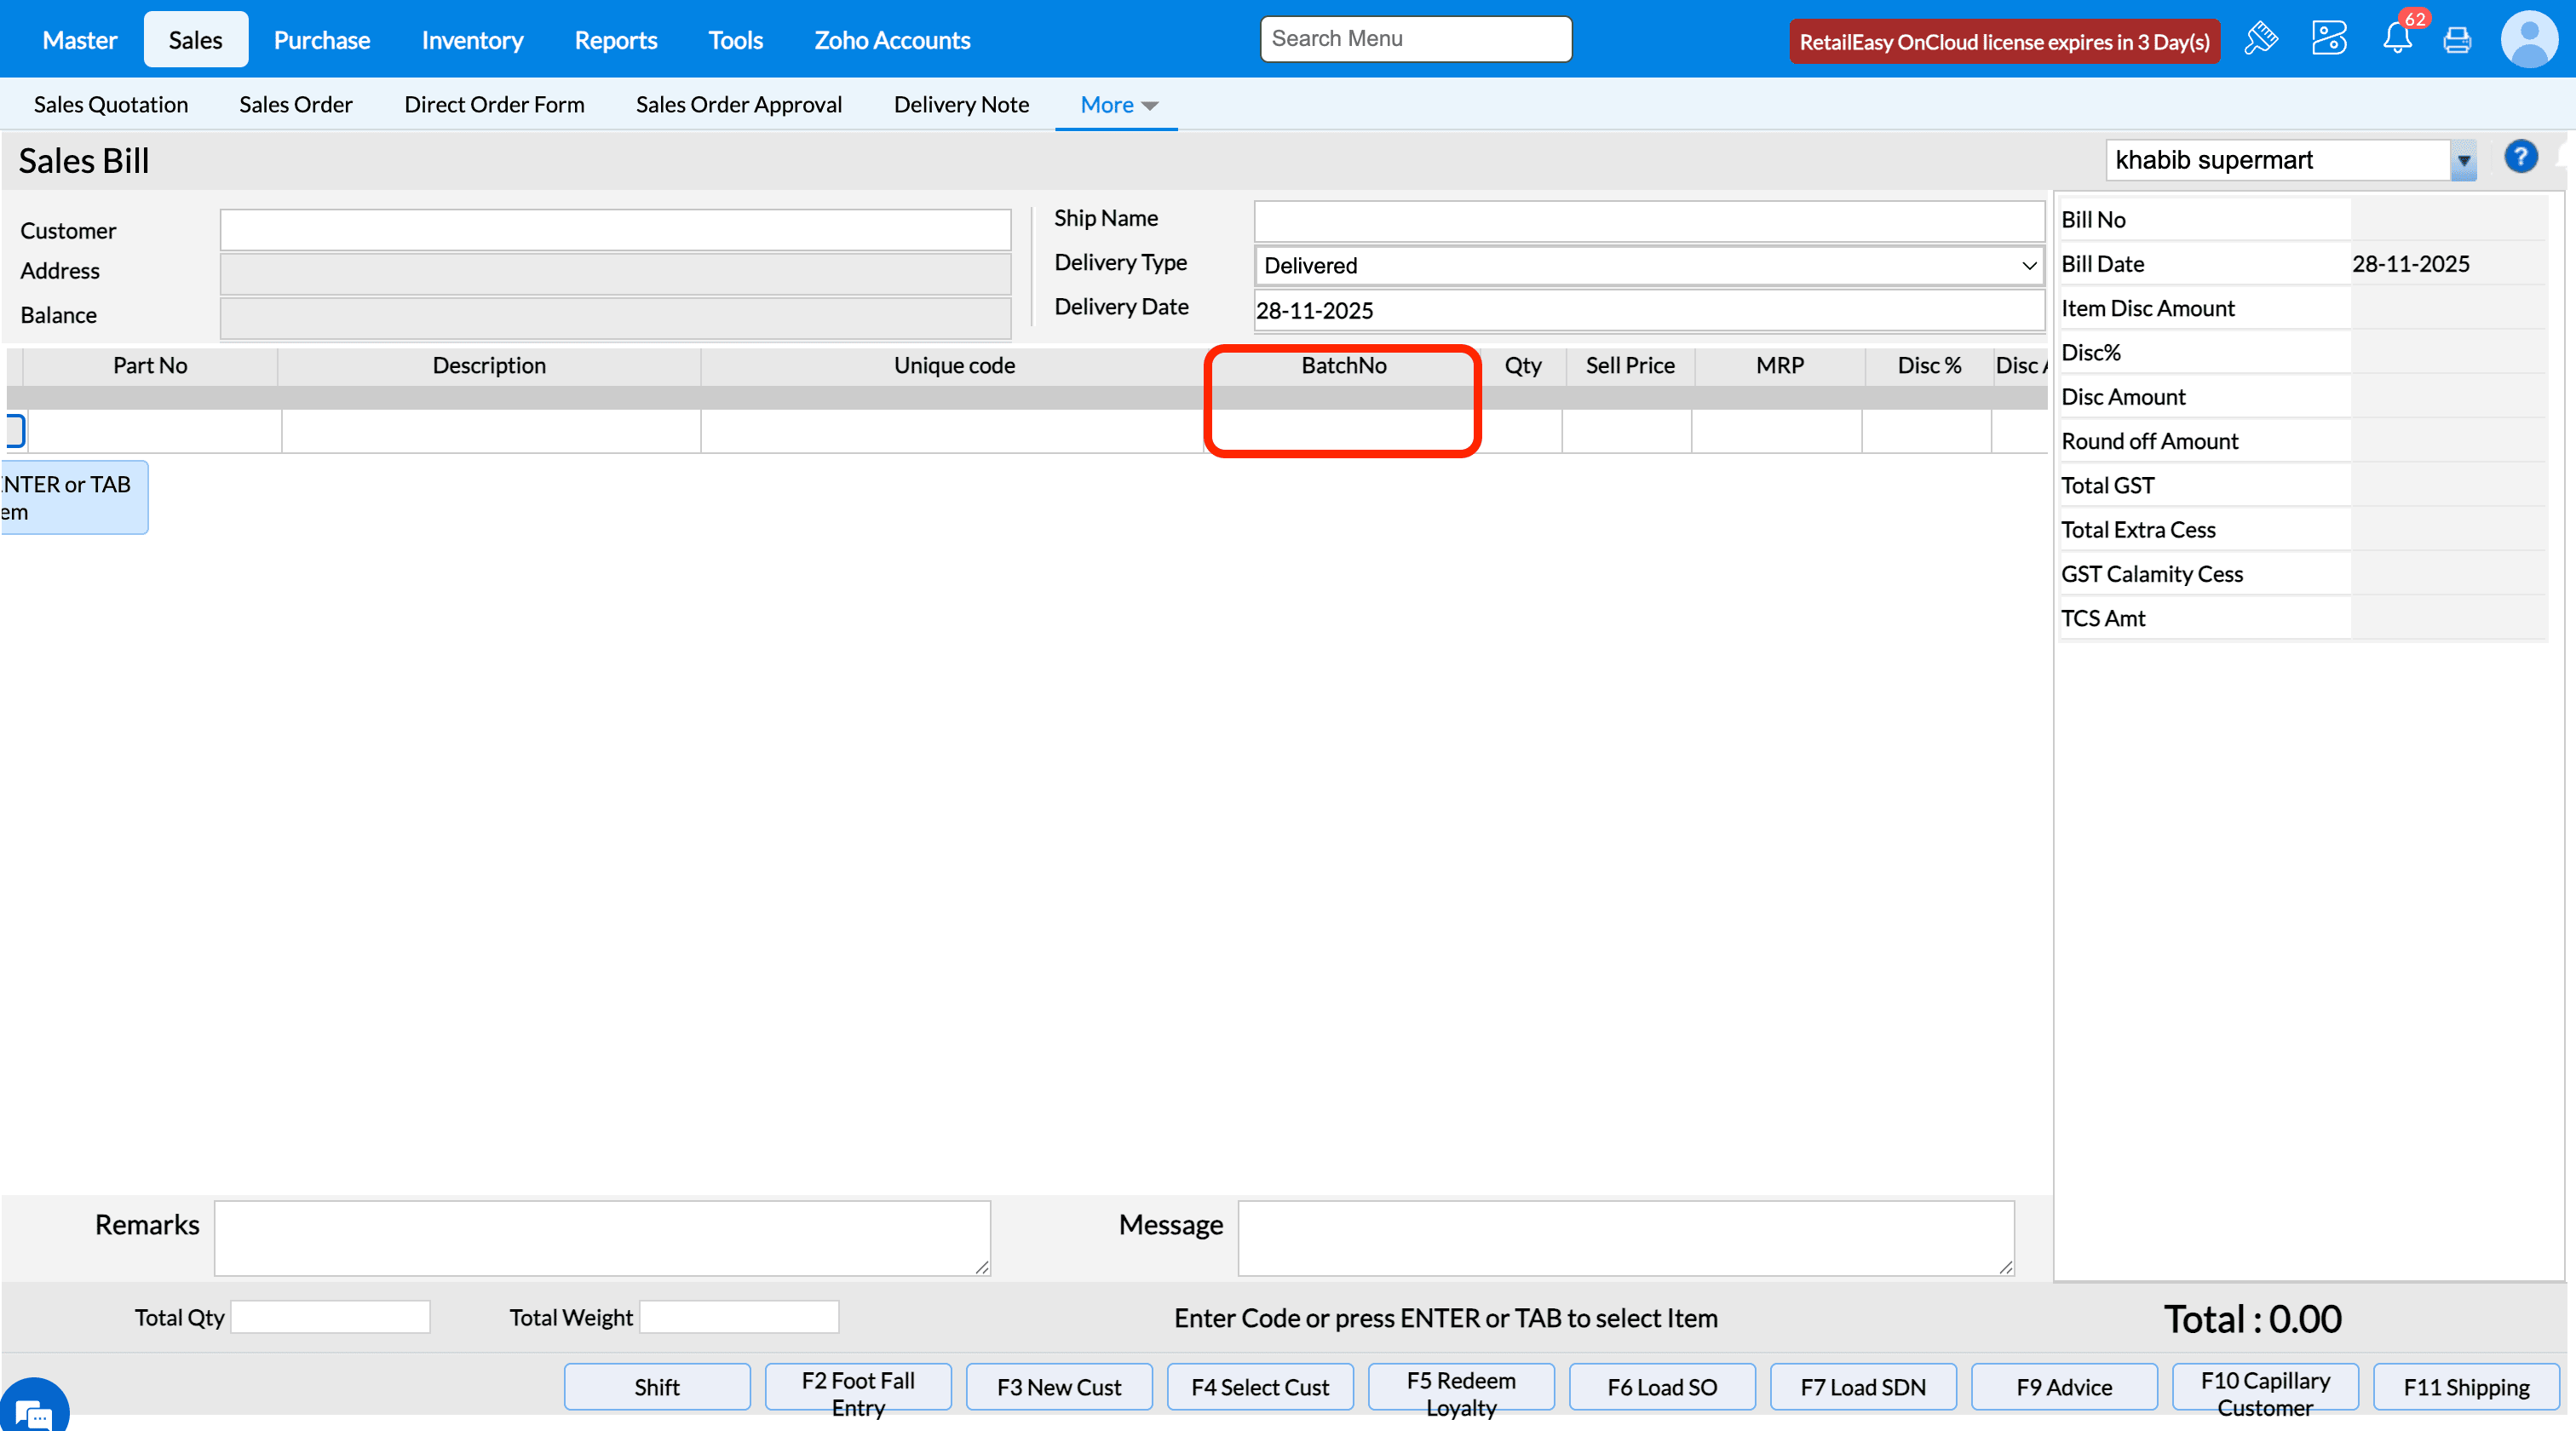
If the configuration is disabled, then BatchNo field will be displayed in all transactions screen.
Q38. What does the “Continous sequence number for all counters” option do?
Purpose - This option ensures a single, continuous sequence number across all counters for invoices. When enabled This Configuration Than follow the same running number sequence, preventing duplicate numbering and maintaining uniform invoice tracking across multiple billing counters.
* If You Enable this Configuration than continuous sequence number will generate across all counters

Note - If You want to enable this Configuration Kindly reach us in Live chat.
For example, if a bill is created at Counter A with bill number 66, then the next bill created at Counter B will be generated with bill number 67.
* If you Disable this Configuration than same continuous sequence number will Not generate across all counters
For example, if a bill is created With Two Different Counter ( Counter A ,Counter B ) For Both The Counter Same Sequence will Not generate.
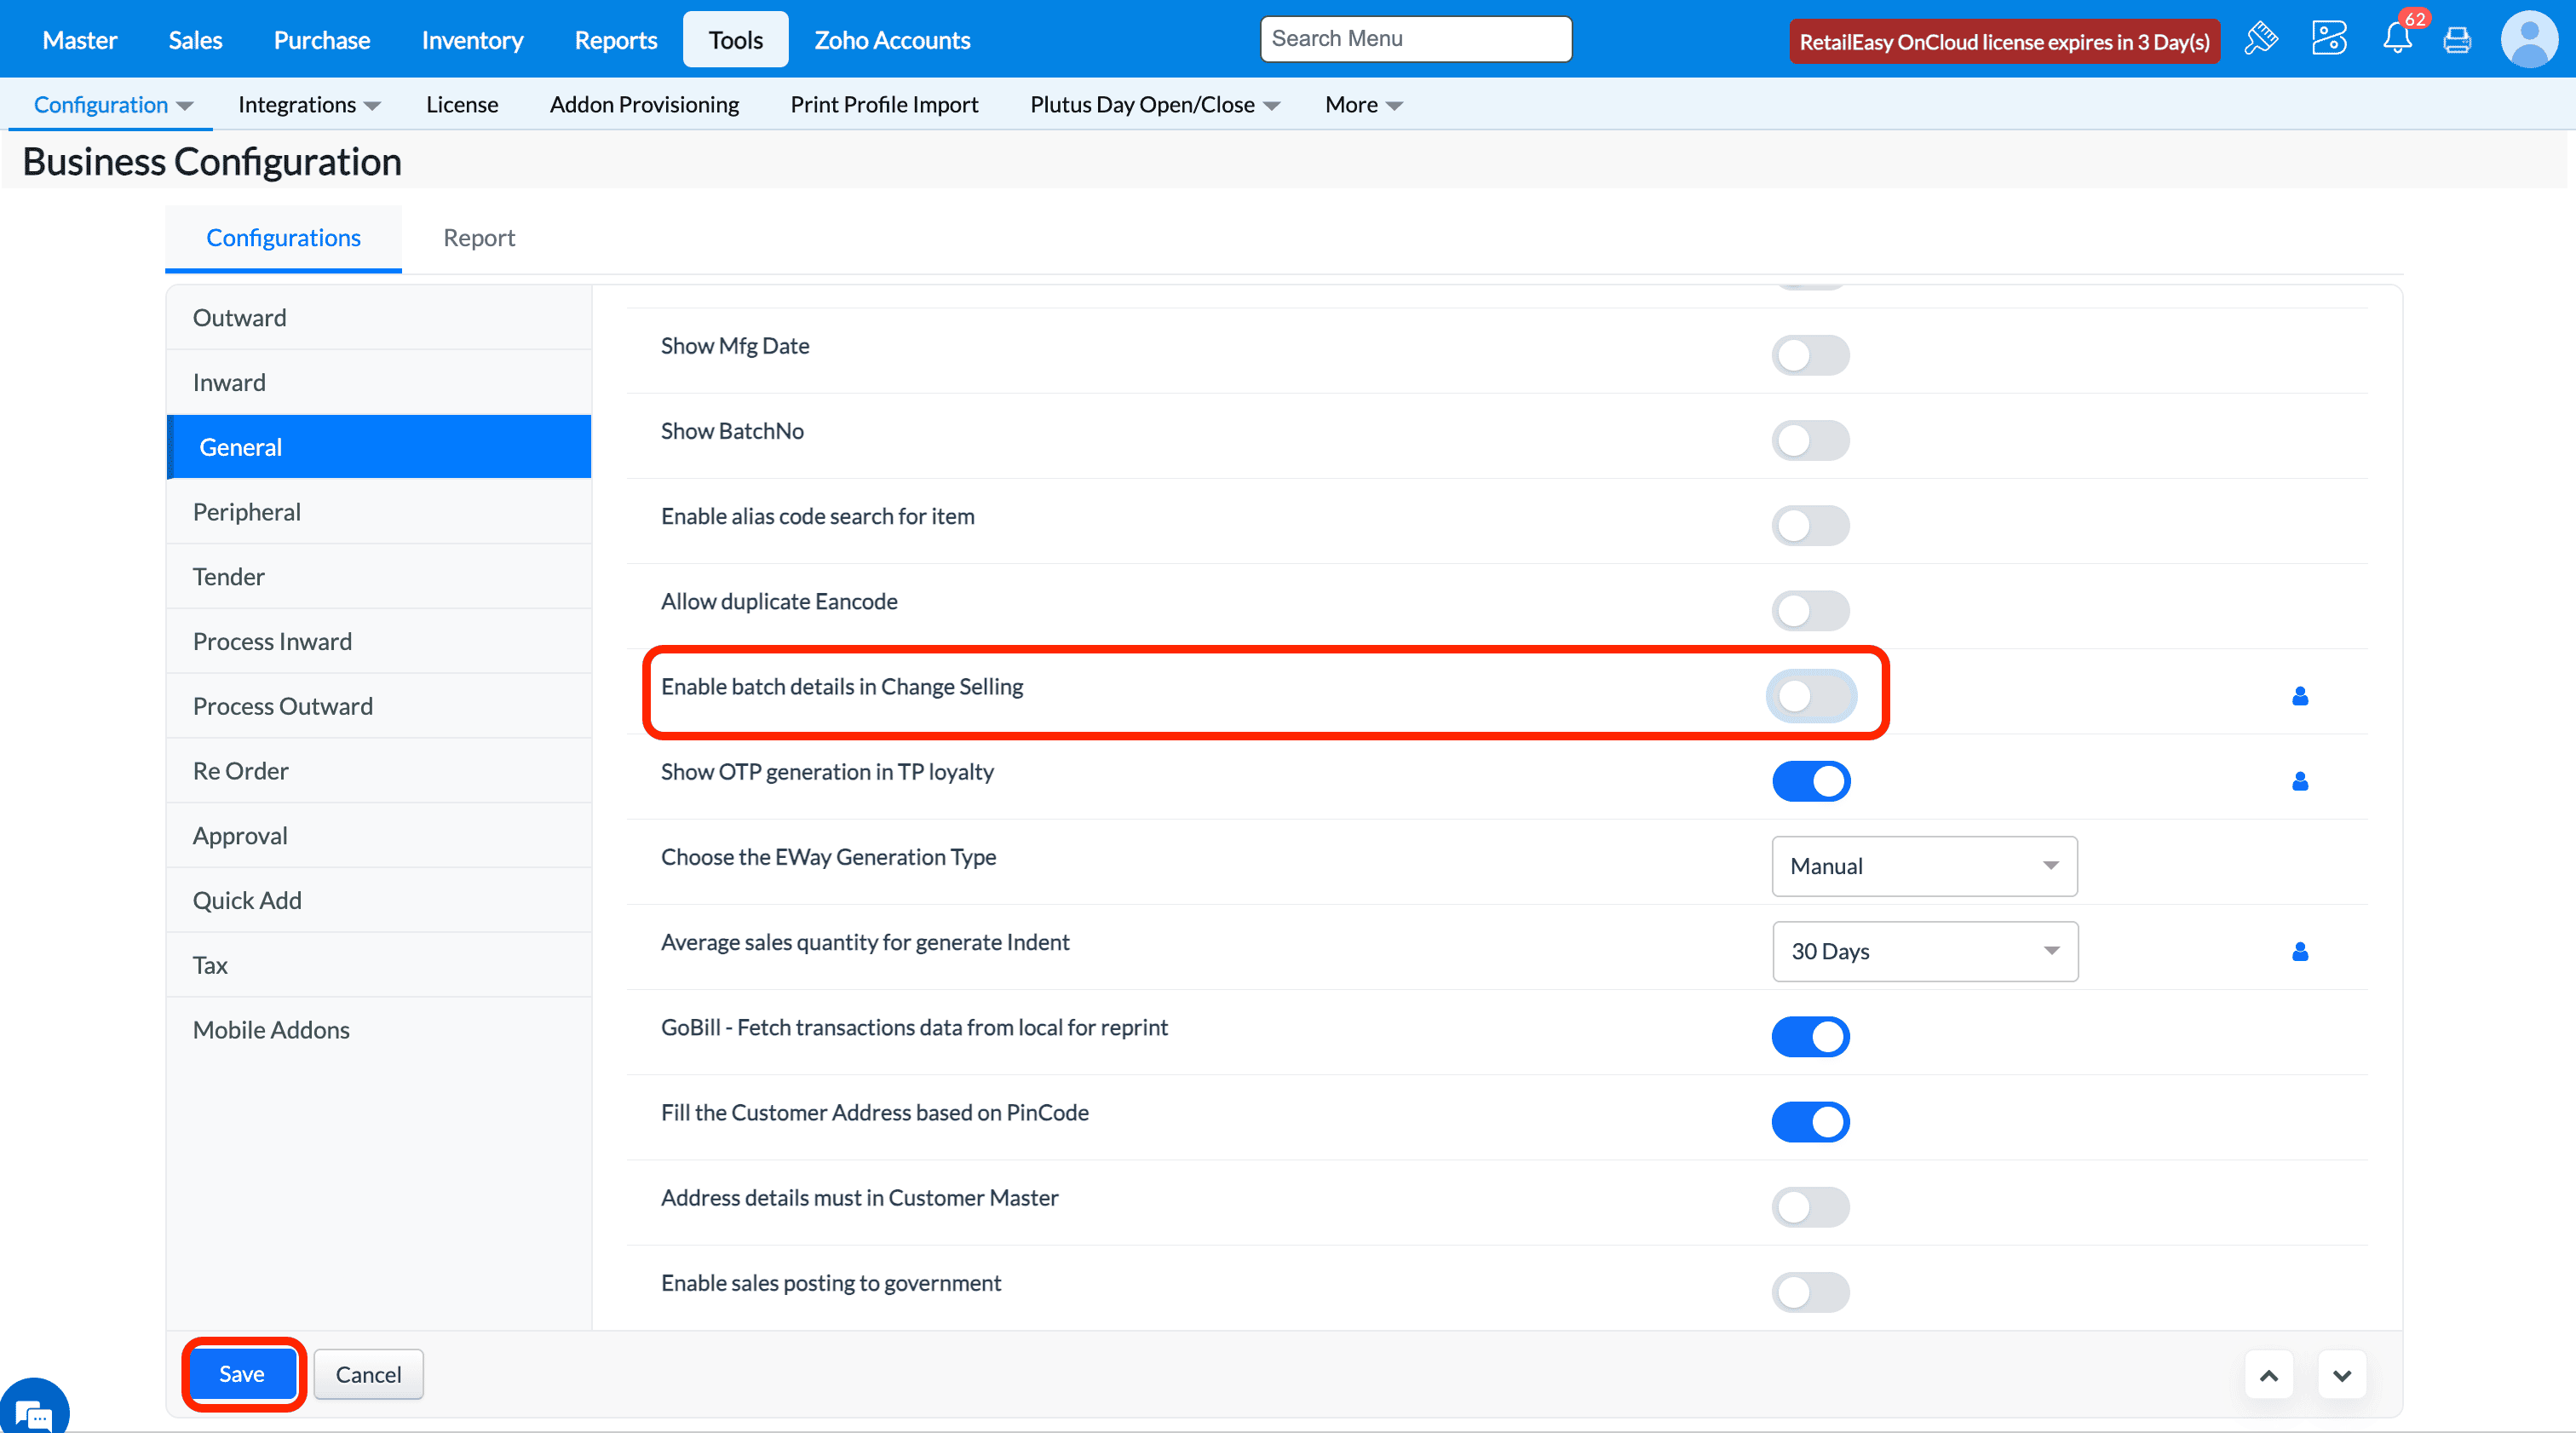
Q40. What does "Enable Batch details in Change Selling" configuration do?
A40. If the configuration is enabled, then Batch details modal popup will be displayed after selecting item in the Change Selling screen.

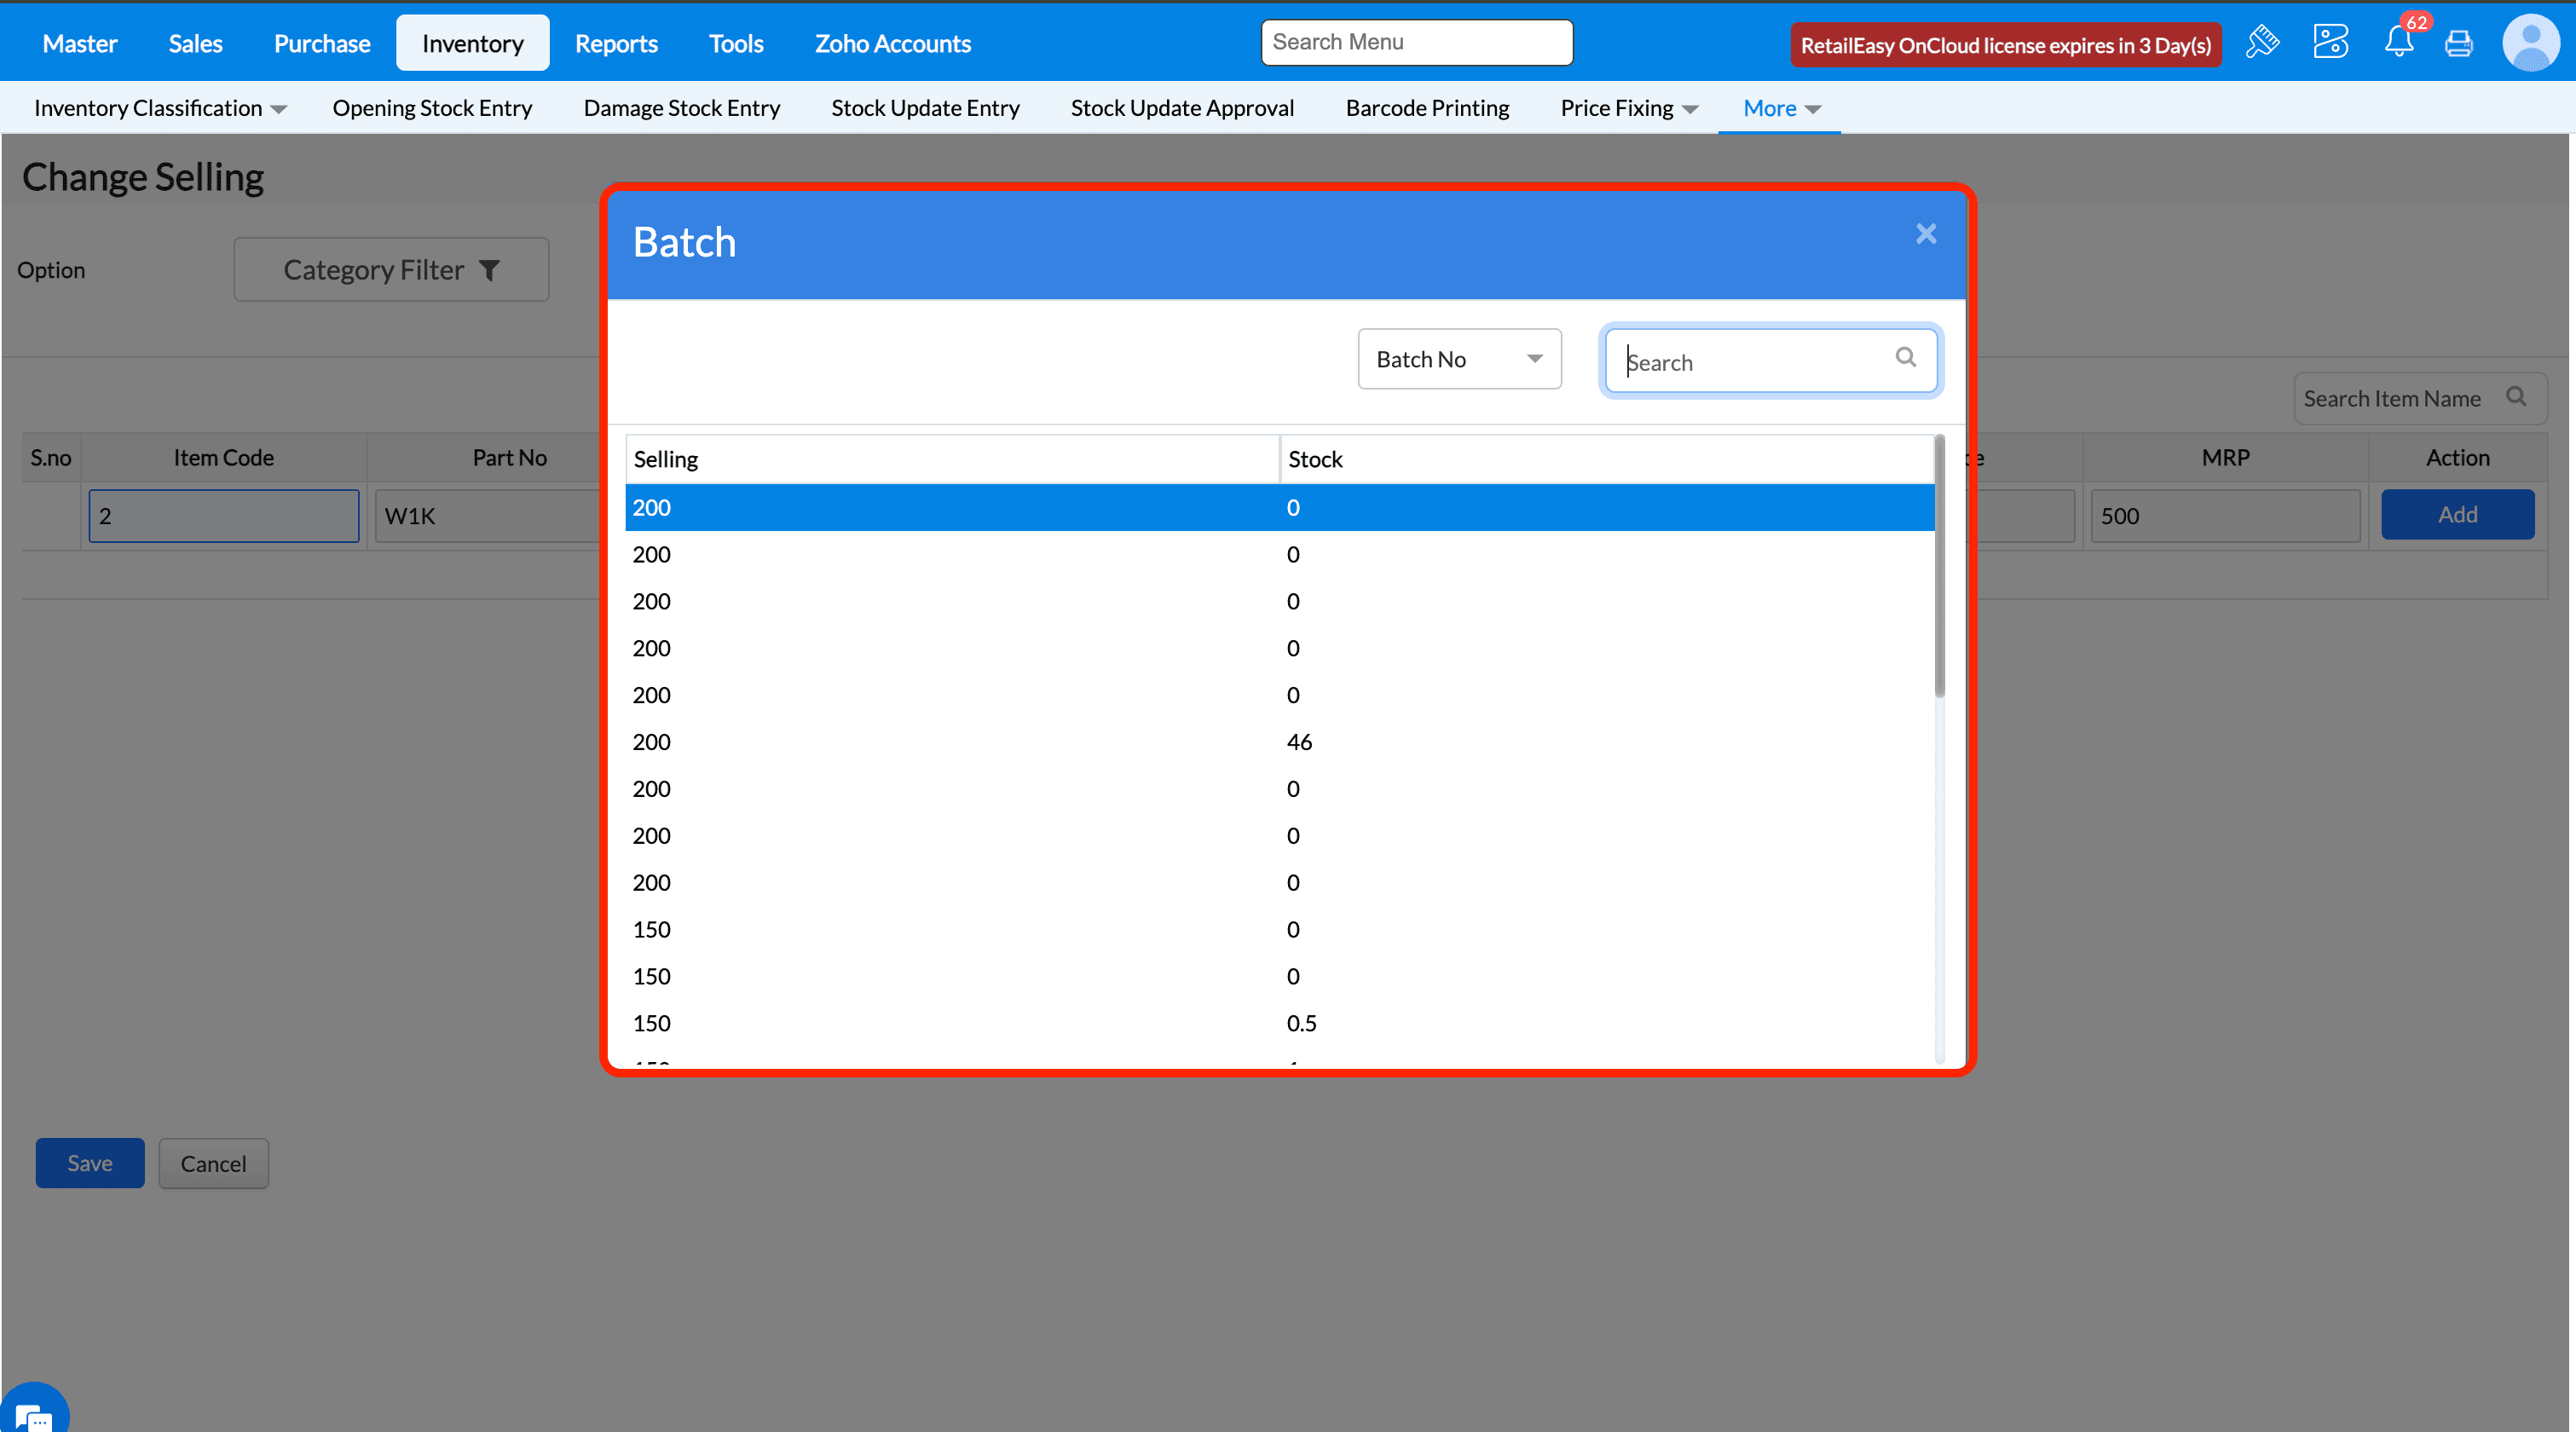
If the configuration is disabled, then Batch details modal popup will not be displayed after selecting item in the Change Selling screen.
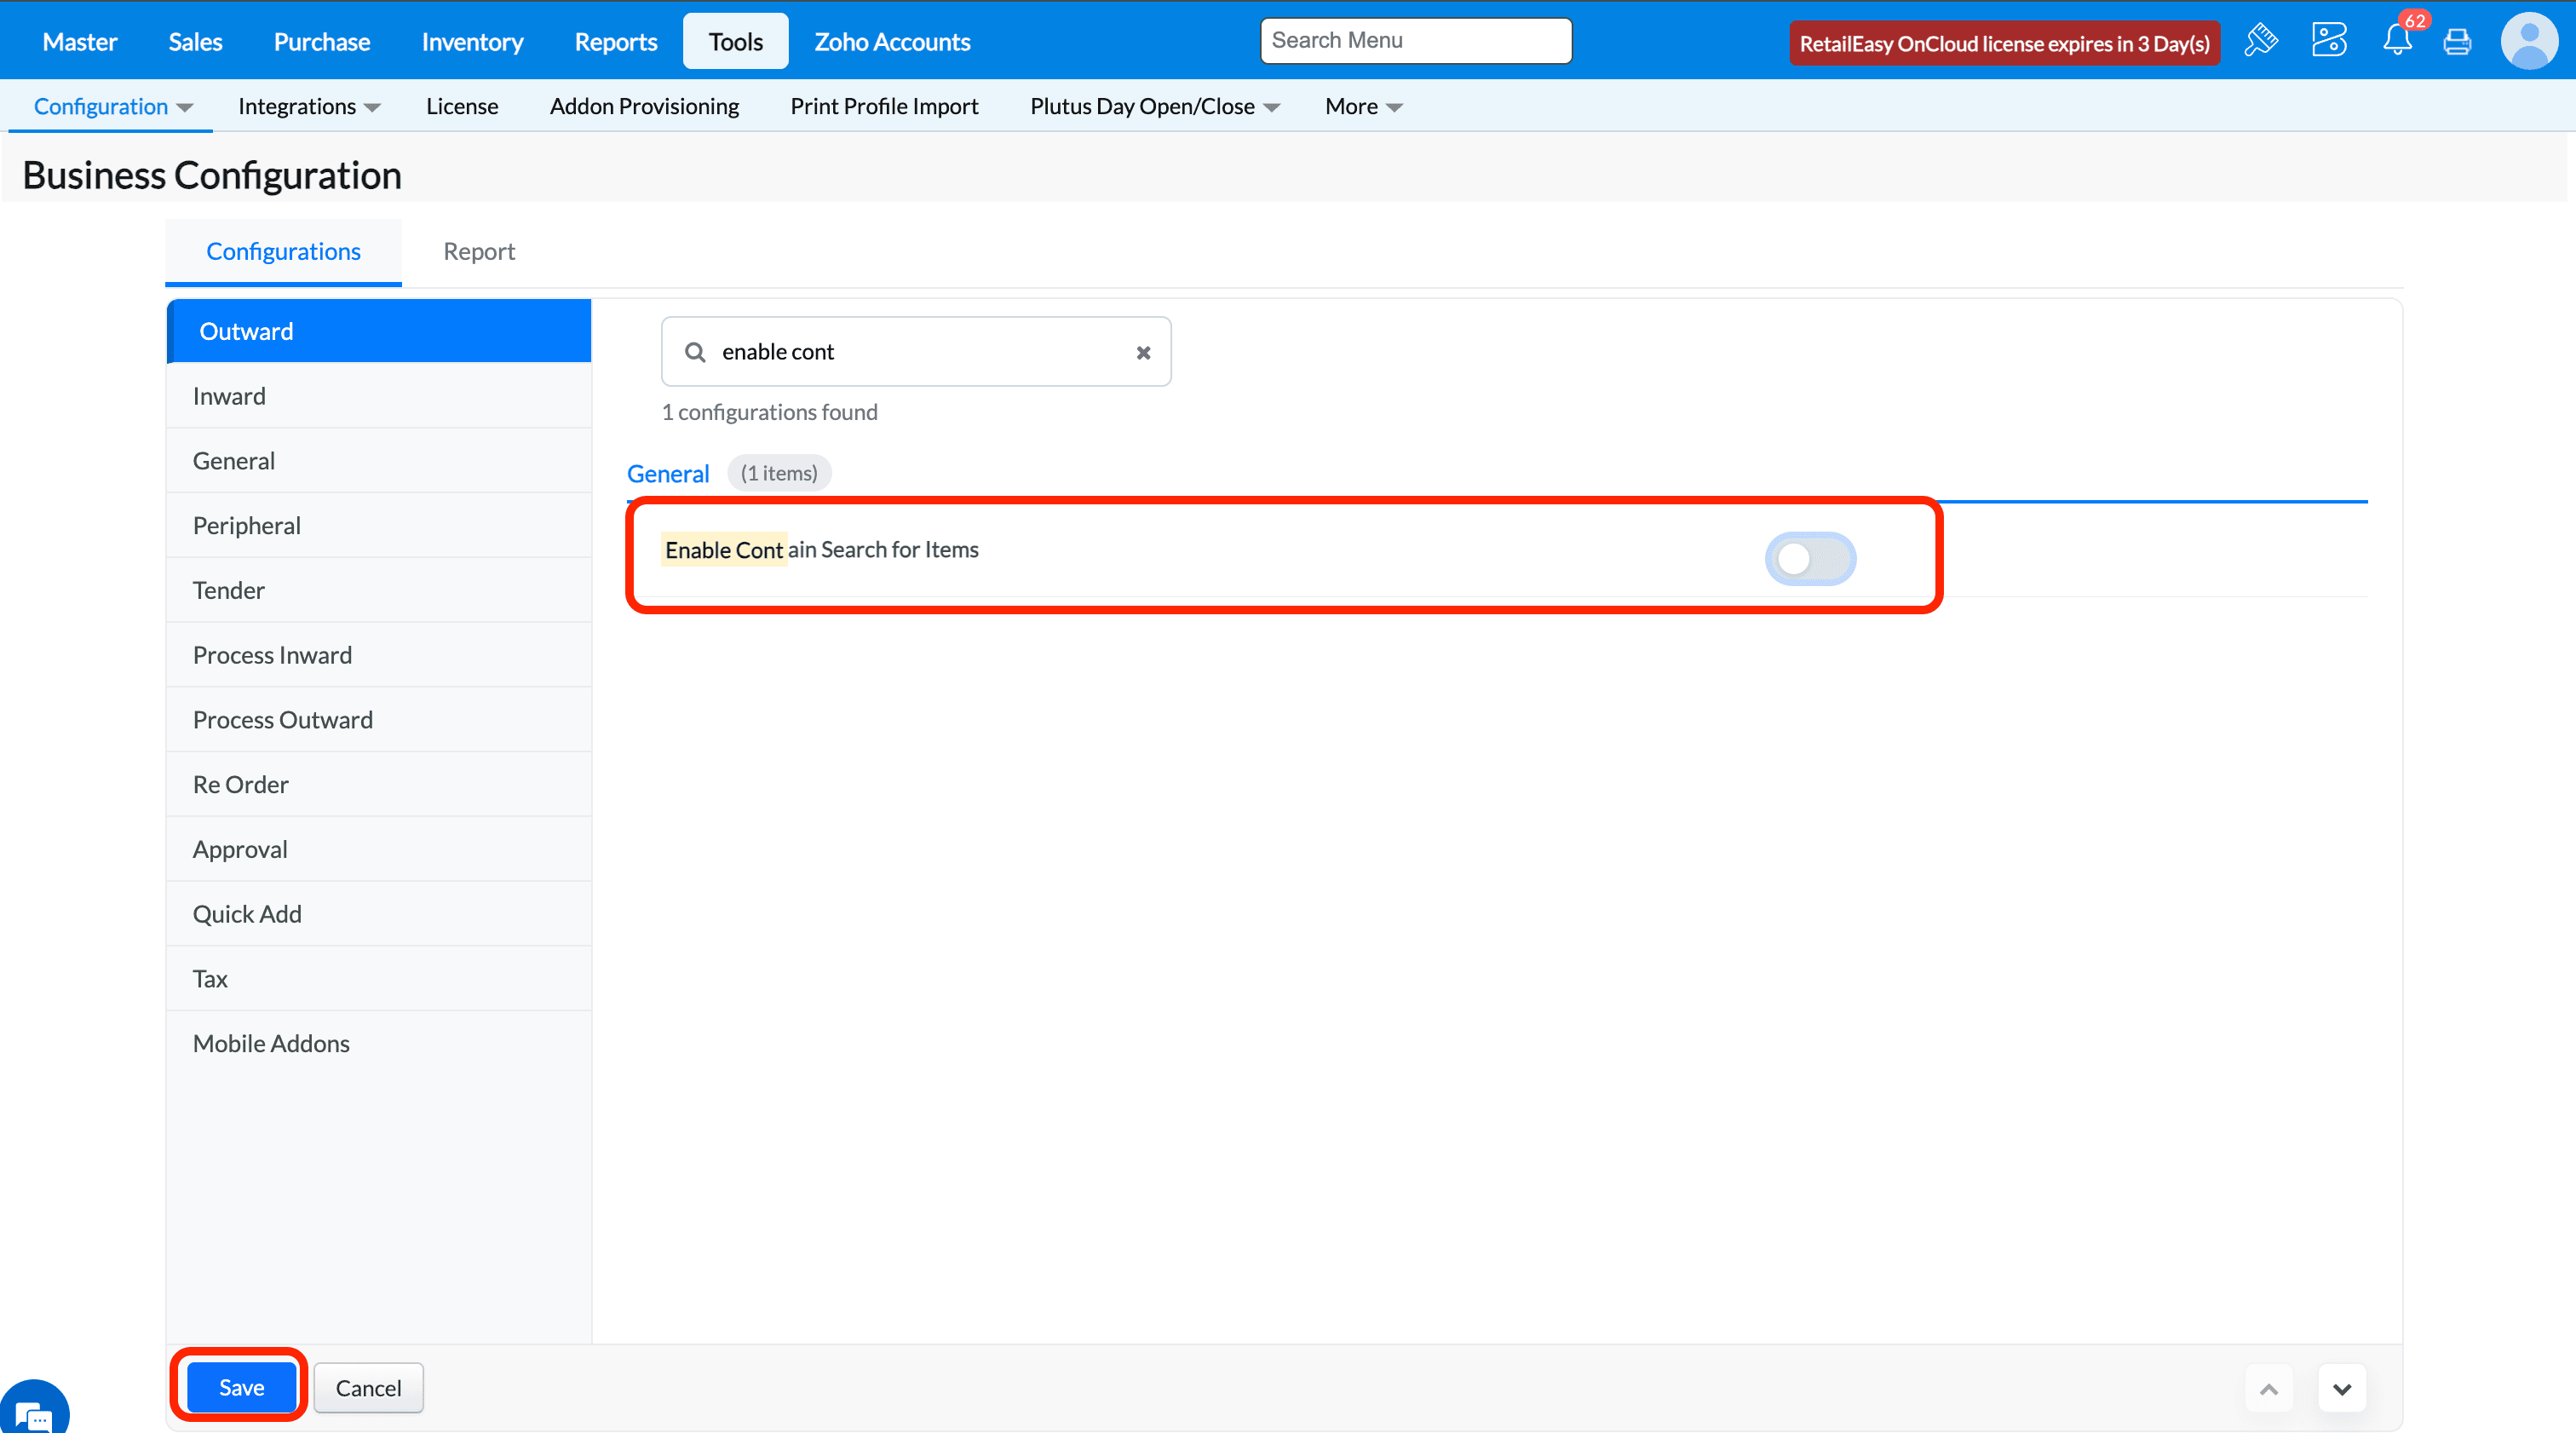
Q17. What does "Enable contains search in Item" configuration do?
A17. If the configuration is enabled, then wherever item is to be searched there we can search based on 'contains' flow. i.e, search any part of the word and if the text is present in the item then it will show the item name.
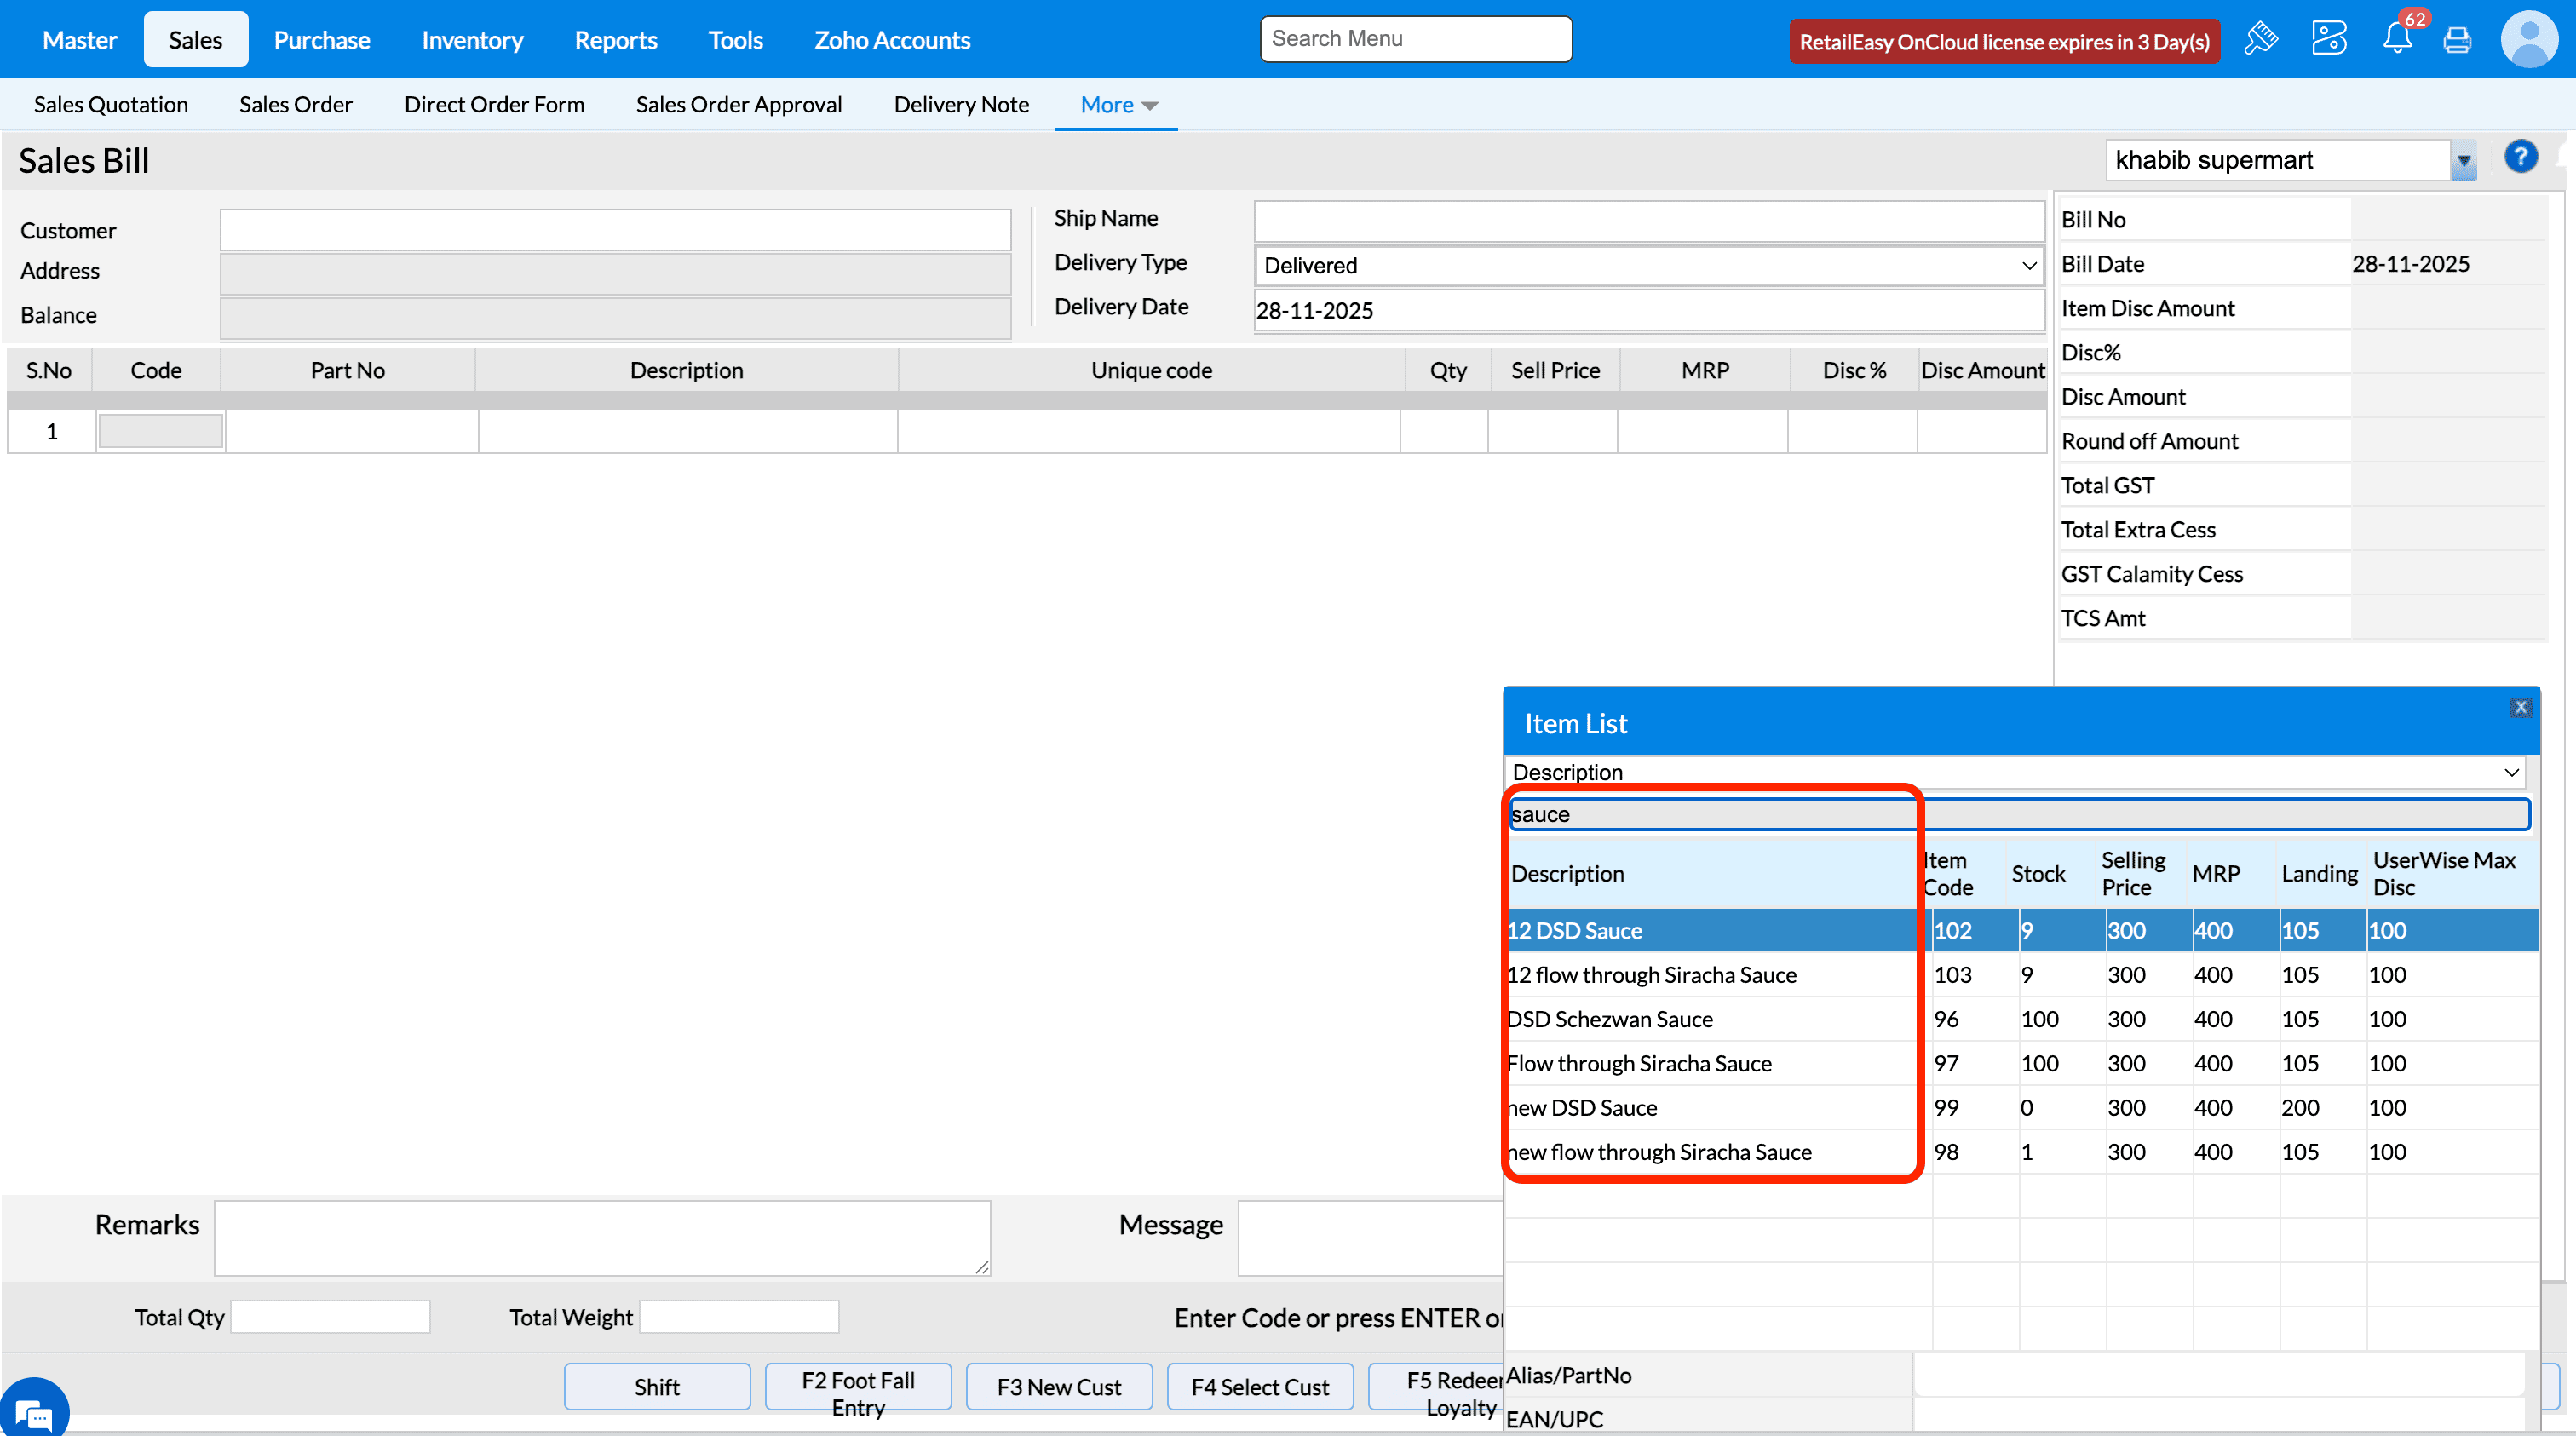
If the configuration is disabled, then item search works based on 'Starts With'. i.e, if the searched text is present in the starting of the item then it will show the item name.
Q23. What does the 'Show stock in Stock update LOV' configuration do?
A23. If this configuration is enabled then the current stock will be displayed in the item selection lov of Stock Update Entry screen.
If this configurations is not enabled, then the current stock column will not be displayed in the item selection lov.
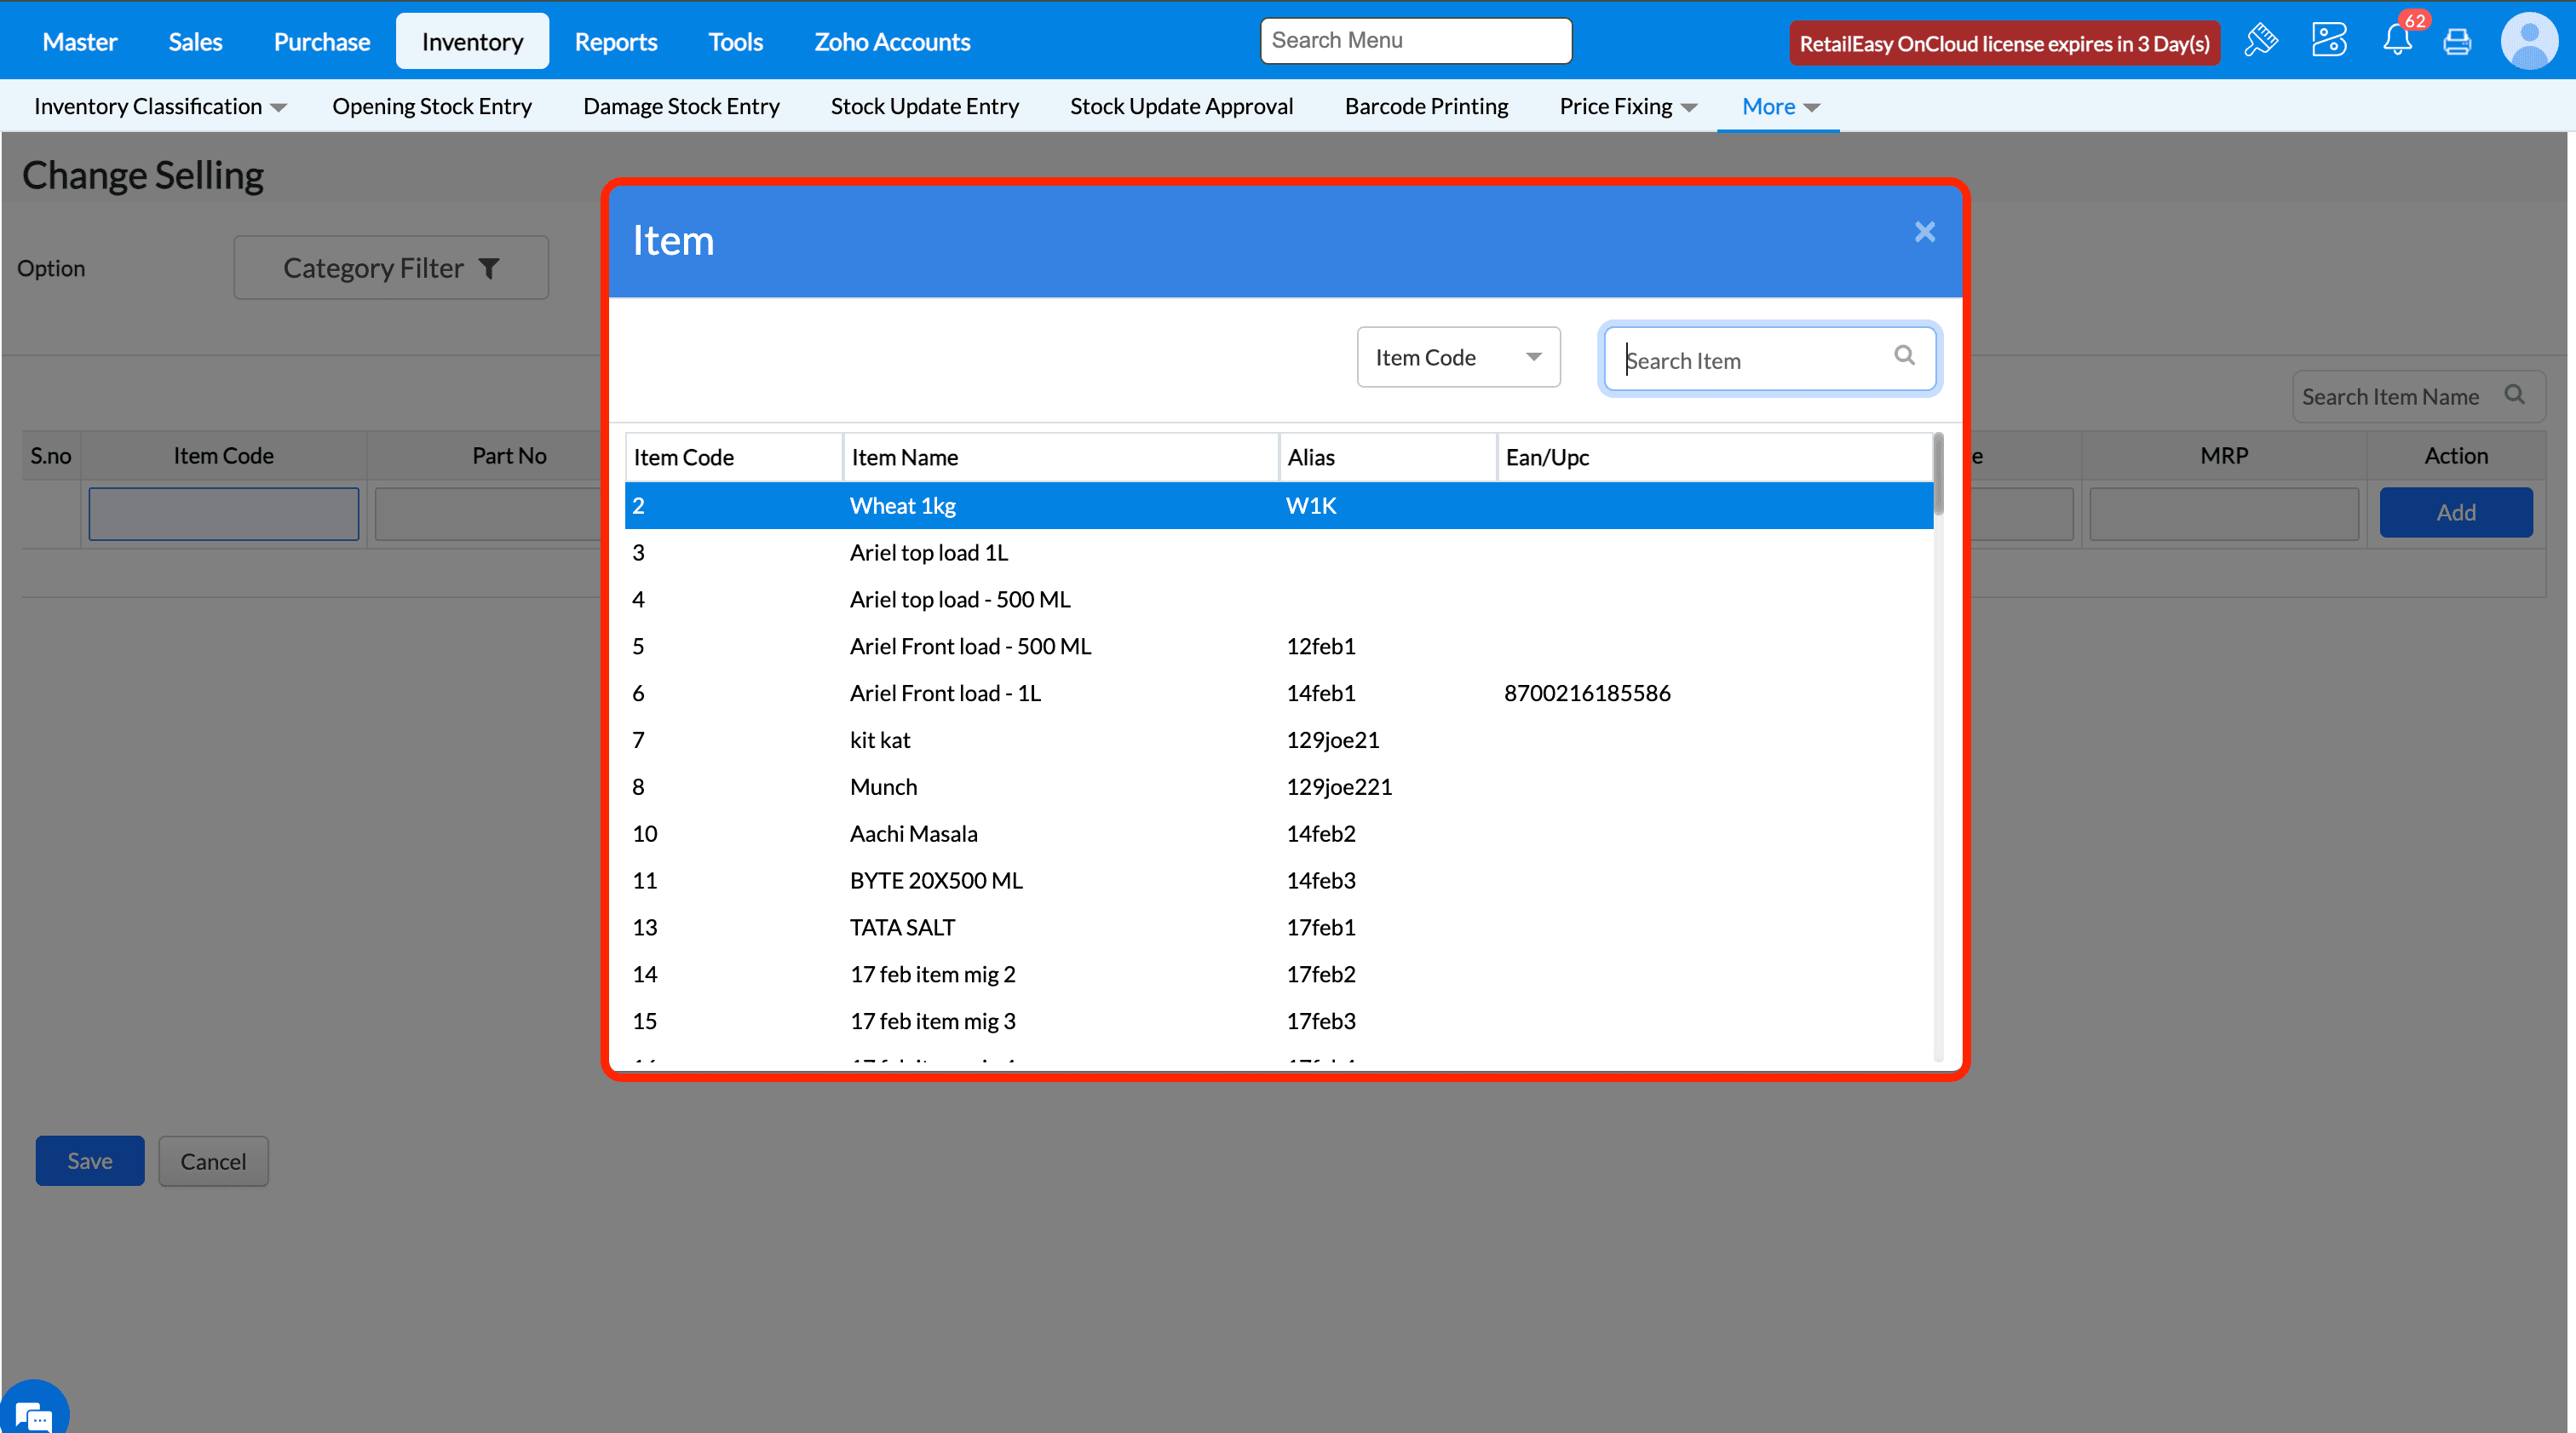
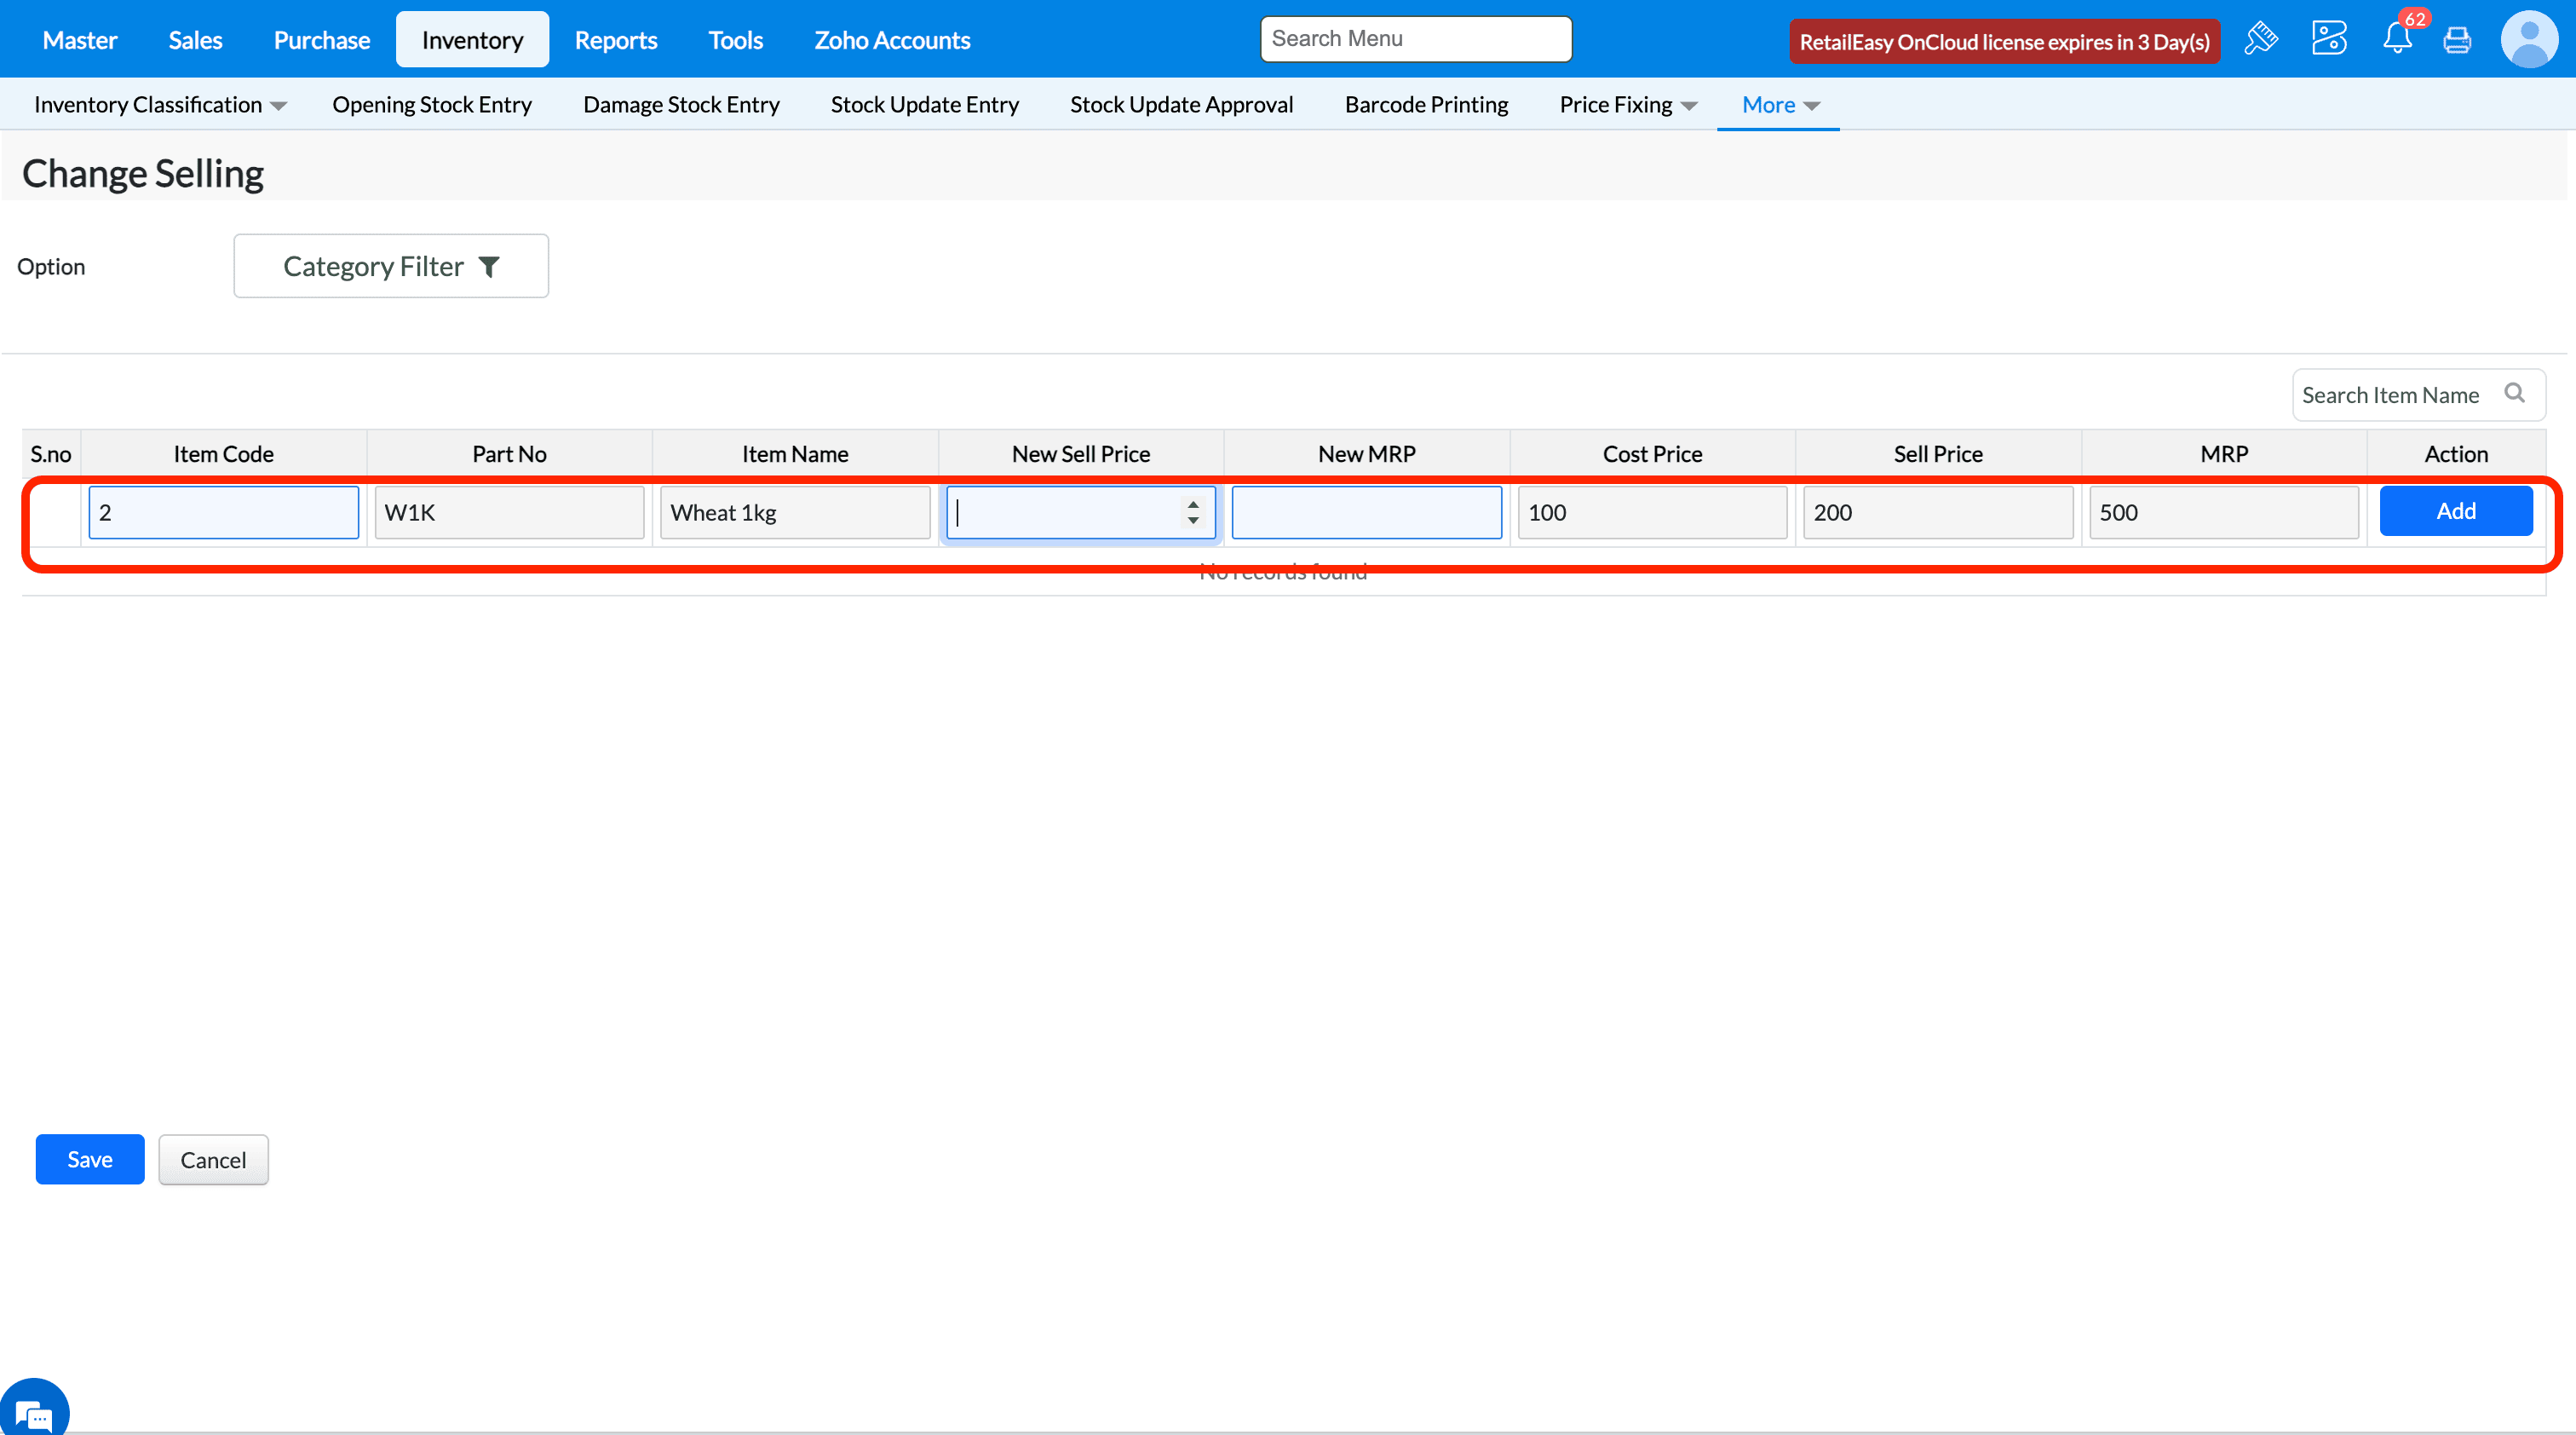
Q 36. What does the 'Enable alias code search for item' configuration do?
A 36. If this configuration is enabled, then in some transactions screens where item code search option is there, we can search item using item code.
For ex., in change selling screen, in place of item code enter the alias code 'W1K' and click enter button.
You can see the item details are being fetched correctly based on item alias code.
If this configuration is disabled, then in transactions screens, an item can be searched using item code.
For ex., in change selling screen, in place of item code enter the item code '2' and click enter button.
You can see the item details are being fetched correctly based on item alias code.
Q 37. What does the 'Allow duplicate eancode' configuration do?
A15. The use of this configuration will ensure if we need to allow duplicate ean code in the system. If the configuration is enabled, then duplicate ean code will be allowed to enter.
In Item master, you can notice the same ean code can be given to multiple items. For ex., 8901058017687 is already present in the system and when trying to map it with another item, system will allow.
If the configuration is disabled, then duplicate ean code will not be allowed to enter.
In Item master, you can notice the same ean code cannot be given to multiple items and will throw error message.
Q44. What does the Average sales quantity for generate Indent configuration do?
A44. The purpose of this configuration is to generate purchase indents based on past sales and current stock levels based on min and max qty. Please refer help document for detailed step by step guidance to make use of the feature
Auto Indent Based on Average Sales Quantity is an automated feature used to generate purchase indents based on past sales and current stock levels based on min and max qty. It calculates how much stock needs to be reordered by multiplying recent sales with a reorder ratio, then subtracting the current stock and if the stock is less then
minimum qty.
Purpose
To streamline stock management by automatically suggesting reorder quantities, reducing manual effort and preventing stock shortages or overstocking.
Calculation Logic
Reorder Indent Quantity = (Total Sales Quantity in the selected number of days × Reorder Ratio) − Current Stock
Calculate for Days: Number of past days to consider for sales data
Sales Quantity: Total quantity sold in that duration
Reorder Ratio: A multiplier used to project future demand
Current Stock: Quantity available in stock
Min - Max : Stock is less the minimum qty
Example
Calculate for Days = 10
Sales Quantity in Last 10 Days = 6 units
Reorder Ratio = 2
Current Stock in Hand = 1 unit. Reorder Indent Quantity = (6 × 2) − 1 = 11 units.
Prerequisite-
Navigate to Tools--> Business configuration--> Select Auto Indent based on should be Average Sales Quantity.

Steps to find Average Sales Quantity-
1.Specify the minimum (2) and maximum (10) quantity for the item in the Item Property setting.
2.Put a sales bill for the item with quantity 9 and ensure the stock in hand is below the minimum quantity.
3. In the Auto Indent screen, select the branch, enter "Calculate for Days" as 5 and "Reorder Ratio" as 2 and click Search Indent.
4.The item will be displayed in the list with the calculated indent quantity.
(Sales Quantity * Reorder ratio) - Stock = Indent Quantity.
(9*2) - 1 = 17.
5. Click the Sales History View button to see the last 10 transactions for the item.
6. Click Generate All button in Auto indent screen and now indent will be raised to main branch.
7. Load the indent in Stock Transfer out screen.
8. Save the indent in Stock Transfer out and then do Transfer IN Process.

9. In Purchase --> Transfer in view the transaction will be displayed.
FAQ:
1. Is there any filter option available in the Auto Indent screen?
A: Yes, an Advance Filter option is available. You can use it to filter items based on Category, Brand, or Item Type.
2. Can I see sales history for the items shown in Auto Indent?
A: Yes. The Sales History View button will display the last 10 transactions for the item.
3. How to verify the Indent status?
A: You can verify the indent status in Reports >> Inventory>> Stock Replenishment >> Indent based on Replenishment report.
4: What happens when an indent is cancelled?
A: When an indent is cancelled through the Indent Cancellation screen, the cancelled quantity will be shown again in the Auto Indent screen for reprocessing.
51. What does the 'GoBill - Fetch transactions data from local for reprint ' configuration do?
A51. This configuration is used to decide whether in reprint screen in gobill application if needed to fetch transactions data from local or from server. If the
configuration is enabled, then the when you try to reprint a bill, the data will be fetched from local gobill.
If the configuration is disabled, then the when you try to reprint a bill, the data will be fetched from TruePOS server.
Q56. What does the 'Validate Customer against OTP' configuration do?
The use of this configuration is to ensure while saving new customer data, the system will validate the authenticity of the data based on OTP verification to the mobile number entered.
Pre-requisites:-
Inorder for this configuration to work, you should have purchased Gofrugal Alerts product and enabled the necessary alert configuration for sending SMS under following menu Configuration -> Outlet Config -> Features tab. Please reach out to your implementation engineer or mail to 'retaileasycloud-support@gofrugal.com' to get it configured.
From the list of configuration, select the checkbox against OTP in 'Send via SMS' column
Steps to verify the configuration:-
1. Enable the configuration 'Validate Customer against OTP'.
2. In customer master screen add the valid mobile number of the customer and click on 'Update' button.
3. A new popup window opens asking to mention the OTP sent to the mentioned mobile number. Once entered the correct otp, click on 'Verify & Save'.
4. If validation is successful then you will get a success message. Click 'Save' button to save the customer details.
5. Once customer is succesfully saved, you will get corresponding success message.
If the configuration is disabled, then at the time of saving address details, it will not ask for any OTP verification and will allow to save directly.
Q58. What does the “Display inactive reps” option do?
Purpose - When this option is enabled, inactive sales representatives will also be displayed in the Sales Bill screen while selecting the salesman, allowing users to view or select reps who are marked as inactive in the master records.
Note - If You want to enable this Configuration Kindly reach us in Live chat.
Prerequisites - Kindly Enable the Configuration (Show Salesman )
* If We enable the Configuration ( Display inactive reps ) Than Inactive Rep master Will show in the sales Screen.
* If We Disable the Configuration ( Display inactive reps ) Than Inactive Rep master Will Not show in the sales Screen.
Q73. What does the 'Show HSN code' configuration do?
The use of this configuration is that when enabled, system will display the hsn code of the item(which is mapped in the item master) in the transactions screen along with item name.
Verify the HSN code mapped in the Item Master.
Here, the item HSN code is displayed alongside the item name in the Sales Bill screen.
Incase of configuration is disabled, the HSN code of the item will not be displayed along with item name in the transaction screens.
Q59. What does the “Item Wise Discount” option do?
Purpose - When this option is enabled, users can apply discounts at the individual item level during billing, allowing precise control and maintenance of item-wise discounts instead of only bill-level discounts.
Note - If You want to enable this Configuration Kindly reach us in Live chat.
* If You enable This Configuration Then You Can Provide the Item Level Discount Amount / Percent in sales Bill Screen.
* If You Disable This Configuration Then You Cannot Provide the Item Level Discount Amount / Percent in sales Bill Screen.

Q61. What does the 'Show Route Plan' configuration do?
A61. The purpose of this configuration is to decide whether to show the route planner menu in earnsmart application or not. If the configuration is enabled then the route planner menu is displayed in earnsmart app.
If the configuration is disabled then the route planner menu is not displayed in earnsmart app.
Q62. What does the 'Allow to edit Route Plan' configuration do?
A62. The purpose of this configuration it to decide whether salesman who is using earnsmart applicaton should be able to edit the route planner or not. If the configuration is enabled, then the sales rep can edit route planner prepared for him.
If the configuration is disabled, then the sales rep cannot edit route planner prepared for him.
Q67. What does the 'AutoSync in Earnsmart' configuration do?
A67. The purpose of this configuration is to provide ease of sync of data in truepos to earnsmart application. If this configuration is enabled then a quick sync will happen when we click on the Sync menu in earnsmart application.
If this configuration is disabled then a quick sync will happen only when we click on the Quick sync button inside the Sync menu in earnsmart application.
Q68. What does the 'Phone Order / Visit Order classification required in EarnSmart' configuration do?
A68. This configuration if enabled will show the phone order option at the time of saving order in earnsmart mobile app.
This configuration if disabled will not show the phone order option at the time of saving order in earnsmart mobile app.
Q70. What does the 'Allow Free qty alone in Earnsmart' configuration do?
A34. The purpose of this configuration to decide whether an earnsmart order can be made with only free qty or not. If the configuration is enabled then the earnsmart order can be made with only free qty.
If the configuration is disabled then the earnsmart order must be made with actual quantity and in cart you can notice amount will not be 0. Earnsmart will not allow to save order with 0 total price.
Q72. What does the 'Customer Creation in Earnsmart' configuration do?
A72. The purpose of this configuration is to decide whether to show option to create customer in earnsmart app or not. If this configuration is enabled then new customer creation icon will show in earnsmart.
If this configuration is disabled then new customer creation icon will not show in earnsmart.
Q76. Validate OTP for Loyalty Redeem in Sales
Purpose
The purpose of this configuration is to decide whether an OTP based authentication is required or not at the time redeeming loyalty points when saving sales bill. Please refer help document for detailed step by step guidance to make use of the feature
OTP (OneTime Password) validation is a form of identity verification that is used to ensure the security of customers’ loyalty redemption activities. It is an extra layer of verification that is used to confirm that the customer is the legitimate owner of the loyalty points being redeemed.
Prerequisite
Configuration -
Need to Buy Alerts / Need Active Plan with SMS Count for Alerts. Note: No configuration in the alerts portal needs to be enabled for OTP validation to redeem loyalty.
Need to configuration loyalty rule - https://community.gofrugal.com/portal/en/kb/articles/loyalty-11-2-2025
Don'ts
For the particular Branch, "Enable Thirdparty Loyalty" shouldn't be enabled in Branch master.
Steps to experience the QTP Validation to redeem loyalty
Step 1 - Need to enable the configuration - "Validate OTP for Loyalty Redeem in Sales"
Step 2 - Mobile number should be configured to the respective customer, Master >> Customer >> Contact Details >> Enter phone number in "Mobile" column
Step 3 - Make a sales bill to the customer who has the required number of loyalty points to be redeemed. The customer will receive an OTP, through the OTP customer can redeem loyalty points.
Enjoy the OTP validation feature to Redeem the loyalty in sales screen !
In case of any further query please reach us in live chat !
Q77. What does the 'Validate Rep Master Against OTP' configuration do?
The use of this configuration is to ensure while saving new rep data, the system will validate the authenticity of the data based on OTP verification to the phone number entered.
Pre-requisites:-
Inorder for this configuration to work, you should have purchased Gofrugal Alerts product and enabled the necessary alert configuration for sending SMS under following menu Configuration -> Outlet Config -> Features tab. Please reach out to your implementation engineer or mail to 'retaileasycloud-support@gofrugal.com' to get it configured.
From the list of configuration, select the checkbox against OTP in 'Send via SMS' column
Steps to verify the configuration:-
1. Enable the configuration 'Validate Rep Master against OTP'.
2. Go to Master -> Rep -> Rep Master and create a new rep.
3. Enter a valid phone number and click Save after entering all details.
4. A dialog window to enter OTP opens along with sms sent sucessfull message.
5. Enter a valid OTP and click on Verify & Save.
6. Upon successfull validation of OTP you will be shown a success message.
7. Click on Save
8. New Rep will be created succesfully.
If the configuration is disabled then at the time of saving the rep, system will not ask for otp verification and directly save the new rep.
Q80. Janta Sales Required
This configuration works only for liquor vertical customers and if this configuration is enabled then counter sales is possible at times of peak hours.
To understand and setup the Janta sales, please refer help document
Note This is a backend configuration. Inorder to enable it Please reach out to your implementation engineer or mail to 'retaileasycloud-support@gofrugal.com' to get it configured.
The Janta Counter Sales process in liquor retail involves a unique billing approach where consumers pay at the counter and collect products directly without entering the store. Since generating individual bills during peak hours is not feasible, the sales are recorded later to maintain accurate inventory management.
At the end of the day or shift, the cashier performs a physical stock count and enters the closing stock into the system. The application calculates the difference between the opening and closing stock and automatically posts the difference as sales in the system, ensuring proper inventory tracking and accurate sales recording.
PREREQUISITE-
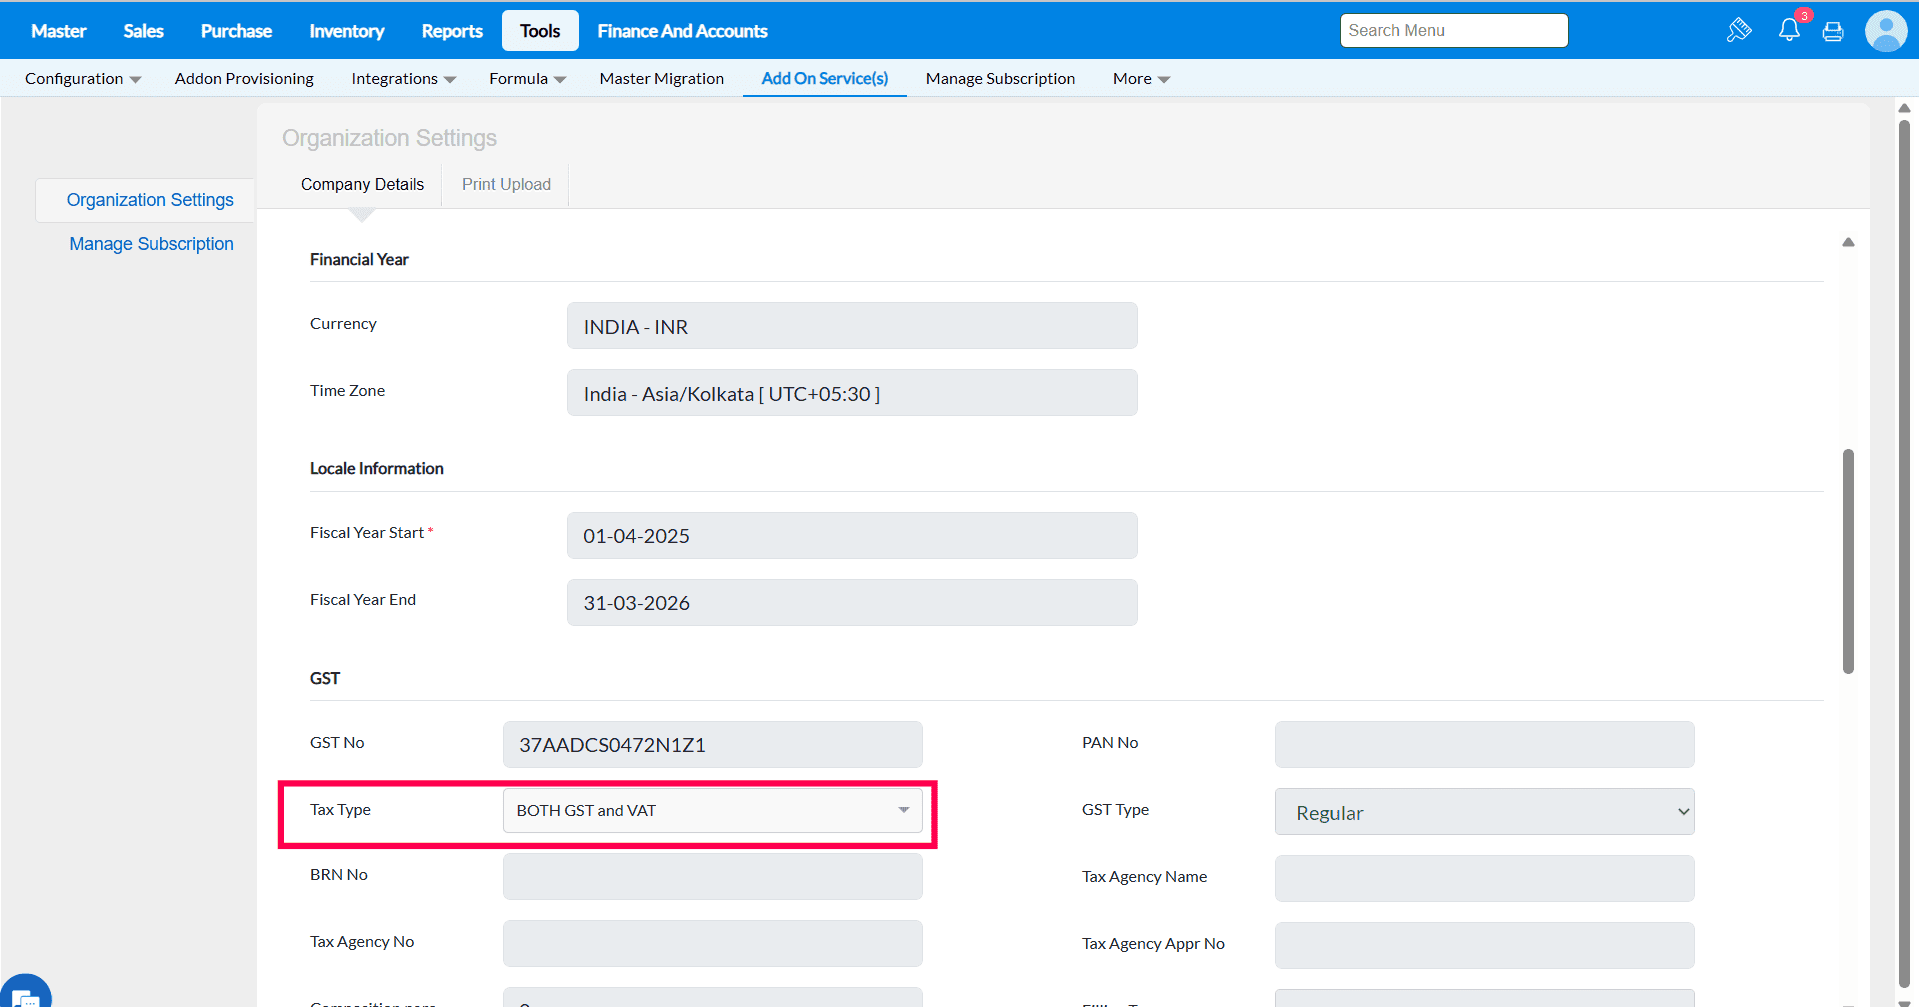
1. In Add On Services, Tax type should be Both GST and VAT.
2. In Branch master, tax type should be Both GST and VAT.
3.In Supplier master, map the purchase formula which configured in formula configuration.
4.Moreover, map the tax formula inclusive and exclusive properly.
Purchase Inclusive No-
Steps to perform Janta Sales in Gobill
1. Navigate to Purchase → Purchase Invoice.
2.Create a purchase entry with a quantity of 100 units for the selected item.
3.In Gobill, Create a sales bill transaction for 80 units of stock.
4.For the remaining 20 units, do the following:
a. Navigate to Truepos, Inventory → open stock update entry screen, Select the item, enter the quantity for stock update and save.
b. From GoBill, open the Sales Order screen to view the sales order details for the remaining 20 stock items.
5.In the Sales Bill screen, click Janta sales button to convert the sales order into a sales bill.
6.In the Janta Sales Bill screen, the quantity field displays the difference between the current stock quantity and the physical quantity.Load the stock and proceed to create the sales bill.
Steps to Perform Janta Sales in TruePOS
1. Navigate to purchase--> purchase invoice. Select the item and enter 100 quantity.
2. Put sales bill transaction for 80 stock.
3.Select the customer.
4.Select the item
5. Enter the quantity for the item.
6.Put stock update entry for the remaining 20 stocks.
7. Click Save.
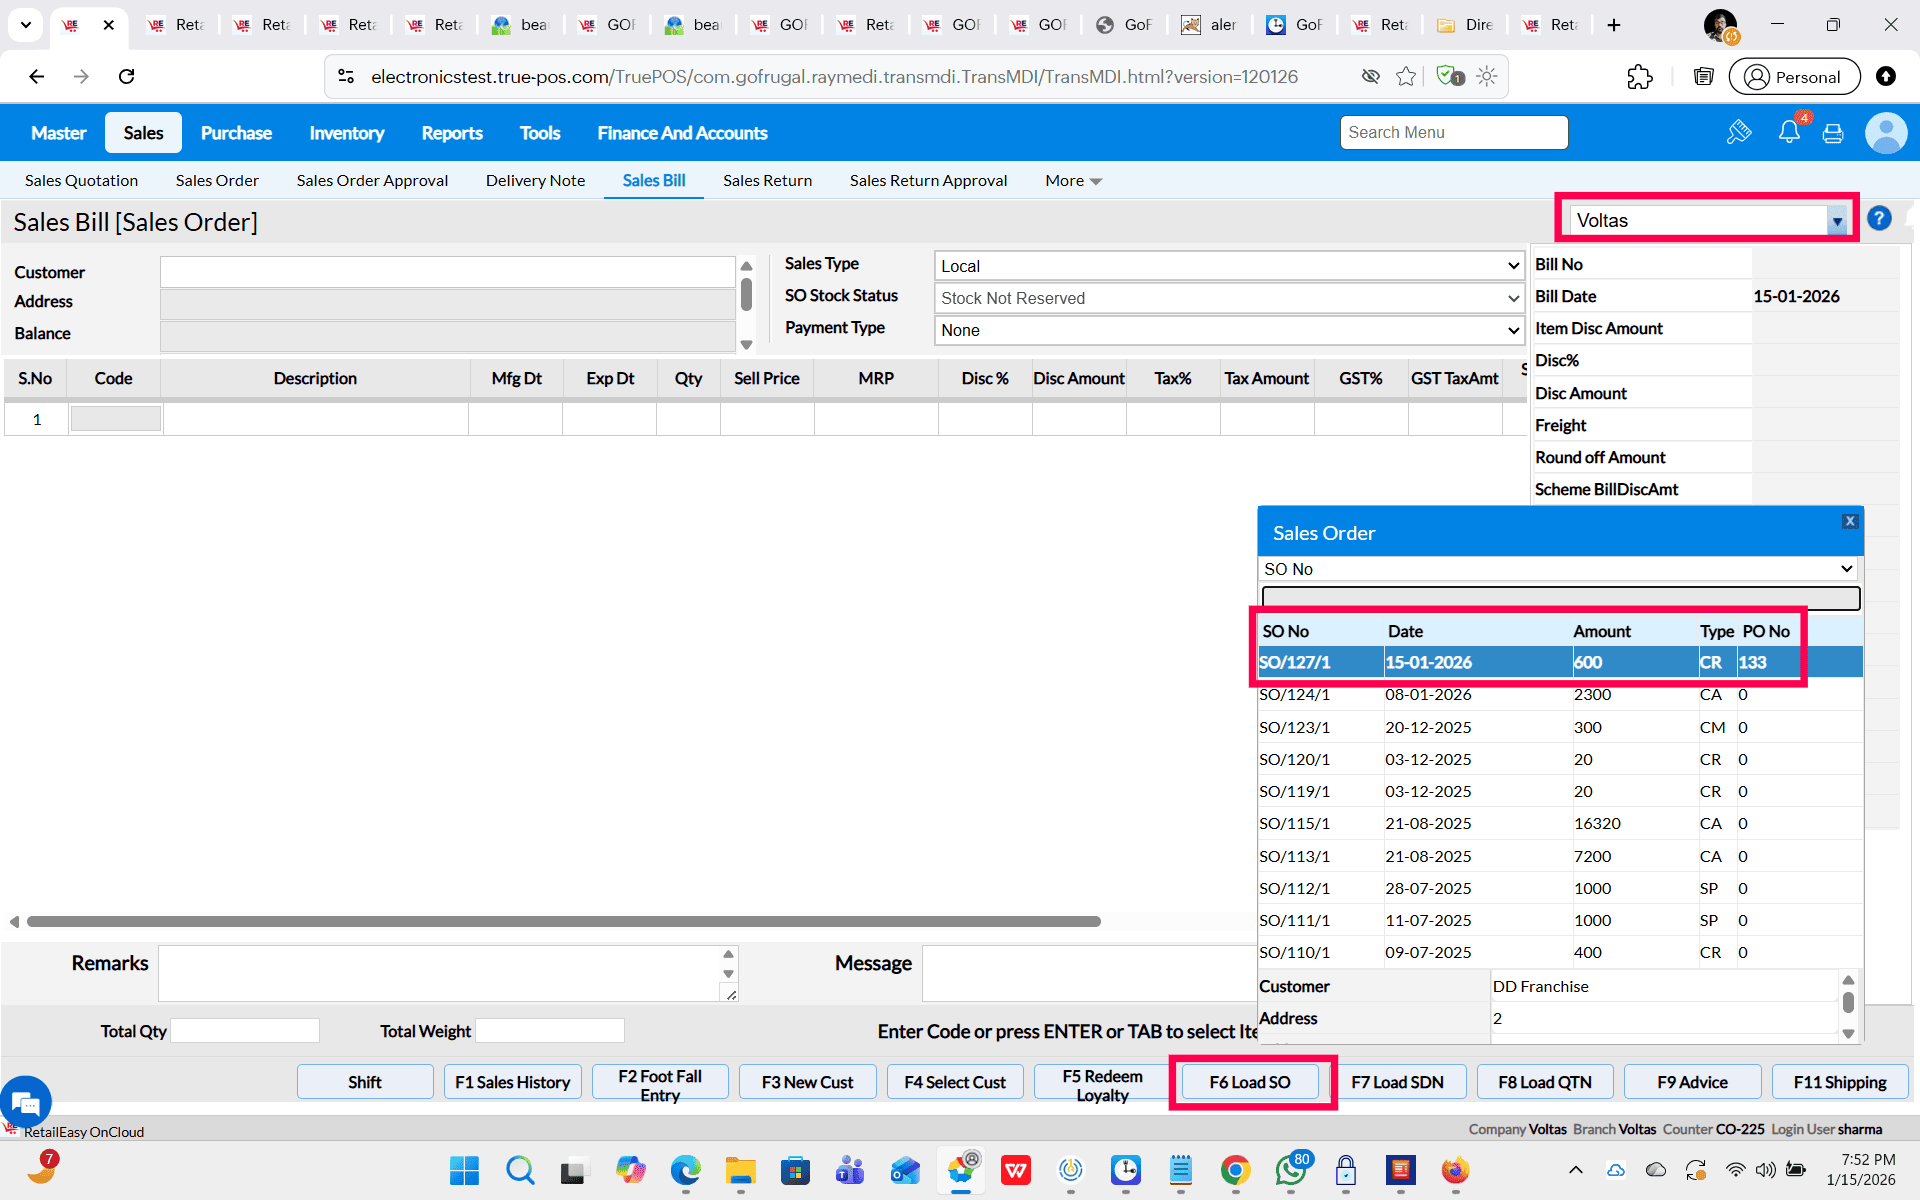
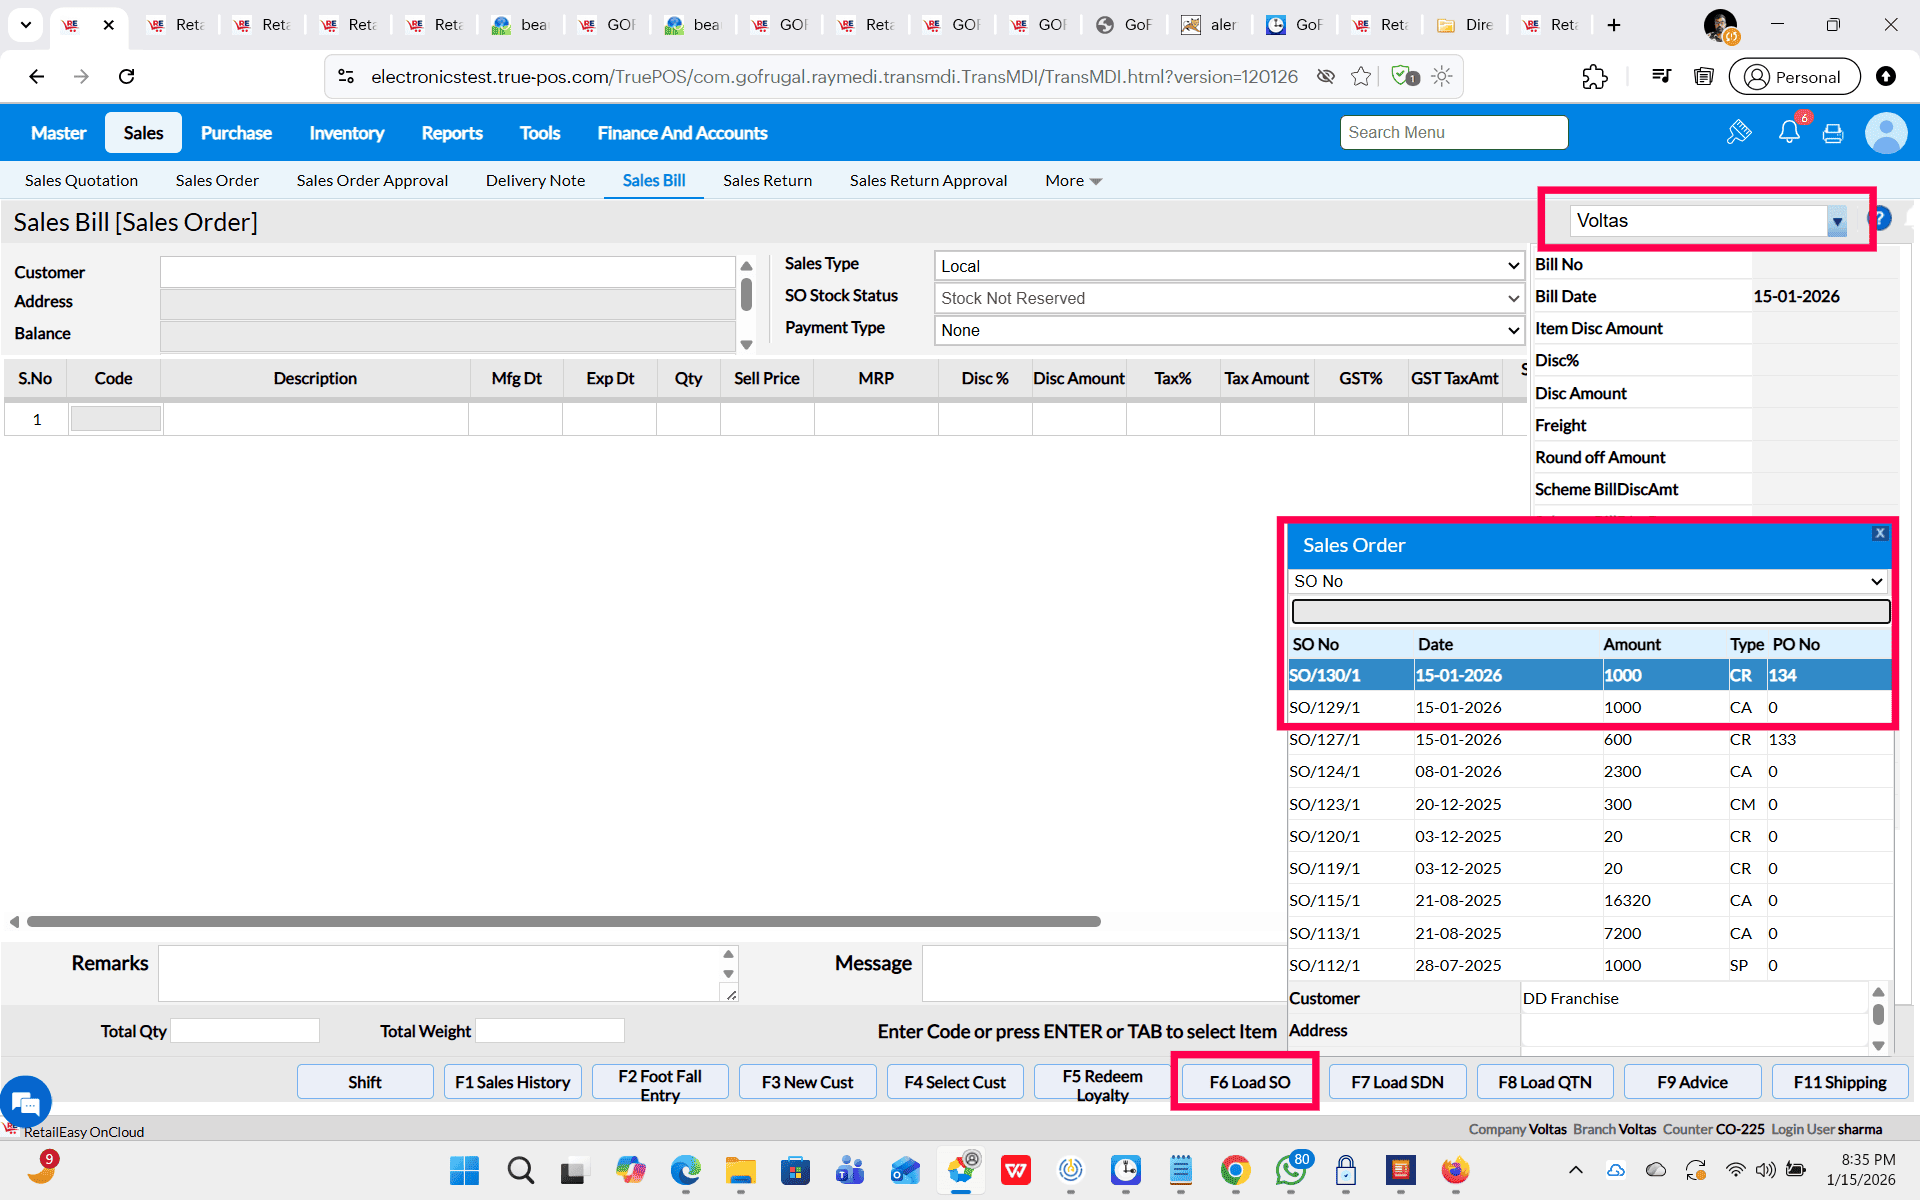
8. Then, in sales bill screen, Load the sales order.
Click Load SO function key and select the sales order.
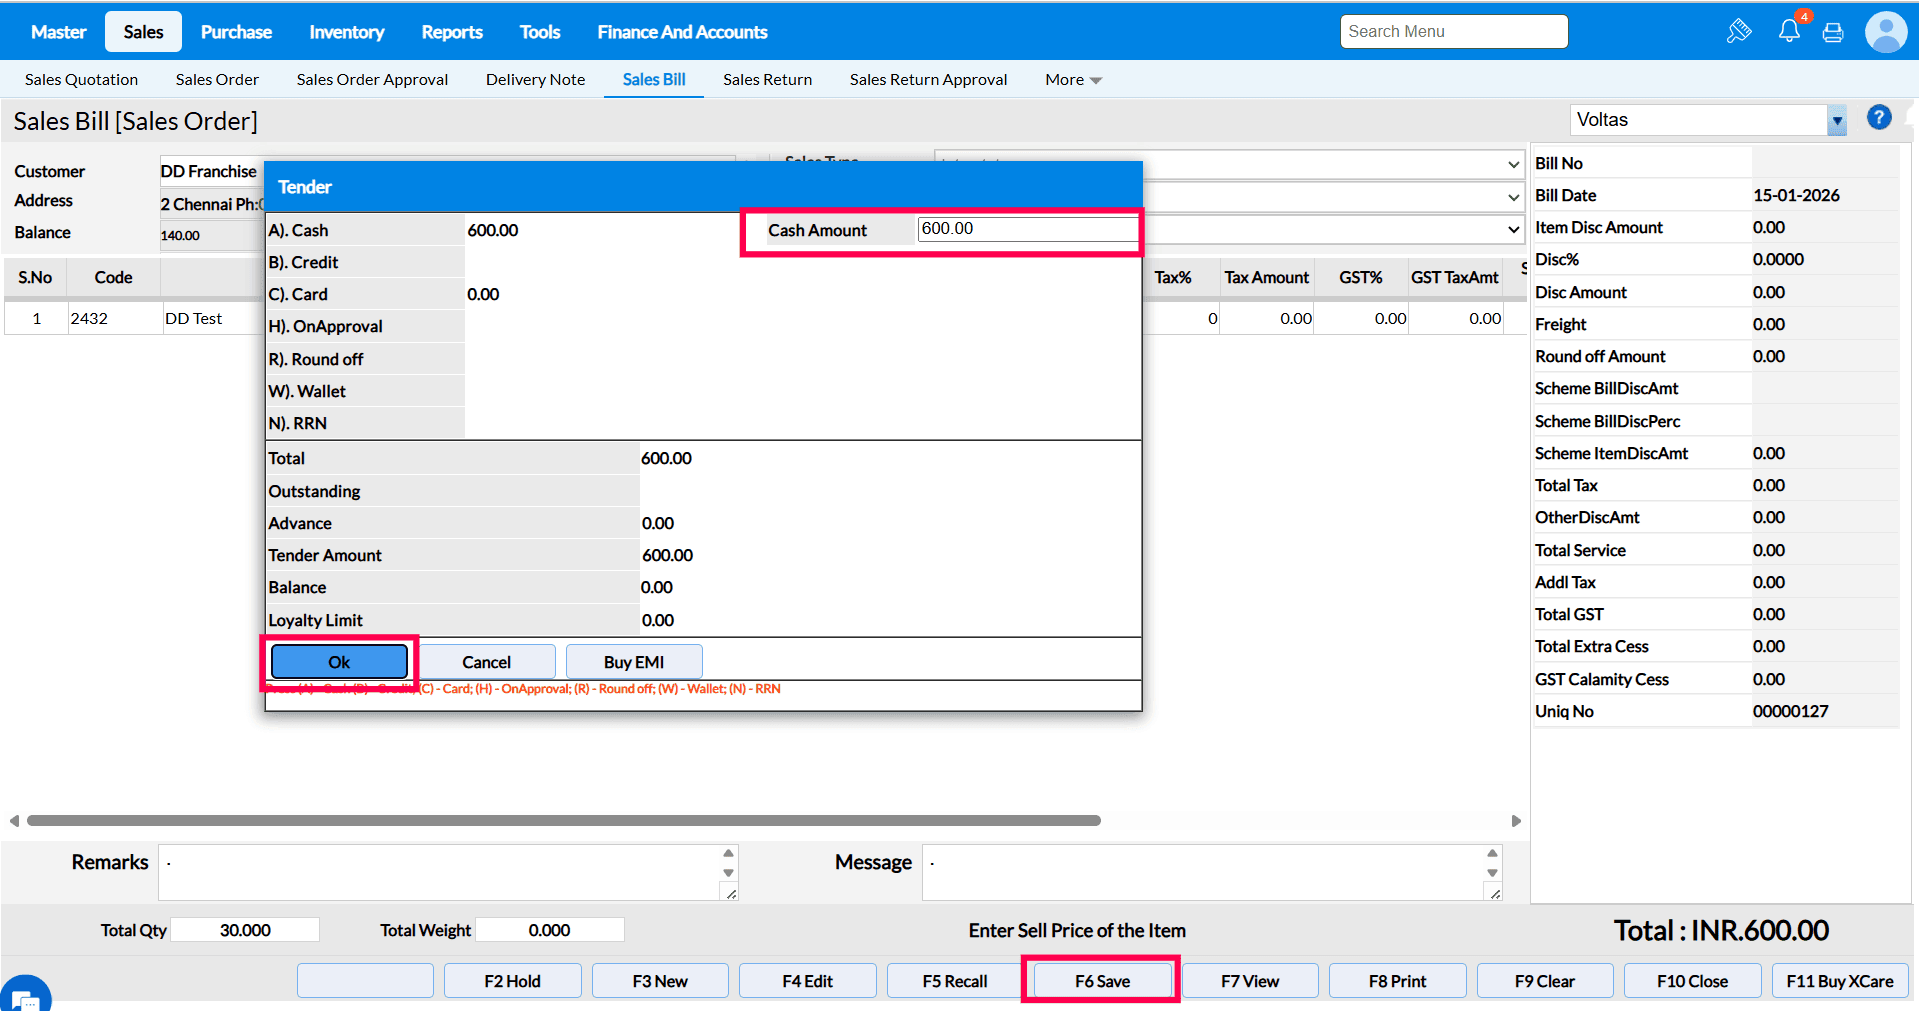
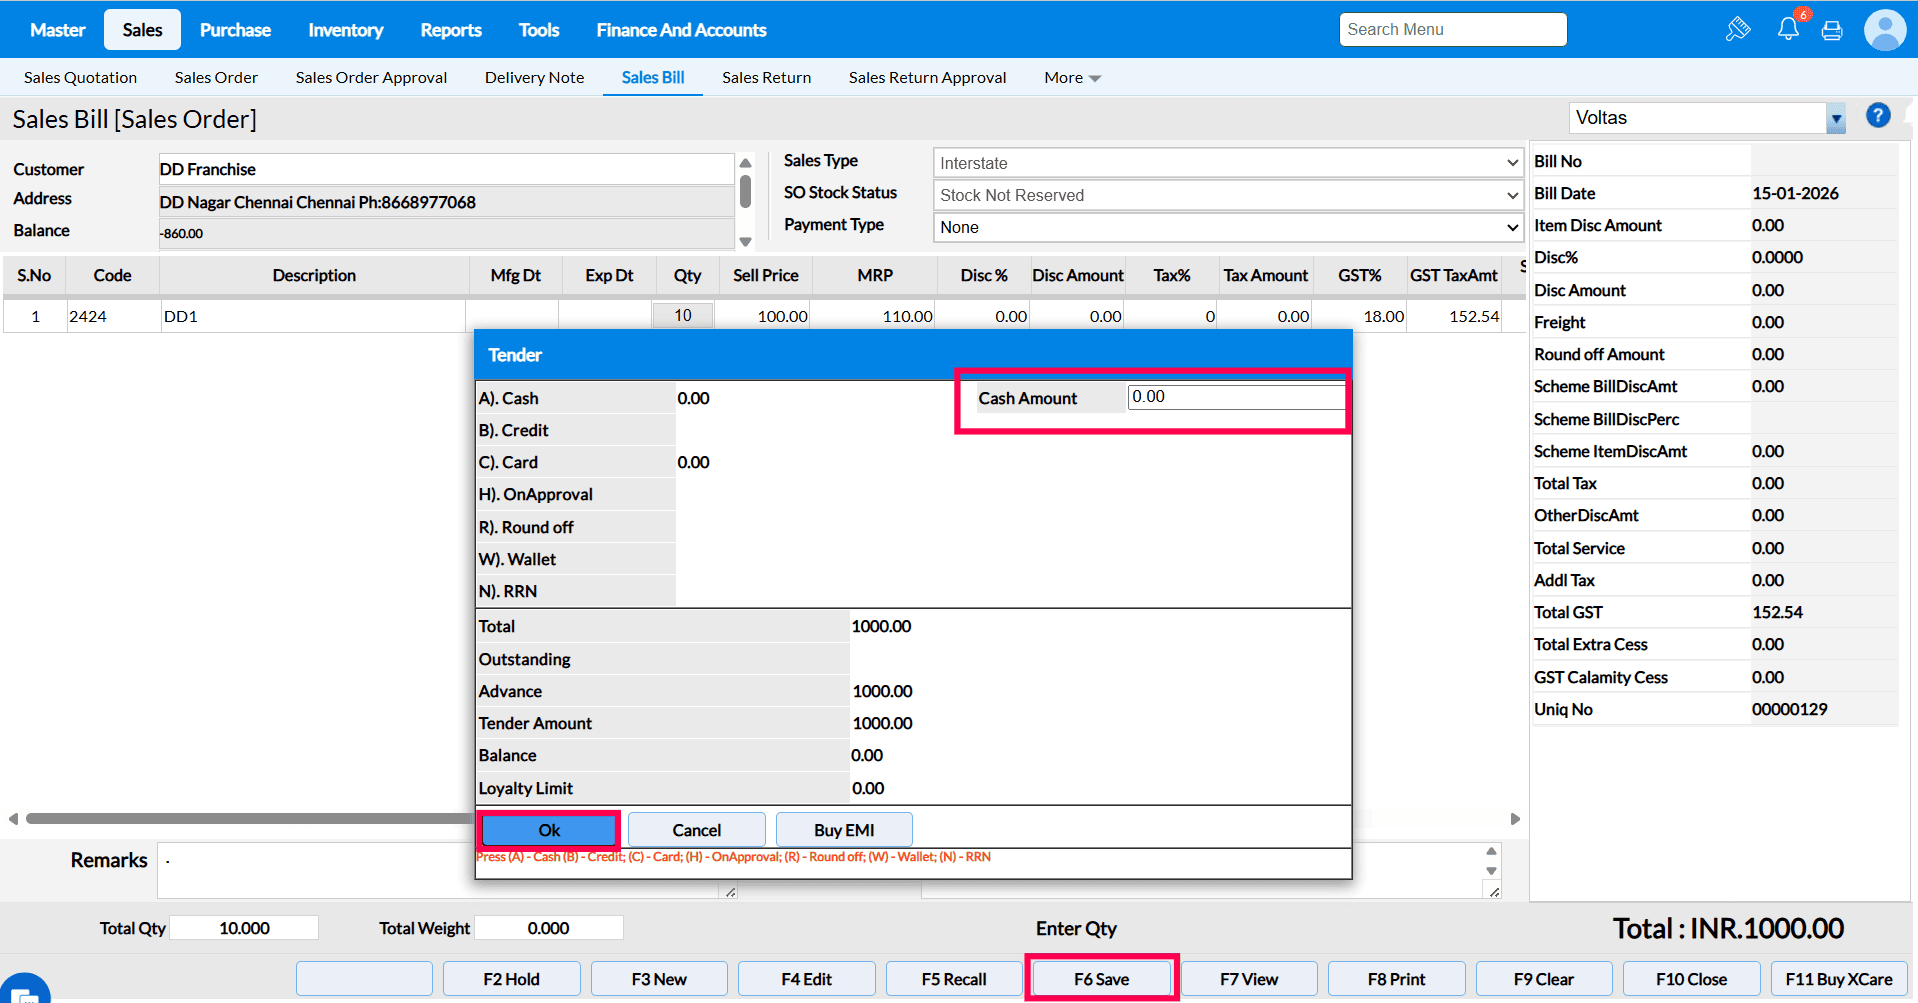
Click Save and enter the tender details.
FAQ:
1. What should do when get the message: "Transactions are not allowed until Janta Sales is converted to Sales Invoice"? When you get this message, it means the Janta Sales Order needs to be converted into a Sales Invoice before proceeding. Action: Go to the Sales Bill screen, use the Load SO option, and convert the Sales Order into a Sales Invoice.
2. Is there any option to load all items in the Stock Update screen instead of searching manually?
Answer: Yes, by enabling the "Stock Update based on Load All Items" option in Business Configuration, all items for the selected location will be automatically listed in the Stock Update screen.
Kindly refer the link for detailed explanation-
https://community.gofrugal.com/portal/en/kb/articles/stock-update-entry-30-10-2025
Q82. What does the 'Map Customer Family Members based on Mobile' configuration do?
A82. If this configuration is enabled then the multiple customers can be saved with same mobile number under the concept of parent child.
For ex., if customer 'A' is already in the system with a mobile number and if another customer 'B' is created with the same mobile number
then a confirmation popup will appear asking if B should be mapped as a family member to A. If clicked 'Yes' then it will be saved and if clicked
'No' then it will ask to edit the mobile number again.
Pre-requisite:- Please ensure the "Enable Multiple Address for customer and supplier" configuration is disabled for this configuration to work.
This operation also works in quick add customer flow in sales bill screen.
If the configuration is disabled, then an error will be thrown "Customer Phone Already Exists" when trying to save customer with duplicate
mobile number so need to change mobile number to unique number and only then we can save.
Q83. What does the 'Holiday of week for Route Plan' configuration do?
A83. The use of this configuration is to let system decide in route planner screen which all days must be marked as holiday so that administrator
need not plan salesman's route for that day.
Note:- This configuration is only available for DMS(Distribution vertical) customers and not for retail customers.
If you mention which day(s) in the configuration has to be marked as holiday in the configuration. Then those days will be disabled to add in the
route planner screen so administrator will know not to plan route for the salesman. You can select 1 or more days in this configuration.
Q93. What does the 'Manual Indent location selection Based on' configuration do?
A93. The purpose of this configuration is to decide whether manually raised indent can be raised to any location shown, or only to distribution centre or to self location.
If the configuration value is set to 'Distribution centre' then in manual indent screen, only distribution centres will be listed in screen and indent will be raised to DC.
If the configuration value is set to 'All location' then in manual indent screen, all locations will be visible and indent can be raised to any location.
If the configuration value is set to 'Distribution centre and self location' then in manual indent screen, distribution centre and self login location will also be displayed.
Q94. What does the 'Raise Auto Indent to DC' configuration do?
A37. The purpose of this configuration is to decide whether to raise auto indent to DC or to headquarter mapped branch. If this configuration is enabled, then the auto generated indent will be raised only to the Distribution Centre even if the headquarter mapped branch is of Branch type.
An indent is raised from branch.
In PO screen, you can see the indent has got raised to the Distribution Centre.
If this configuration is disabled, then the auto generated indent will be raised to the headquarter mapped branch irrespective of it's type being Branch or Distribution Centre.
An indent is raised from branch.
In PO screen, you can see the indent has got raised to the headquarter branch instead of DC.
Q98. What does the “Save purchase order for Franchisee as” option do?
Purpose: This configuration defines how Purchase Orders at franchise outlets are recorded in the system. Based on the selected option, the order is treated either as Sales Advice or a Sales Order, ensuring proper transaction flow, visibility, and accurate tracking on the respective screens.

PREREQUISITE - Enable Franchise configuration Must Need to enable than only franchise Flow Will Work.

a. Sales Advice - If this option is selected, then after completing the purchase Order, the transaction will appear in the Sales Advice section on the Sales Order screen.
Steps To proceed For Save Purchase Order For franchise as Sales advice.
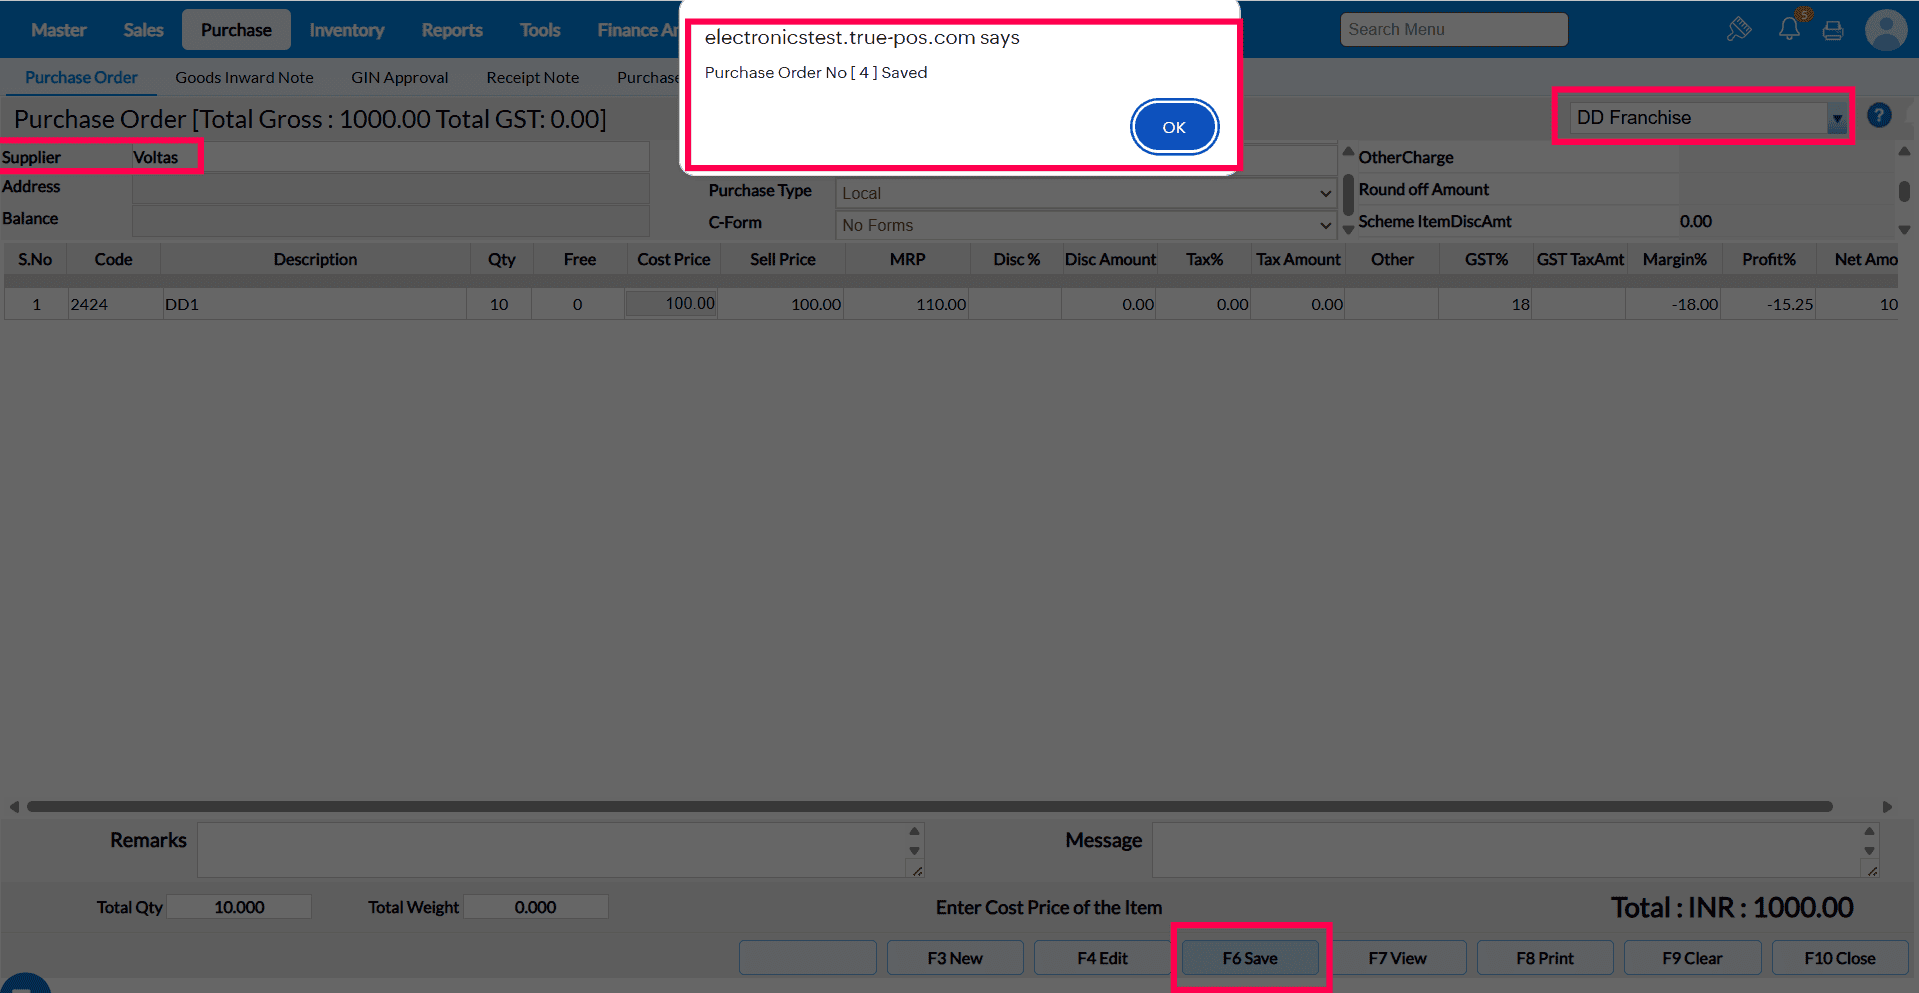
1. Create The Purchase Order against the Franchise in Purchase Order Screen.
2. After that Go to to the sales Order Screen, select the Branch and press Ctrl + F9 ( Load SO Advice )Than List of So Advice Will display and select the SO Advice from LOV.
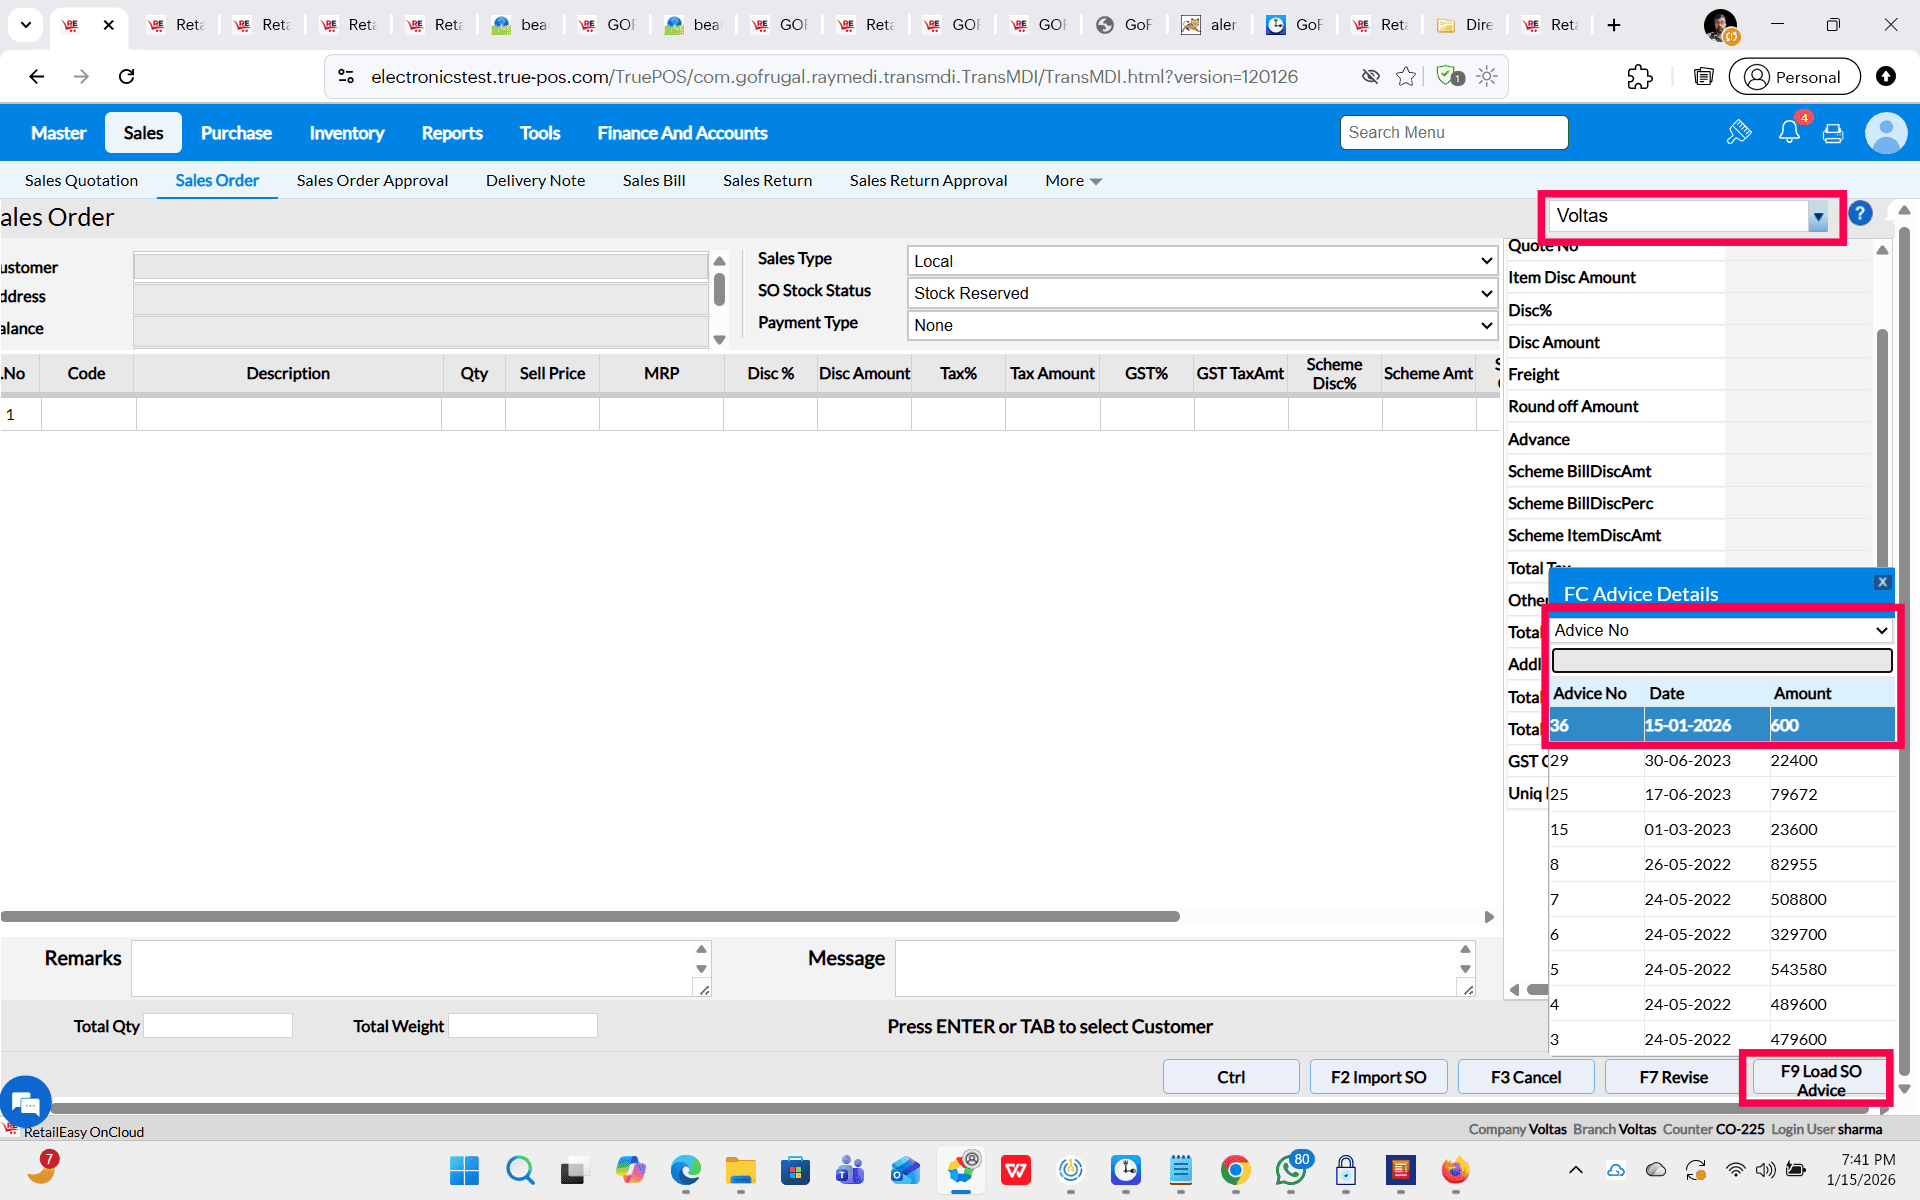
3. After Loading the SO advice click on F6 save Key.
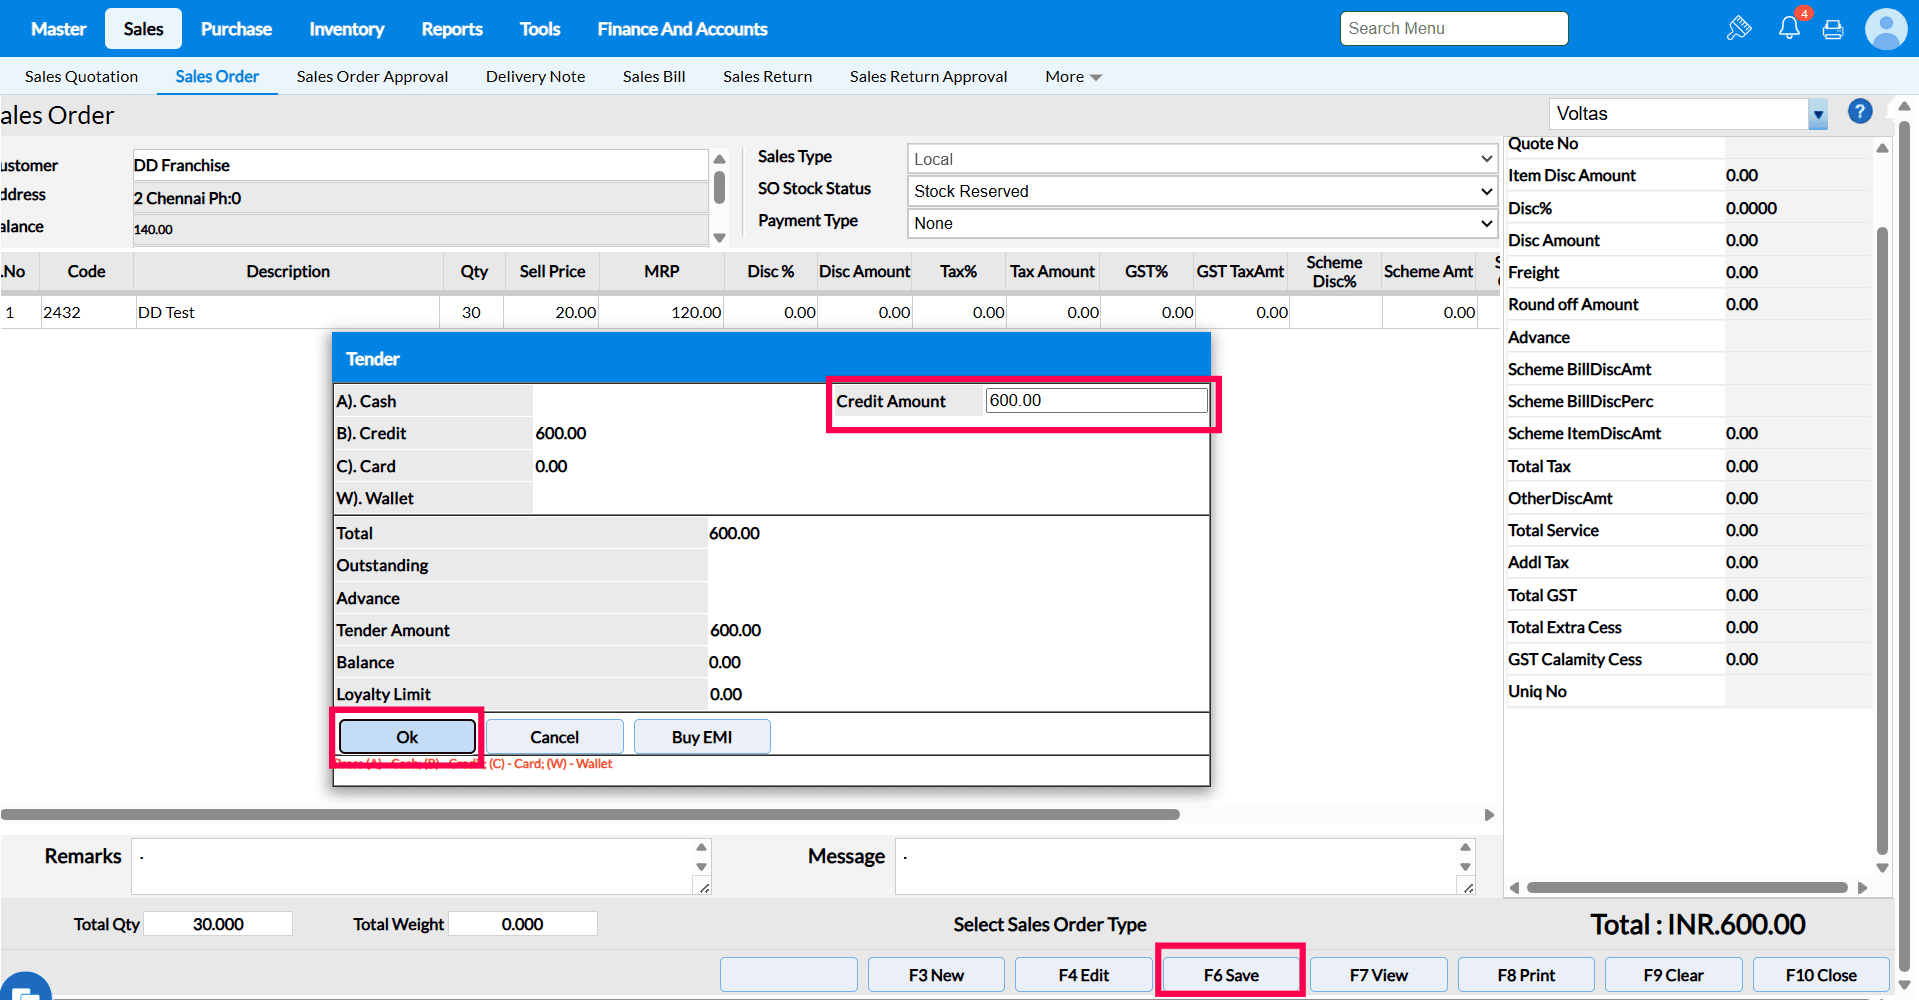
4. Enter the Tender value and press ok. So you will get Save Successfully Popup.
5. To Convert Sales Order to sales Bill go to sales screen select the location. Press Shift+F6 ( Load SO ). Select the sales Order from LOV.
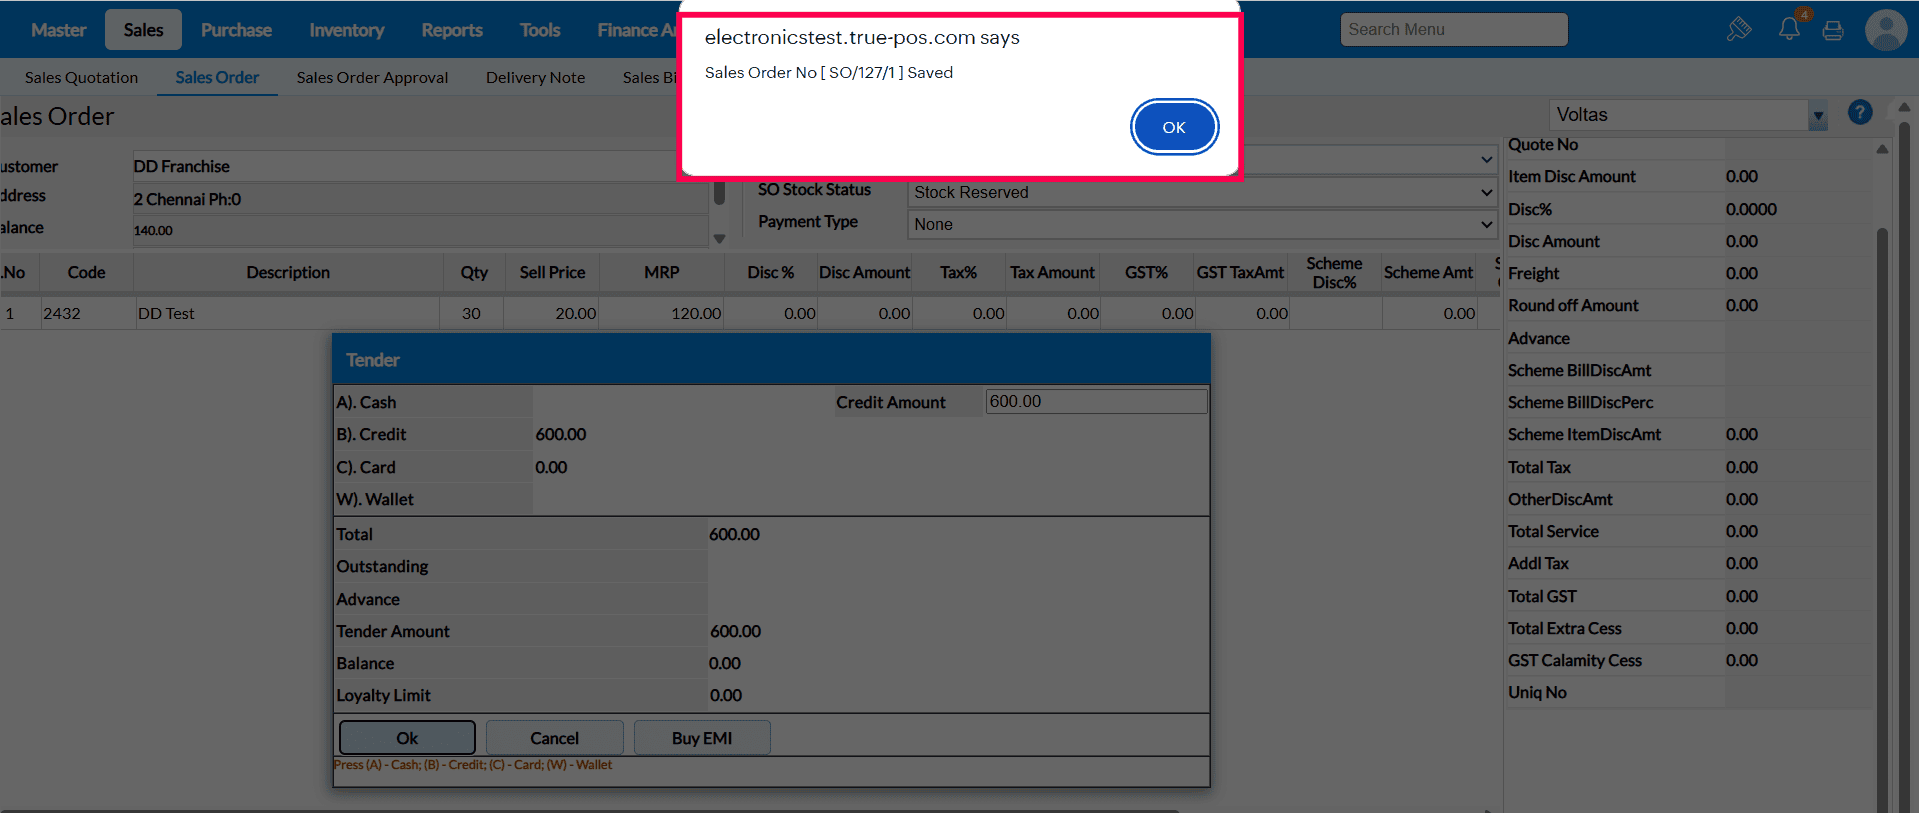
6. Click On F6 (Save) to save the sales order fill the tender details and press ok.
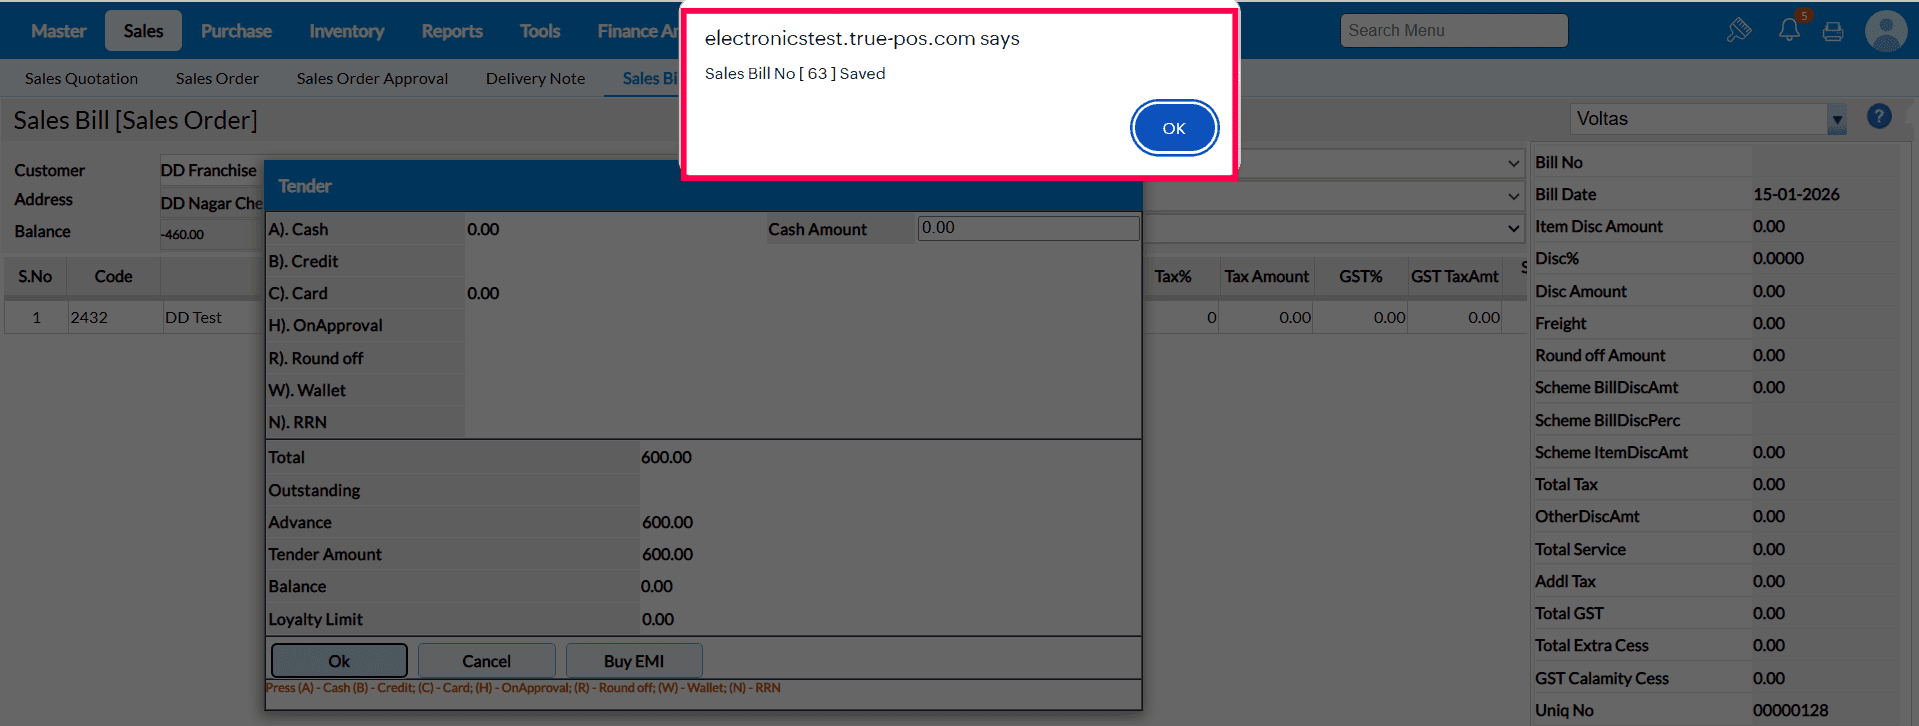
7. You Will get successfully sales Bill saved Popup.
 b. Sales Order
 - If this option is selected, then after completing the purchase Order, the transaction will appear in the Sales Order Screen in View Mode.
Steps To proceed For Save Purchase Order For franchise as Sales Order.
1. Create The Purchase Order against the Franchise in Purchase Order Screen.
2. After that Go to to the sales Order Screen, select the Branch and
Press F7 View Key the List of Sales Order Value Will display.
3.To Convert Sales Order to sales Bill go to sales screen select the location. Press Shift+F6 ( Load SO ). Select the sales Order from LOV.
4. Click On F6 (Save) to save the sales order fill the tender details and press ok.
5. You Will get successfully sales Bill saved Popup.
Q99. What does the “Save purchase return for Franchise as” option do?
Purpose - This configuration controls how Purchase Returns at franchise outlets are recorded in the system. Based on the selected option, the return is either treated as SR Advice or Sales Return, ensuring correct transaction flow, visibility, and accurate tracking in the respective screens.
PREREQUISITE - Enable Franchise configuration Must Need to enable than only franchise Flow Will Work.
a. SR Advice - If this option is selected, then after completing the purchase return, the transaction will appear in the SR Advice section on the Sales Return screen.
Steps To proceed For Save Purchase Return For franchise as SR advice.
1. Create The Purchase Return against the Franchise in Purchase Return Screen.
2. After Loading the Items that you want to return Click on save. so you will receive the Purchase return saved Popup.
3. After that Go to to the sales Return Screen select the Branch and press Shift + F6 ( Load SR Advice )
4. Than select the SR Advice from the LOV and load it in the SR screen.
5. After Filling The Remark Click on save so you will get the saved Popup.
b. Sales Return - If this option is selected, then after completing the purchase return, the transaction will automatically appear in the Sales Return View screen.
Steps To proceed For Save PR For franchise as Sales Return.
1. Create The Purchase Return against the Franchise in Purchase Return Screen.
2. After that Go to to the sales Return Screen select the Branch and press View so that you can see the Respective SR in View Mode.
Q101. What does the 'Show only Home Outlet Rep in Master and Sales' configuration do?
A101. This configuration is used to decide whether to show all location reps or just the home location sales reps in item master and sales bill screen in gobill application. If the configuration is enabled then the home outlet rep will only be displayed in rep master and gobill sales screen.
If the configuration is disabled then all outlet rep will only be displayed in rep master and gobill sales screen.
Q102. What does the 'Show global Customer/Customer Category for franchise' configuration do?
A102. This configuration is used to decide whether to display 'All Location' in Location dropdown in certain master screens of franchise login. The same is impacted in following menus - transporter master, customer master, supplier master, customer categories, Area/Beat master, rep master, tender type detail, loyalty program, discount coupon, item ean/upc entry.
If the configuration is enabled then the 'Global' will be displayed in branch dropdown in certain screens where franchise operation is supported.
If the configuration is disabled then the 'Global' will not be displayed in branch dropdown and only franchise locations will be displayed in certain screens where franchise operation is supported.
Q103. What does the 'Hide Company name in footer section for Franchisee location users' configuration do?
A103. The use of this configuration is to decide whether to display company name in the footer section of the application or not. Some franchisors can decide to not display their company name in the application so they can enable it and the company name won't appear in the footer section of the application.
If the configuration is disabled then the company name will be displayed in the footer section.
Q104. What does the “Default customer for Janta Sales” option do?
Purpose - Janta Counter Sales allows quick selling during busy hours without generating individual bills. At the end of the shift, the cashier updates the closing stock, and the system automatically records the sold quantity as sales, ensuring correct inventory and sales tracking. and You can select the Default Customer For Bill in Business Configuration.
PREREQUISITE For ( Default customer for Janta Sales )
1. In Add On Services, Tax type should be Both GST and VAT.
2. In Branch master, tax type should be Both GST and VAT.
3.In Supplier master, map the purchase formula which configured in formula configuration.
Steps to Proceed The janta sales For default Customer
1. Check the Closing stock for the respective Item
2, At time Of Closing the Shift do stock Update with physical QTY at time of saving you will get pop-up Janta sales Created.

3. In Sales Bill Screen Load the Janta Sales Through F6- Load SO Key then you can select the Janta Sales From LOV.
4. After Loading the Janta Sales Default Customer will load automatically that you mapped under the Configuration.
5. You can save the Bill

* In which report will the Janta Sales bill amount be captured?
Ans - There is no separate report for Janta Sales. However, you can track it in the Daily Sales Summary report, bill number–wise. The Janta Sales bill amount will be reflected under the Advance Cash Amount column.
Q106. What does the “Offer Management Applies to” option do?
Purpose - This option allows you to decide where offers should be applied. You can run offers based on location, branch area, circle, or state, so the same offer is applied only to selected stores or regions as per your business requirement.
1. Offer management applies to - Location wise ( While saving the Offer Location list will display ) Based on that You can mark Active / Inactive for the respective Location.
2. Offer management applies to - Branch Area ( While saving the Offer Branch Area list will display ) Based on that You can mark Active / Inactive for the respective Branch Area.
3. Offer management applies to - Circle ( While saving the Offer Branch Circle list will display ) Based on that You can mark Active / Inactive for the respective Circle.
4. Offer management applies to - State ( While saving the Offer Branch State list will display ) Based on that You can mark Active / Inactive for the respective State.
Q107. What does the “Load GST% for return basedon” option do?
Purpose -This option lets you decide how GST percentage is applied during sales or purchase returns. You can choose whether the GST% should be taken from the item master or from the original transaction.
1. Master - If you select the option Master in Configuration ( Load GST% for return basedon ) than at time of return Tax % will take from item master.
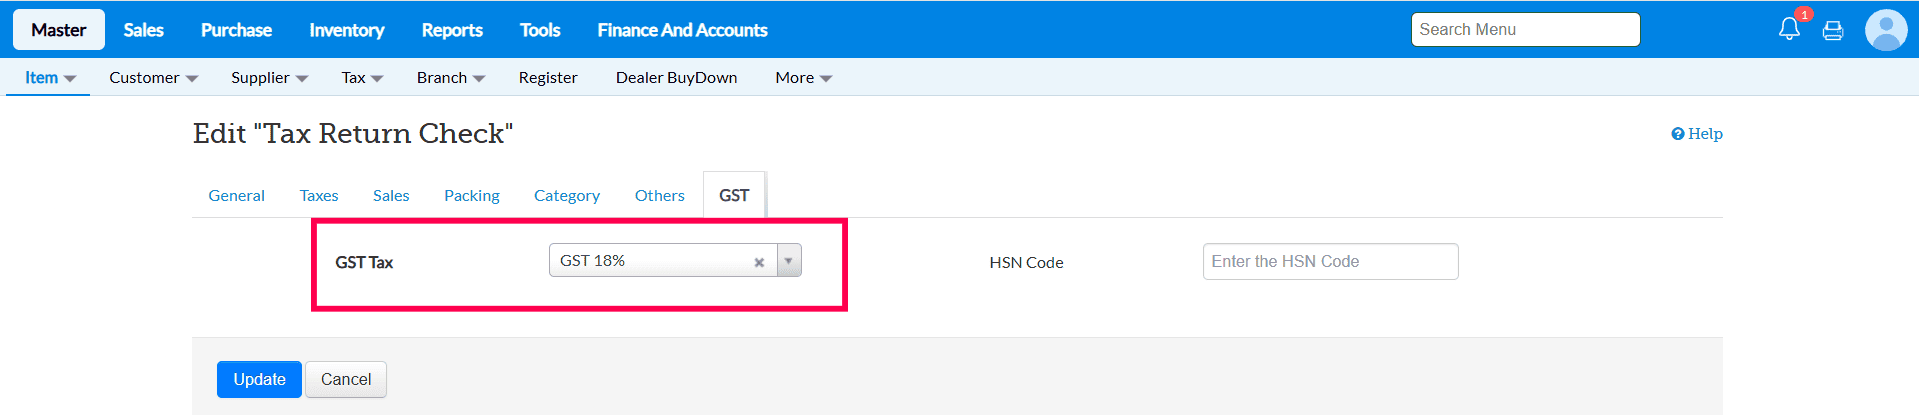
a. Item master Tax % set as 18%
b. In purchase transaction GST % is 5 %
c. While making the Purchase Return Based in item master Tax is Taking 18%

2. Transaction - If you select the option Transaction in Configuration ( Load GST% for return basedon ) than at time of return Tax % will take from original transaction.
a. In Purchase transaction GST % is 18

b. While making the Purchase Return Based in transaction Tax is Taking 18%
Q 108. Item Update Based On – Configuration Guide
Overview
The "Item Update Based On" configuration determines how items are identified and updated through the API. This setting allows you to choose the reference field used for item updates.
Available Options
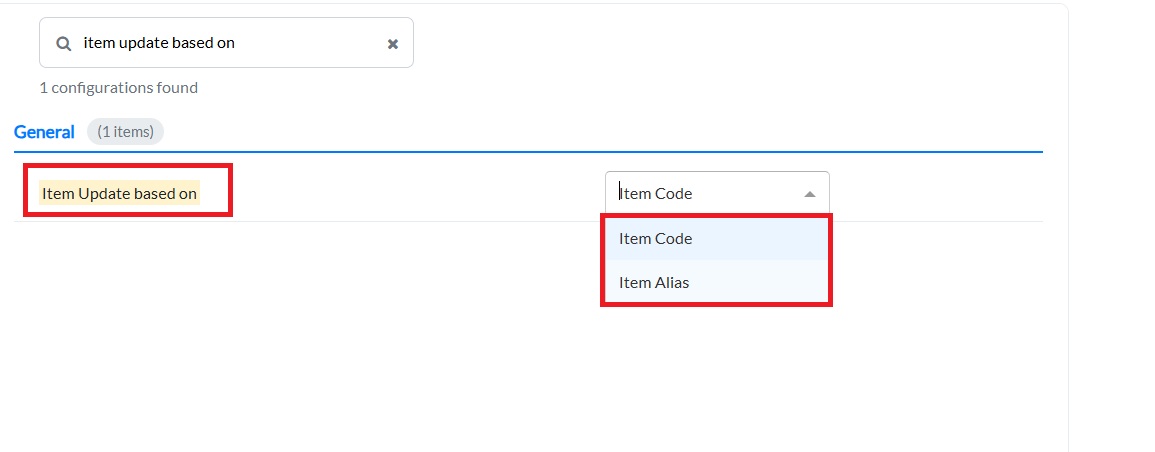
1. Item Code (Default)
-
This is the default configuration.
-
When selected, item updates via API are performed using the Item Code.
-
The Item Code is also displayed at the screen level in the Item Master.
2. Item Alias
-
This option allows item updates based on an alternate identifier.
-
When configured, the API will use the Item Alias to update items.
-
Ensure that the correct alias is maintained for accurate updates.
When to Use
Note


