Introduction of Physical Inventory

Introduction
Physical inventory refers to the stock of the items physically available in the store. In other words, it is a process of physically counting the inventory i.e. taking the actual count of the stock manually. This is usually done in the financial year end but can be done periodically also. Physical inventory helps to verify if the stock in the system is matching with the physical stock in hand and the user can know the discrepancies between the system stock and the physical stock. If there is a mismatch between the two, the user can adjust and update the inventory with the right one to maintain a proper inventory from then.
There are certain businesses where people do not maintain a proper inventory. In such cases, physical inventory is a great tool to adjust the stock entries correctly and follow with the right inventory.
It is recommended to take the backup before you proceed.
Physical Inventory Workflow
Use the physical inventory screen to load the items.
1. Click Inventory >> Physical Inventory. The Physical inventory screen is displayed.

2. Press the F3 [New] key. The Physical inventory screen is displayed.
3. The Department field displays the name of the vertical selected for installation.
4. The Description/User Reference Number field is used to enter your reference number or description.

5. The Item Type is a drop-down field and displays the following options.
- Standard
- Serialized
- Matrix
6. Generation Selection
Use the Generation Selection section to select and load the items for physical inventory.
The Generation Selection section displays the following options:
- Generate all items in the selected group.
- Create a new blank physical inventory count for manual entry.
- Generate for all items in the specified filter.
- Generate for all items with a last counted date older than the specified
For more details, click here
7. Stock-taking options
The following three options are provided for counting the stock.
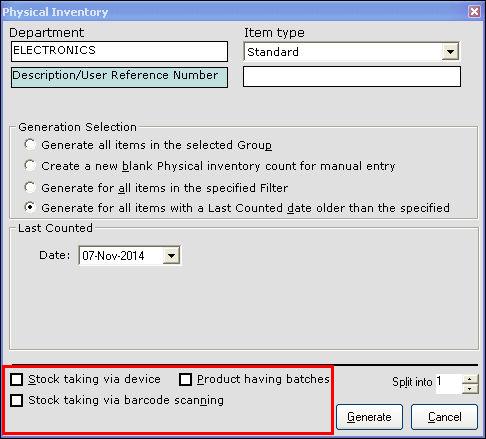
7.1. Stock taking via device
Enable this option to take the stock using the stock-taking device. This will read the barcodes of the items and store the count.
7.2. Stock taking via barcode scanning
Enable this option to take the stock using the barcode scanning. This option is not available for Serialized items.
For more details, click here
7.3. Product having batches
Enable this option to take the stock having batches (mainly used in the Pharma vertical). For details, click here
When the options Stock taking via device and Stocktaking via barcode scanning are enabled, the Product having batches option is not displayed as shown in the below images.
8. Split
This option is used for splitting a single form into multiple forms. For more details, click here
Note: Split is not available for Matrix items
Item-wise stock taking
Note: Split is not available for Matrix items
Item-wise stock taking
The stock-taking procedure varies based on the item type. Refer to the links below for stock-taking on various items.
Standard items
Serialised items
Matrix items
Batch mandatory items
Vertical-wise stock taking
The stock-taking procedure is the same vertical except for the Hypermart vertical where you need to select the department before stock-taking. For more details, click here
Other features:
Other features:
- View All - Select the View All check box to view all the forms (Open and closed)
- Split - To split a single form into multiple forms. For details, click here
- Merge - To merge one or more forms into a single form. For details, click here
- Import - To import the items via CSV file. For details, click here
Related Articles
Physical Inventory - Generation Selection
Generation Selection This section guides you on how to load items. You can choose to load all items at once, create a blank page, load only the items selected through a filter, or load items that were not included in the previous stock-taking ...How to perform Stock taking via bar-code scanning from Physical inventory screen?
Physical inventory - Barcode scanning Use this option if you want to take the stock count by barcode scanning. This option is not available for serialised items. The steps for Standard items are illustrated below. 1. Click Inventory >> Physical ...How do we stock count the serialised items in the Physical inventory screen?
Batch items - stock taking 1. Click Inventory >> Physical Inventory. The Physical inventory screen is displayed. 2. Press F3 or click New. The Physical inventory screen is displayed. 3. In the Item Type field, select the option Serialized. 4. In ...Introduction to Practice Login
Introduction The Practice login feature in RPOS7 has been designed to assist users who want to practice or who wants to train others in a secured and controlled environment. It helps the users to train themselves in making any type of transactions ...Stock Ledger
Introduction Stock Ledger is a record which shows the stock details including the opening stock, closing stock, in stock and out stock of the items. For each item, you can also view the transaction history including purchase, sales, stock in hand, ...